VSPERF Installation Guide
1. Installing vswitchperf
1.1. Supported Operating Systems
- CentOS 7
- Fedora 20
- Fedora 21
- Fedora 22
- RedHat 7.2
- Ubuntu 14.04
1.2. Supported vSwitches
The vSwitch must support Open Flow 1.3 or greater.
- OVS (built from source).
- OVS with DPDK (built from source).
1.3. Supported Hypervisors
- Qemu version 2.3.
1.4. Available VNFs
A simple VNF that forwards traffic through a VM, using:
- DPDK testpmd
- Linux Brigde
- custom l2fwd module
The official VM image is called vloop-vnf and it is available for free download at OPNFV website.
1.4.1. vloop-vnf changelog:
- vloop-vnf-ubuntu-14.04_20160804
- Linux kernel 4.4.0 installed
- libnuma-dev installed
- security updates applied
- vloop-vnf-ubuntu-14.04_20160303
- snmpd service is disabled by default to avoid error messages during VM boot
- security updates applied
- vloop-vnf-ubuntu-14.04_20151216
- version with development tools required for build of DPDK and l2fwd
1.5. Other Requirements
The test suite requires Python 3.3 and relies on a number of other packages. These need to be installed for the test suite to function.
Installation of required packages, preparation of Python 3 virtual environment and compilation of OVS, DPDK and QEMU is performed by script systems/build_base_machine.sh. It should be executed under user account, which will be used for vsperf execution.
Please Note: Password-less sudo access must be configured for given user account before script is executed.
Execution of installation script:
$ cd systems
$ ./build_base_machine.sh
Please Note: you don’t need to go into any of the systems subdirectories, simply run the top level build_base_machine.sh, your OS will be detected automatically.
Script build_base_machine.sh will install all the vsperf dependencies in terms of system packages, Python 3.x and required Python modules. In case of CentOS 7 it will install Python 3.3 from an additional repository provided by Software Collections (a link). In case of RedHat 7 it will install Python 3.4 as an alternate installation in /usr/local/bin. Installation script will also use virtualenv to create a vsperf virtual environment, which is isolated from the default Python environment. This environment will reside in a directory called vsperfenv in $HOME.
You will need to activate the virtual environment every time you start a new shell session. Its activation is specific to your OS:
1.5.1. CentOS 7
$ scl enable python33 bash
$ cd $HOME/vsperfenv
$ source bin/activate
1.5.2. Fedora, RedHat and Ubuntu
$ cd $HOME/vsperfenv
$ source bin/activate
1.5.2.1. Gotcha
$ source bin/activate
Badly placed ()'s.
Check what type of shell you are using
echo $shell
/bin/tcsh
See what scripts are available in $HOME/vsperfenv/bin
$ ls bin/
activate          activate.csh      activate.fish     activate_this.py
source the appropriate script
$ source bin/activate.csh
1.5.3. Working Behind a Proxy
If you’re behind a proxy, you’ll likely want to configure this before running any of the above. For example:
export http_proxy=proxy.mycompany.com:123
export https_proxy=proxy.mycompany.com:123
1.6. Hugepage Configuration
Systems running vsperf with either dpdk and/or tests with guests must configure hugepage amounts to support running these configurations. It is recommended to configure 1GB hugepages as the pagesize.
The amount of hugepages needed depends on your configuration files in vsperf.
Each guest image requires 4096 MB by default according to the default settings
in the 04_vnf.conf file.
GUEST_MEMORY = ['4096', '4096']
The dpdk startup parameters also require an amount of hugepages depending on
your configuration in the 02_vswitch.conf file.
VSWITCHD_DPDK_ARGS = ['-c', '0x4', '-n', '4', '--socket-mem 1024,1024']
VSWITCHD_DPDK_CONFIG = {
    'dpdk-init' : 'true',
    'dpdk-lcore-mask' : '0x4',
    'dpdk-socket-mem' : '1024,1024',
}
Note: Option VSWITCHD_DPDK_ARGS is used for vswitchd, which supports –dpdk parameter. In recent vswitchd versions, option VSWITCHD_DPDK_CONFIG will be used to configure vswitchd via ovs-vsctl calls.
With the –socket-mem argument set to use 1 hugepage on the specified sockets as seen above, the configuration will need 10 hugepages total to run all tests within vsperf if the pagesize is set correctly to 1GB.
VSPerf will verify hugepage amounts are free before executing test environments. In case of hugepage amounts not being free, test initialization will fail and testing will stop.
Please Note: In some instances on a test failure dpdk resources may not release hugepages used in dpdk configuration. It is recommended to configure a few extra hugepages to prevent a false detection by VSPerf that not enough free hugepages are available to execute the test environment. Normally dpdk would use previously allocated hugepages upon initialization.
Depending on your OS selection configuration of hugepages may vary. Please refer to your OS documentation to set hugepages correctly. It is recommended to set the required amount of hugepages to be allocated by default on reboots.
Information on hugepage requirements for dpdk can be found at http://dpdk.org/doc/guides/linux_gsg/sys_reqs.html
You can review your hugepage amounts by executing the following command
cat /proc/meminfo | grep Huge
If no hugepages are available vsperf will try to automatically allocate some.
Allocation is controlled by HUGEPAGE_RAM_ALLOCATION configuration parameter in
02_vswitch.conf file. Default is 2GB, resulting in either 2 1GB hugepages
or 1024 2MB hugepages.
2. ‘vsperf’ Traffic Gen Guide
2.1. Overview
VSPERF supports the following traffic generators:
- Dummy (DEFAULT): Allows you to use your own external traffic generator.
- IXIA (IxNet and IxOS)
- Spirent TestCenter
- Xena Networks
- MoonGen
To see the list of traffic gens from the cli:
$ ./vsperf --list-trafficgens
This guide provides the details of how to install and configure the various traffic generators.
2.2. Background Information
The traffic default configuration can be found in tools/pkt_gen/trafficgen/trafficgenhelper.py, and is configured as follows:
TRAFFIC_DEFAULTS = {
    'l2': {
        'framesize': 64,
        'srcmac': '00:00:00:00:00:00',
        'dstmac': '00:00:00:00:00:00',
    },
    'l3': {
        'proto': 'tcp',
        'srcip': '1.1.1.1',
        'dstip': '90.90.90.90',
    },
    'l4': {
        'srcport': 3000,
        'dstport': 3001,
    },
    'vlan': {
        'enabled': False,
        'id': 0,
        'priority': 0,
        'cfi': 0,
    },
}
The framesize parameter can be overridden from the configuration
files by adding the following to your custom configuration file
10_custom.conf:
TRAFFICGEN_PKT_SIZES = (64, 128,)
OR from the commandline:
$ ./vsperf --test-params "pkt_sizes=x,y" $TESTNAME
You can also modify the traffic transmission duration and the number of tests run by the traffic generator by extending the example commandline above to:
$ ./vsperf --test-params "pkt_sizes=x,y;duration=10;rfc2544_tests=1" $TESTNAME
2.3. Dummy Setup
To select the Dummy generator please add the following to your
custom configuration file 10_custom.conf.
TRAFFICGEN = 'Dummy'
OR run vsperf with the --trafficgen argument
$ ./vsperf --trafficgen Dummy $TESTNAME
Where $TESTNAME is the name of the vsperf test you would like to run. This will setup the vSwitch and the VNF (if one is part of your test) print the traffic configuration and prompt you to transmit traffic when the setup is complete.
Please send 'continuous' traffic with the following stream config:
30mS, 90mpps, multistream False
and the following flow config:
{
    "flow_type": "port",
    "l3": {
        "srcip": "1.1.1.1",
        "proto": "tcp",
        "dstip": "90.90.90.90"
    },
    "traffic_type": "continuous",
    "multistream": 0,
    "bidir": "True",
    "vlan": {
        "cfi": 0,
        "priority": 0,
        "id": 0,
        "enabled": false
    },
    "frame_rate": 90,
    "l2": {
        "dstport": 3001,
        "srcport": 3000,
        "dstmac": "00:00:00:00:00:00",
        "srcmac": "00:00:00:00:00:00",
        "framesize": 64
    }
}
What was the result for 'frames tx'?
When your traffic gen has completed traffic transmission and provided the results please input these at the vsperf prompt. vsperf will try to verify the input:
Is '$input_value' correct?
Please answer with y OR n.
- VPSERF will ask you for:
- Result for ‘frames tx’
- Result for ‘frames rx’
- Result for ‘min latency’
- Result for ‘max latency’
- Result for ‘avg latency’
Finally vsperf will print out the results for your test and generate the appropriate logs and csv files.
2.4. IXIA Setup
2.4.1. On the CentOS 7 system
You need to install IxNetworkTclClient$(VER_NUM)Linux.bin.tgz.
2.4.2. On the IXIA client software system
Find the IxNetwork TCL server app (start -> All Programs -> IXIA -> IxNetwork -> IxNetwork_$(VER_NUM) -> IxNetwork TCL Server)
Right click on IxNetwork TCL Server, select properties - Under shortcut tab in the Target dialogue box make sure there is the argument “-tclport xxxx” where xxxx is your port number (take note of this port number as you will need it for the 10_custom.conf file).
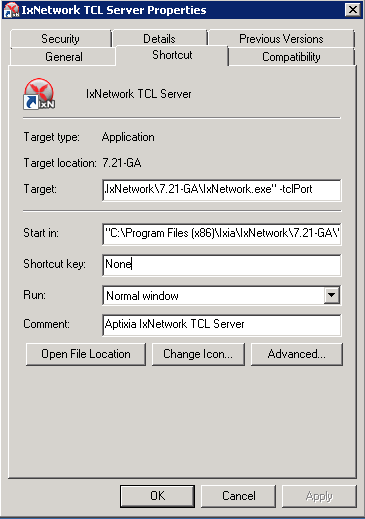
Hit Ok and start the TCL server application
2.4.3. VSPERF configuration
There are several configuration options specific to the IxNetworks traffic generator from IXIA. It is essential to set them correctly, before the VSPERF is executed for the first time.
Detailed description of options follows:
- TRAFFICGEN_IXNET_MACHINE - IP address of server, where IxNetwork TCL Server is running
- TRAFFICGEN_IXNET_PORT - PORT, where IxNetwork TCL Server is accepting connections from TCL clients
- TRAFFICGEN_IXNET_USER - username, which will be used during communication with IxNetwork TCL Server and IXIA chassis
- TRAFFICGEN_IXIA_HOST - IP address of IXIA traffic generator chassis
- TRAFFICGEN_IXIA_CARD - identification of card with dedicated ports at IXIA chassis
- TRAFFICGEN_IXIA_PORT1 - identification of the first dedicated port at TRAFFICGEN_IXIA_CARD at IXIA chassis; VSPERF uses two separated ports for traffic generation. In case of unidirectional traffic, it is essential to correctly connect 1st IXIA port to the 1st NIC at DUT, i.e. to the first PCI handle from WHITELIST_NICS list. Otherwise traffic may not be able to pass through the vSwitch.
- TRAFFICGEN_IXIA_PORT2 - identification of the second dedicated port at TRAFFICGEN_IXIA_CARD at IXIA chassis; VSPERF uses two separated ports for traffic generation. In case of unidirectional traffic, it is essential to correctly connect 2nd IXIA port to the 2nd NIC at DUT, i.e. to the second PCI handle from WHITELIST_NICS list. Otherwise traffic may not be able to pass through the vSwitch.
- TRAFFICGEN_IXNET_LIB_PATH - path to the DUT specific installation of IxNetwork TCL API
- TRAFFICGEN_IXNET_TCL_SCRIPT - name of the TCL script, which VSPERF will use for communication with IXIA TCL server
- TRAFFICGEN_IXNET_TESTER_RESULT_DIR - folder accessible from IxNetwork TCL server, where test results are stored, e.g.
c:/ixia_results; see test-results-share- TRAFFICGEN_IXNET_DUT_RESULT_DIR - directory accessible from the DUT, where test results from IxNetwork TCL server are stored, e.g.
/mnt/ixia_results; see test-results-share
2.5. Spirent Setup
Spirent installation files and instructions are available on the Spirent support website at:
Select a version of Spirent TestCenter software to utilize. This example will use Spirent TestCenter v4.57 as an example. Substitute the appropriate version in place of ‘v4.57’ in the examples, below.
2.5.1. On the CentOS 7 System
Download and install the following:
Spirent TestCenter Application, v4.57 for 64-bit Linux Client
2.5.2. Spirent Virtual Deployment Service (VDS)
Spirent VDS is required for both TestCenter hardware and virtual chassis in the vsperf environment. For installation, select the version that matches the Spirent TestCenter Application version. For v4.57, the matching VDS version is 1.0.55. Download either the ova (VMware) or qcow2 (QEMU) image and create a VM with it. Initialize the VM according to Spirent installation instructions.
2.5.3. Using Spirent TestCenter Virtual (STCv)
STCv is available in both ova (VMware) and qcow2 (QEMU) formats. For VMware, download:
Spirent TestCenter Virtual Machine for VMware, v4.57 for Hypervisor - VMware ESX.ESXi
Virtual test port performance is affected by the hypervisor configuration. For best practice results in deploying STCv, the following is suggested:
- Create a single VM with two test ports rather than two VMs with one port each
- Set STCv in DPDK mode
- Give STCv 2*n + 1 cores, where n = the number of ports. For vsperf, cores = 5.
- Turning off hyperthreading and pinning these cores will improve performance
- Give STCv 2 GB of RAM
To get the highest performance and accuracy, Spirent TestCenter hardware is recommended. vsperf can run with either stype test ports.
2.5.4. Using STC REST Client
The stcrestclient package provides the stchttp.py ReST API wrapper module. This allows simple function calls, nearly identical to those provided by StcPython.py, to be used to access TestCenter server sessions via the STC ReST API. Basic ReST functionality is provided by the resthttp module, and may be used for writing ReST clients independent of STC.
- Project page: <https://github.com/Spirent/py-stcrestclient>
- Package download: <http://pypi.python.org/pypi/stcrestclient>
To use REST interface, follow the instructions in the Project page to install the package. Once installed, the scripts named with ‘rest’ keyword can be used. For example: testcenter-rfc2544-rest.py can be used to run RFC 2544 tests using the REST interface.
2.6. Xena Networks
2.6.1. Installation
Xena Networks traffic generator requires specific files and packages to be installed. It is assumed the user has access to the Xena2544.exe file which must be placed in VSPerf installation location under the tools/pkt_gen/xena folder. Contact Xena Networks for the latest version of this file. The user can also visit www.xenanetworks/downloads to obtain the file with a valid support contract.
Note VSPerf has been fully tested with version v2.43 of Xena2544.exe
To execute the Xena2544.exe file under Linux distributions the mono-complete package must be installed. To install this package follow the instructions below. Further information can be obtained from http://www.mono-project.com/docs/getting-started/install/linux/
rpm --import "http://keyserver.ubuntu.com/pks/lookup?op=get&search=0x3FA7E0328081BFF6A14DA29AA6A19B38D3D831EF"
yum-config-manager --add-repo http://download.mono-project.com/repo/centos/
yum -y install mono-complete
To prevent gpg errors on future yum installation of packages the mono-project repo should be disabled once installed.
yum-config-manager --disable download.mono-project.com_repo_centos_
2.6.2. Configuration
Connection information for your Xena Chassis must be supplied inside the
10_custom.conf or 03_custom.conf file. The following parameters must be
set to allow for proper connections to the chassis.
TRAFFICGEN_XENA_IP = ''
TRAFFICGEN_XENA_PORT1 = ''
TRAFFICGEN_XENA_PORT2 = ''
TRAFFICGEN_XENA_USER = ''
TRAFFICGEN_XENA_PASSWORD = ''
TRAFFICGEN_XENA_MODULE1 = ''
TRAFFICGEN_XENA_MODULE2 = ''
2.6.3. RFC2544 Throughput Testing
Xena traffic generator testing for rfc2544 throughput can be modified for different behaviors if needed. The default options for the following are optimized for best results.
TRAFFICGEN_XENA_2544_TPUT_INIT_VALUE = '10.0'
TRAFFICGEN_XENA_2544_TPUT_MIN_VALUE = '0.1'
TRAFFICGEN_XENA_2544_TPUT_MAX_VALUE = '100.0'
TRAFFICGEN_XENA_2544_TPUT_VALUE_RESOLUTION = '0.5'
TRAFFICGEN_XENA_2544_TPUT_USEPASS_THRESHHOLD = 'false'
TRAFFICGEN_XENA_2544_TPUT_PASS_THRESHHOLD = '0.0'
Each value modifies the behavior of rfc 2544 throughput testing. Refer to your Xena documentation to understand the behavior changes in modifying these values.
2.7. MoonGen
2.7.1. Installation
MoonGen architecture overview and general installation instructions can be found here:
https://github.com/emmericp/MoonGen
- Note: Today, MoonGen with VSPERF only supports 10Gbps line speeds.
For VSPerf use, MoonGen should be cloned from here (as opposed to the previously mentioned GitHub):
git clone https://github.com/atheurer/MoonGen
and use the opnfv-stable branch:
git checkout opnfv-stable
VSPerf uses a particular example script under the examples directory within the MoonGen project:
MoonGen/examples/opnfv-vsperf.lua
Follow MoonGen set up instructions here:
https://github.com/atheurer/MoonGen/blob/opnfv-stable/MoonGenSetUp.html
Note one will need to set up ssh login to not use passwords between the server running MoonGen and the device under test (running the VSPERF test infrastructure). This is because VSPERF on one server uses ‘ssh’ to configure and run MoonGen upon the other server.
One can set up this ssh access by doing the following on both servers:
ssh-keygen -b 2048 -t rsa
ssh-copy-id <other server>
2.7.2. Configuration
Connection information for your Xena Chassis must be supplied inside the
10_custom.conf or 03_custom.conf file. The following parameters must be
set to allow for proper connections to the chassis.
TRAFFICGEN_MOONGEN_HOST_IP_ADDR = ""
TRAFFICGEN_MOONGEN_USER = ""
TRAFFICGEN_MOONGEN_BASE_DIR = ""
TRAFFICGEN_MOONGEN_PORTS = ""
TRAFFICGEN_MOONGEN_LINE_SPEED_GBPS = ""