SampleVNF User Guide¶
1. Introduction¶
Welcome to SampleVNF’s documentation !
SampleVNF is an OPNFV Project.
The project’s goal is to provides a placeholder for various sample VNF (Virtual Network Function (VNF)) development which includes example reference architecture and optimization methods related to VNF/Network service for high performance VNFs. This project provides benefits to other OPNFV projects like Functest, Models, yardstick etc to perform real life use-case based testing and VNF/ Network Function Virtualization Infrastructure (NFVI) characterization for the same.
The Project’s scope to create a repository of sample VNFs to help VNF benchmarking and NFVI characterization with real world traffic and host a common development environment for developing the VNF using optimized libraries. Also, develop a test framework in yardstick to enable VNF/NFVI verification.
SampleVNF is used in OPNFV for characterization of NFVI/VNF on OPNFV infrastructure and some of the OPNFV features.
See also
Pharos for information on OPNFV community labs and this Technical_Briefs for an overview of SampleVNF
1.1. About This Document¶
This document consists of the following chapters:
- Chapter Introduction provides a brief introduction to SampleVNF project’s background and describes the structure of this document.
- Chapter Methodology describes the methodology implemented by the SampleVNF Project for VNF and NFVI verification.
- Chapter Architecture provides information on the software architecture of SampleVNF.
- Chapter SampleVNF Installation provides instructions to install SampleVNF.
- Chapter SampleVNF - How to run provides example on how installing and running SampleVNF.
- Chapter REST API provides info on how to run REST API SampleVNF.
- Chapter SampleVNF - Config files provides info SampleVNF configuration.
- Chapter CLI Command Reference provides info on CLI commands supported by SampleVNF
1.2. Contact SampleVNF¶
Feedback? Contact us
2. Methodology¶
2.1. Abstract¶
This chapter describes the methodology/overview of SampleVNF project from the perspective of a VNF and NFVI Characterization
2.2. Overview¶
This project provides a placeholder for various sample VNF (Virtual Network Function (VNF)) development which includes example reference architecture and optimization methods related to VNF/Network service for high performance VNFs.
The sample VNFs are Open Source approximations* of Telco grade VNF using optimized VNF + NFVi Infrastructure libraries, with Performance Characterization of Sample† Traffic Flows. • * Not a commercial product. Encourage the community to contribute and close the feature gaps. • † No Vendor/Proprietary Workloads
2.3. ETSI-NFV¶
SampleVNF Test Infrastructure (NSB (Yardstick_NSB))in yardstick helps to facilitate consistent/repeatable methodologies for characterizing & validating the sample VNFs (VNF) through OPEN SOURCE VNF approximations.
Network Service Benchmarking in yardstick framework follows ETSI GS NFV-TST001 to verify/characterize both NFVI & VNF
The document ETSI GS NFV-TST001, “Pre-deployment Testing; Report on Validation of NFV Environments and Services”, recommends methods for pre-deployment testing of the functional components of an NFV environment.
The SampleVNF project implements the methodology described in chapter 13 of Yardstick_NSB, “Pre-deployment validation of NFV infrastructure”.
The methodology consists in decomposing the typical VNF work-load performance metrics into a number of characteristics/performance vectors, which each can be represented by distinct test-cases.
See also
SampleVNFtst for material on alignment ETSI TST001 and SampleVNF.
2.4. Metrics¶
The metrics, as defined by ETSI GS NFV-TST001, are shown in Table1.
Table 1 - Performance/Speed Metrics
| Category | Performance/Speed |
| Network |
|
Note
The description in this OPNFV document is intended as a reference for users to understand the scope of the SampleVNF Project and the deliverables of the SampleVNF framework. For complete description of the methodology, please refer to the ETSI document.
Footnotes
| [1] | To be included in future deliveries. |
3. Architecture¶
3.1. Abstract¶
This chapter describes the samplevnf software architecture. we will introduce it VNFs. More technical details will be introduced in this chapter.
3.2. Overview¶
3.2.1. Architecture overview¶
This project provides a placeholder for various sample VNF (Virtual Network Function) development which includes example reference architecture and optimization methods related to VNF/Network service for high performance VNFs.
The sample VNFs are Open Source approximations* of Telco grade VNF’s using optimized VNF + NFVi Infrastructure libraries, with Performance Characterization of Sample† Traffic Flows.
* Not a commercial product. Encourage the community to contribute and close the feature gaps.
† No Vendor/Proprietary Workloads
It helps to facilitate deterministic & repeatable bench-marking on Industry standard high volume Servers. It augments well with a Test infrastructure to help facilitate consistent/repeatable methodologies for characterizing & validating the sample VNFs through OPEN SOURCE VNF approximations and test tools. The VNFs belongs to this project are never meant for field deployment. All the VNF source code part of this project requires Apache License Version 2.0.
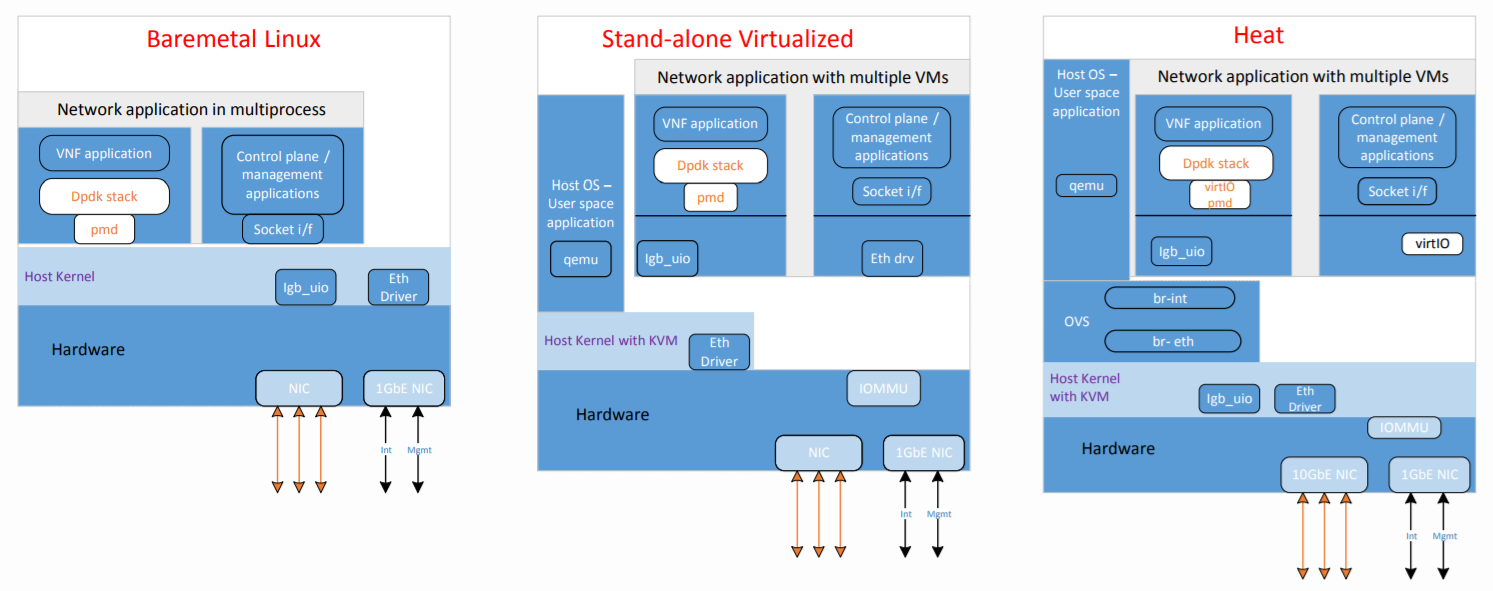
3.2.2. Supported deployment:¶
- Bare-Metal - All VNFs can run on a Bare-Metal DUT
- Standalone Virtualization(SV): All VNFs can run on SV like VPP as switch, ovs, ovs-dpdk, srioc
- Openstack: Latest Openstack supported
3.2.3. VNF supported¶
Carrier Grade Network Address Translation (CG-NAT) VNF
The Carrier Grade Network Address and port Translation (vCG-NAPT) is a
VNF approximation extending the life of the service providers IPv4 network
infrastructure and mitigate IPv4 address exhaustion by using address and
port translation in large scale. It processes the traffic in both the directions.
It also supports the connectivity between the IPv6 access network to
IPv4 data network using the IPv6 to IPv4 address translation and vice versa.
Firewall (vFW) VNF
The Virtual Firewall (vFW) is a VNF approximation serving as a state full
L3/L4 packet filter with connection tracking enabled for TCP, UDP and ICMP.
The VNF could be a part of Network Services (industry use-cases) deployed
to secure the enterprise network from un-trusted network.
Access Control List (vACL) VNF
The vACL vNF is implemented as a DPDK application using VNF Infrastructure
Library (VIL). The VIL implements common VNF internal, optimized for
Intel Architecture functions like load balancing between cores, IPv4/IPv6
stack features, and interface to NFV infrastructure like OVS or SRIOV.
UDP_Replay
The UDP Replay is implemented as a DPDK application using VNF Infrastructure
Library (VIL). Performs as a refelector of all the traffic on given port.
Prox - Packet pROcessing eXecution engine.
Packet pROcessing eXecution Engine (PROX) which is a DPDK application.
PROX can do operations on packets in a highly configurable manner.
The PROX application is also displaying performance statistics that can
be used for performance investigations.
Intel® DPPD - PROX is an application built on top of DPDK which allows
creating software architectures, such as the one depicted below, through
small and readable configuration files.
This VNF can act as L2FWD, L3FWD, BNG etc.
3.2.4. Feature supported by the VNFs¶
The following features were verified by SampleVNF test cases:
- vFW - Virtual Firewall
- Basic Packet filter dropping malformed, invalid packets based on L3/L4 packet headers
- Policy based filtering
- Dynamic Packet filtering through Connection Tracker for TCP and UDP
- SYN-flood protection via synproxy for TCP
- UDP, TCP and ICMP protocol pass-through
- CLI based enable/disable connection tracking, synproxy, basic packet filtering
- Multithread support
- Multiple physical port support
- Providing statistics on traffic traversing the VNF
- vCG-NAPT - Carrier Grade Network Address and port Translation
- Static and dynamic Network address translation.
- Static and dynamic Network address and port translation
- ARP (request, response, gratuitous)
- ICMP (terminal echo, echo response, pass-through)
- UDP, TCP and ICMP protocol pass-through
- Multithread support and Multiple physical port support
- Limiting max ports per client
- Limiting max clients per public IP address
- Live Session tracking to NAT flow
- NAT64 – connectivity between IPv6 access network to IPv4 data network.
- vACL - Access Control List
- CLI based Run-time rule configuration (Add, Delete, List, Display, Clear, Modify)
- IPv4 and IPv6 5 tuple packet Selector support
- Counting packets and bytes per rule
- Multithread support
- Multiple physical port support
- Forwarding packets to specific ports on base of rules
- Rules definition on base TCP/UDP connection tracking
- Prox - Packet pROcessing eXecution engine.
- Classify
- Drop
- Basic Forwarding (no touch)
- L2 Forwarding (change MAC)
- GRE encap/decap
- Load balance based on packet fields
- Symmetric load balancing
- QinQ encap/decap IPv4/IPv6
- ARP
- QoS
- Routing
- Unmpls
- Policing
- Basic ACL
- Basic CGNAT
3.2.5. Test Framework¶
SampleVNF Test Infrastructure (NSB (Yardstick_NSB)) in yardstick helps to facilitate consistent/repeatable methodologies for characterizing & validating the sample VNFs (VNF) through OPEN SOURCE VNF approximations.
Network Service Benchmarking in yardstick framework follows ETSI GS NFV-TST001_ to verify/characterize both NFVI & VNF
For more inforamtion refer, Yardstick_NSB
3.3. SampleVNF Directory structure¶
samplevnf/ - SampleVNF main directory.
common/ - Common re-useable code like arp, nd, packet fwd etc
- docs/ - All documentation is stored here, such as configuration guides,
- user guides and SampleVNF descriptions.
- tools/ - Currently contains tools to build image for VMs which are deployed
- by Heat. Currently contains helper scripts like install, setup env
VNFs/ - all VNF source code directory.
VNF_Catalogue/ - Collection of all Open Source VNFs
heat_template/ - Sample HEAT templates for VNFs
4. SampleVNF Installation¶
4.1. Abstract¶
This project provides a placeholder for various sample VNF (Virtual Network Function (VNF)) development which includes example reference architecture and optimization methods related to VNF/Network service for high performance VNFs. The sample VNFs are Open Source approximations* of Telco grade VNF’s using optimized VNF + NFVi Infrastructure libraries, with Performance Characterization of Sample† Traffic Flows.
* Not a commercial product. Encourage the community to contribute and close the feature gaps.
† No Vendor/Proprietary Workloads
SampleVNF supports installation directly in Ubuntu. The installation procedure are detailed in the sections below.
- The steps needed to run SampleVNF are:
- Install and Build SampleVNF.
- Deploy the VNF on the target and modify the config based on the Network under test
- Run the traffic generator to generate the traffic.
4.2. Prerequisites¶
4.2.1. Supported Test setup¶
- The device under test (DUT) consists of a system following;
- A single or dual processor and PCH chip, except for System on Chip (SoC) cases
- DRAM memory size and frequency (normally single DIMM per channel)
- Specific Intel Network Interface Cards (NICs)
- BIOS settings noting those that updated from the basic settings
- DPDK build configuration settings, and commands used for tests
Connected to the DUT is an IXIA* or Software Traffic generator like pktgen or TRex, simulation platform to generate packet traffic to the DUT ports and determine the throughput/latency at the tester side.
Below are the supported/tested (VNF) deployment type.
4.2.2. Hardware & Software Ingredients¶
SUT requirements:
+-----------+------------------+
| Item      | Description      |
+-----------+------------------+
| Memory    | Min 20GB         |
+-----------+------------------+
| NICs      | 2 x 10G          |
+-----------+------------------+
| OS        | Ubuntu 16.04 LTS |
+-----------+------------------+
| kernel    |  4.4.0-34-generic|
+-----------+------------------+
| DPDK      | 17.02            |
+-----------+------------------+
Boot and BIOS settings:
+------------------+---------------------------------------------------+
| Boot settings    | default_hugepagesz=1G hugepagesz=1G hugepages=16  |
|                  | hugepagesz=2M hugepages=2048 isolcpus=1-11,22-33  |
|                  | nohz_full=1-11,22-33 rcu_nocbs=1-11,22-33         |
|                  | Note: nohz_full and rcu_nocbs is to disable Linux*|
|                  | kernel interrupts, and it’s import                |
+------------------+---------------------------------------------------+
|BIOS              | CPU Power and Performance Policy <Performance>    |
|                  | CPU C-state Disabled                              |
|                  | CPU P-state Disabled                              |
|                  | Enhanced Intel® Speedstep® Tech Disabled          |
|                  | Hyper-Threading Technology (If supported) Enable  |
|                  | Virtualization Techology Enable                   |
|                  | Coherency Enable                                  |
|                  | Turbo Boost Disabled                              |
+------------------+---------------------------------------------------+
4.3. Network Topology for testing VNFs¶
The ethernet cables should be connected between traffic generator and the VNF server (BM, SRIOV or OVS) setup based on the test profile.
The connectivity could be
- Single port pair : One pair ports used for traffic
e.g. Single port pair link0 and link1 of VNF are used
TG:port 0 <------> VNF:Port 0
TG:port 1 <------> VNF:Port 1

For correalted traffic, use below configuration
TG_1:port 0 <------> VNF:Port 0
                   VNF:Port 1 <------> TG_2:port 0 (UDP Replay)
(TG_2(UDP_Replay) reflects all the traffic on the given port)
- Multi port pair : More than one pair of traffic
e.g. Two port pair link 0, link1, link2 and link3 of VNF are used
TG:port 0 <------> VNF:Port 0
TG:port 1 <------> VNF:Port 1
TG:port 2 <------> VNF:Port 2
TG:port 3 <------> VNF:Port 3

For correalted traffic, use below configuration
TG_1:port 0 <------> VNF:Port 0
                     VNF:Port 1 <------> TG_2:port 0 (UDP Replay)
TG_1:port 1 <------> VNF:Port 2
                     VNF:Port 3 <------> TG_2:port 1 (UDP Replay)
(TG_2(UDP_Replay) reflects all the traffic on the given port)
- Bare-Metal
Refer: http://fast.dpdk.org/doc/pdf-guides/ to setup the DUT for VNF to run
- Standalone Virtualization - PHY-VM-PHY
- SRIOV Refer below link to setup sriov https://software.intel.com/en-us/articles/using-sr-iov-to-share-an-ethernet-port-among-multiple-vms
- OVS_DPDK
Refer below link to setup ovs-dpdk http://docs.openvswitch.org/en/latest/intro/install/general/ http://docs.openvswitch.org/en/latest/intro/install/dpdk/
- Openstack
Use any OPNFV installer to deploy the openstack.
4.4. Build VNFs on the DUT:¶
- Clone sampleVNF project repository - git clone https://git.opnfv.org/samplevnf
4.4.1. Auto Build - Using script to build VNFs¶
Interactive options:
./tools/vnf_build.sh -i
Follow the steps in the screen from option [1] –> [10] and
select option [9] to build the vnfs.
It will automatically download selected DPDK version and any
required patches and will setup everything and build VNFs.

Options [8], If RestAPI feature is needed install 'civetweb'

Following are the options for setup:
----------------------------------------------------------
Step 1: Environment setup.
----------------------------------------------------------
[1] Check OS and network connection
[2] Select DPDK RTE version

----------------------------------------------------------
Step 2: Download and Install
----------------------------------------------------------
[3] Agree to download
[4] Download packages
[5] Download DPDK zip
[6] Build and Install DPDK
[7] Setup hugepages
[8] Download and Build civetweb

----------------------------------------------------------
Step 3: Build VNFs
----------------------------------------------------------
[9] Build all VNFs (vACL, vCGNAPT, vFW, UDP_Replay, DPPD-PROX)

[10] Exit Script
non-Interactive options:
./tools/vnf_build.sh -s -d=<dpdk version eg 17.02>
4.4.2. Manual Build¶
1. Download DPDK supported version from dpdk.org
   * http://dpdk.org/browse/dpdk/snapshot/dpdk-$DPDK_RTE_VER.zip
   * unzip dpdk-$DPDK_RTE_VER.zip and apply dpdk patches only in case of 16.04 (Not required for other DPDK versions)
   * cd dpdk
   * make config T=x86_64-native-linuxapp-gcc O=x86_64-native-linuxapp-gcc
   * cd x86_64-native-linuxapp-gcc
   * make -j
2. Add this to Go to /etc/default/grub configuration file to setup hugepages.
   * Append “default_hugepagesz=1G hugepagesz=1G hugepages=8 hugepagesz=2M hugepages=2048” to the GRUB_CMDLINE_LINUX entry.
3. Setup Environment Variable
   * export RTE_SDK=<samplevnf>/dpdk
   * export RTE_TARGET=x86_64-native-linuxapp-gcc
   * export VNF_CORE=<samplevnf> or using ./tools/setenv.sh
4. Build SampleVNFs e.g, vACL
   * cd <samplevnf>/VNFs/vACL
   * make clean
   * make
   * The vACL executable will be created at the following location
     <samplevnf>/VNFs/vACL/build/vACL
Standalone virtualization/Openstack:
Build VM image from script in yardstick
1) git clone https://git.opnfv.org/samplevnf
2) cd samplevnf and run
   ./tools/samplevnf-img-dpdk-samplevnf-modify tools/ubuntu-server-cloudimg-samplevnf-modify.sh
   Image available in: /tmp/workspace/samplevnf/xenial-server-cloudimg-amd64-disk1.img
To run VNFs. Please refer chapter 05-How_to_run_SampleVNFs.rst
5. SampleVNF - How to run¶
5.1. Prerequisites¶
5.1.1. Supported Test setup¶
- The device under test (DUT) consists of a system following;
- A single or dual processor and PCH chip, except for System on Chip (SoC) cases
- DRAM memory size and frequency (normally single DIMM per channel)
- Specific Intel Network Interface Cards (NICs)
- BIOS settings noting those that updated from the basic settings
- DPDK build configuration settings, and commands used for tests
Connected to the DUT is an IXIA* or Software Traffic generator like pktgen or TRex, simulation platform to generate packet traffic to the DUT ports and determine the throughput/latency at the tester side.
Below are the supported/tested (VNF) deployment type.
5.1.2. Hardware & Software Ingredients¶
SUT requirements:
Item Description Memory Min 20GB NICs 2 x 10G OS Ubuntu 16.04 LTS kernel 4.4.0-34-generic DPDK 17.02
Boot and BIOS settings:
Boot settings default_hugepagesz=1G hugepagesz=1G hugepages=16 hugepagesz=2M hugepages=2048 isolcpus=1-11,22-33 nohz_full=1-11,22-33 rcu_nocbs=1-11,22-33 Note: nohz_full and rcu_nocbs is to disable Linux* kernel interrupts, and it’s import BIOS CPU Power and Performance Policy <Performance> CPU C-state Disabled CPU P-state Disabled Enhanced Intel® Speedstep® Tech Disabled Hyper-Threading Technology (If supported) Enable Virtualization Techology Enable Coherency Enable Turbo Boost Disabled
5.2. Network Topology for testing VNFs¶
The ethernet cables should be connected between traffic generator and the VNF server (BM, SRIOV or OVS) setup based on the test profile.
The connectivity could be
Single port pair : One pair ports used for traffic
e.g. Single port pair link0 and link1 of VNF are used
TG:port 0 <------> VNF:Port 0
TG:port 1 <------> VNF:Port 1

For correalted traffic, use below configuration
TG_1:port 0 <------> VNF:Port 0
                     VNF:Port 1 <------> TG_2:port 0 (UDP Replay)
(TG_2(UDP_Replay) reflects all the traffic on the given port)
Multi port pair : More than one pair of traffic
e.g. Two port pair link 0, link1, link2 and link3 of VNF are used
TG:port 0 <------> VNF:Port 0
TG:port 1 <------> VNF:Port 1
TG:port 2 <------> VNF:Port 2
TG:port 3 <------> VNF:Port 3

For correalted traffic, use below configuration
TG_1:port 0 <------> VNF:Port 0
                     VNF:Port 1 <------> TG_2:port 0 (UDP Replay)
TG_1:port 1 <------> VNF:Port 2
                     VNF:Port 3 <------> TG_2:port 1 (UDP Replay)
(TG_2(UDP_Replay) reflects all the traffic on the given port)
Bare-Metal Refer: http://fast.dpdk.org/doc/pdf-guides/ to setup the DUT for VNF to run
Standalone Virtualization - PHY-VM-PHY * SRIOV
Refer below link to setup sriov https://software.intel.com/en-us/articles/using-sr-iov-to-share-an-ethernet-port-among-multiple-vms
- OVS_DPDK Refer below link to setup ovs-dpdk http://docs.openvswitch.org/en/latest/intro/install/general/ http://docs.openvswitch.org/en/latest/intro/install/dpdk/
- Openstack
Use any OPNFV installer to deploy the openstack.
5.3. Setup Traffic generator¶
Step 0: Preparing hardware connection
Connect Traffic generator and VNF system back to back as shown in previous section
TRex port 0 ↔ (VNF Port 0) ↔ (VNF Port 1) ↔ TRex port 1
Step 1: Setting up Traffic generator (TRex)
- Install the OS (Bare metal Linux, not VM!)
- Obtain the latest TRex package: wget https://trex-tgn.cisco.com/trex/release/latest
- Untar the package: tar -xzf latest
- Change dir to unzipped TRex
- Create config file using command: sudo python dpdk_setup_ports.py -i In case of Ubuntu 16 need python3 See paragraph config creation for detailed step-by-step
(Refer: https://trex-tgn.cisco.com/trex/doc/trex_stateless_bench.html)
5.4. Build SampleVNFs¶
Step 2: Procedure to build SampleVNFs
- Clone sampleVNF project repository - git clone https://git.opnfv.org/samplevnf
- Build VNFs
5.4.1. Auto Build¶
- Interactive options:
./tools/vnf_build.sh -i
Follow the steps in the screen from option [1] –> [10] and select option [9] to build the vnfs.
It will automatically download selected DPDK version and any required patches and will setup everything and build VNFs.

Options [8], If RestAPI feature is needed install 'civetweb'

Following are the options for setup:
----------------------------------------------------------
Step 1: Environment setup.
----------------------------------------------------------
[1] Check OS and network connection
[2] Select DPDK RTE version

----------------------------------------------------------
Step 2: Download and Install
----------------------------------------------------------
[3] Agree to download
[4] Download packages
[5] Download DPDK zip
[6] Build and Install DPDK
[7] Setup hugepages
[8] Download and Build civetweb

----------------------------------------------------------
Step 3: Build VNFs
----------------------------------------------------------
[9] Build all VNFs (vACL, vCGNAPT, vFW, UDP_Replay, DPPD-PROX)

[10] Exit Script
- Non-Interactive options:
./tools/vnf_build.sh -s -d=<dpdk version eg 17.02>
if system is behind the proxy
./tools/vnf_build.sh -s -d=<dpdk version eg 17.02> -p=<proxy>
5.4.2. Manual Build¶
1) Download DPDK supported version from dpdk.org
   * http://dpdk.org/browse/dpdk/snapshot/dpdk-$DPDK_RTE_VER.zip
   * unzip dpdk-$DPDK_RTE_VER.zip and apply dpdk patches only in case of 16.04 (Not required for other DPDK versions)
   * cd dpdk
   * make config T=x86_64-native-linuxapp-gcc O=x86_64-native-linuxapp-gcc
   * cd x86_64-native-linuxapp-gcc
   * make

2) Download civetweb 1.9 version from the following link
   * https://sourceforge.net/projects/civetweb/files/1.9/CivetWeb_V1.9.zip
   * unzip CivetWeb_V1.9.zip
   * mv civetweb-master civetweb
   * cd civetweb
   * make lib

3) Add this to Go to /etc/default/grub configuration file to setup higepages.
   * Append “default_hugepagesz=1G hugepagesz=1G hugepages=8 hugepagesz=2M hugepages=2048” to the GRUB_CMDLINE_LINUX entry.
   * execute update-grub
   * Reboot after grub setup

4) Setup Environment Variable
   * export RTE_SDK=<samplevnf>/dpdk
   * export RTE_TARGET=x86_64-native-linuxapp-gcc
   * export VNF_CORE=<samplevnf> or using ./tools/setenv.sh

5) Build VNFs
   * cd <samplevnf>
   * make
   * or To build individual VNFs
     * cd <samplevnf>/VNFs/
     * make clean
     * make
     * The vFW executable will be created at the following location
     * <samplevnf>/VNFs/vFW/build/vFW
5.5. Virtual Firewall - How to run¶
Step 3: Bind the datapath ports to DPDK
- Bind ports to DPDK
For DPDK versions 17.xx
1) cd <samplevnf>/dpdk
2) ./usertools/dpdk-devbind.py --status <--- List the network device
3) ./usertools/dpdk-devbind.py -b igb_uio <PCI Port 0> <PCI Port 1>
.. _More details: http://dpdk.org/doc/guides-17.05/linux_gsg/build_dpdk.html#binding-and-unbinding-network-ports-to-from-the-kernel-modules
- Prepare script to enalble VNF to route the packets
cd <samplevnf>/VNFs/vFW/config
Open -> VFW_SWLB_SinglePortPair_script.tc. Replace the bold items based on your setting.

link 0 config <VNF port 0 IP eg 202.16.100.10> 8
link 0 up
link 1 down
link 1 config <VNF port 0 IP eg 172.16.40.10> 8
link 1 up

; routeadd <net/host> <port #> <ipv4 nhip address in decimal> <Mask>
routeadd net 0 <traffic generator port 0 IP eg 202.16.100.20> 0xff000000
routeadd net 1 <traffic generator port 1 IP eg 172.16.40.20> 0xff000000

; IPv4 static ARP; disable if dynamic arp is enabled.
p 1 arpadd 0 <traffic generator port 0 IP eg 202.16.100.20> <traffic generator port 0 MAC>
p 1 arpadd 1  <traffic generator port 1 IP eg 172.16.40.20> <traffic generator port 1 MAC>
p action add 0 accept
p action add 0 fwd 0
p action add 0 count
p action add 1 accept
p action add 1 fwd 1
p action add 1 count
p action add 2 drop
p action add 2 count
p action add 0 conntrack
p action add 1 conntrack
p action add 2 conntrack
p action add 3 conntrack
; IPv4 rules
p vfw add 1 <traffic generator port 0 IP eg 202.16.100.20> 8 <traffic generator port 1 IP eg 172.16.40.20> 8 0 65535 67 69 0 0 2
p vfw add 2 <traffic generator port 0 IP eg 202.16.100.20> 8 <traffic generator port 1 IP eg 172.16.40.20> 8 0 65535 0 65535 0 0 1
p vfw add 2 <traffic generator port 1 IP eg 172.16.40.20> 8 <traffic generator port 0 IP eg 202.16.100.20> 8 0 65535 0 65535 0 0 0
p vfw applyruleset
- Run below cmd to launch the VNF. Please make sure both hugepages and ports to be used are bind to dpdk.
cd <samplevnf>/VNFs/vFW/
./build/vFW -p 0x3 -f ./config/VFW_SWLB_SinglePortPair_4Thread.cfg  -s ./config/VFW_SWLB_SinglePortPair_script.tc
step 4: Run Test using traffic geneator
On traffic generator system:
cd <trex eg v2.28/stl>
Update the bench.py to generate the traffic.

class STLBench(object):
ip_range = {}
ip_range['src'] = {'start': '<traffic generator port 0 IP eg 202.16.100.20>', 'end': '<traffic generator port 0 IP eg 202.16.100.20>'}
ip_range['dst'] = {'start': '<traffic generator port 1 IP eg 172.16.40.20>', 'end': '<traffic generator port 1 IP eg 172.16.40.20>'}
cd <trex eg v2.28>
Run the TRex server: sudo ./t-rex-64 -i -c 7
In another shell run TRex console: trex-console
The console can be run from another computer with -s argument, --help for more info.
Other options for TRex client are automation or GUI
In the console, run "tui" command, and then send the traffic with commands like:
start -f stl/bench.py -m 50% --port 0 3 -t size=590,vm=var1
For more details refer: https://trex-tgn.cisco.com/trex/doc/trex_stateless_bench.html
5.6. Virtual Access Control list - How to run¶
Step 3: Bind the datapath ports to DPDK
- Bind ports to DPDK
For DPDK versions 17.xx
1) cd <samplevnf>/dpdk
2) ./usertools/dpdk-devbind.py --status <--- List the network device
3) ./usertools/dpdk-devbind.py -b igb_uio <PCI Port 0> <PCI Port 1>
.. _More details: http://dpdk.org/doc/guides-17.05/linux_gsg/build_dpdk.html#binding-and-unbinding-network-ports-to-from-the-kernel-modules
- Prepare script to enalble VNF to route the packets
cd <samplevnf>/VNFs/vACL/config
Open -> IPv4_swlb_acl.tc. Replace the bold items based on your setting.

link 0 config <VNF port 0 IP eg 202.16.100.10> 8
link 0 up
link 1 down
link 1 config <VNF port 0 IP eg 172.16.40.10> 8
link 1 up

; routeadd <port #> <ipv4 nhip address in decimal> <Mask>
routeadd net 0 <traffic generator port 0 IP eg 202.16.100.20> 0xff000000
routeadd net 1 <traffic generator port 1 IP eg 172.16.40.20> 0xff000000

; IPv4 static ARP; disable if dynamic arp is enabled.
p 1 arpadd 0 <traffic generator port 0 IP eg 202.16.100.20> <traffic generator port 0 MAC>
p 1 arpadd 1  <traffic generator port 1 IP eg 172.16.40.20> <traffic generator port 1 MAC>
p action add 0 accept
p action add 0 fwd 0
p action add 0 count
p action add 1 accept
p action add 1 fwd 1
p action add 1 count
p action add 2 drop
p action add 2 count
p action add 0 conntrack
p action add 1 conntrack
p action add 2 conntrack
p action add 3 conntrack
; IPv4 rules
p acl add 1 <traffic generator port 0 IP eg 202.16.100.20> 8 <traffic generator port 1 IP eg 172.16.40.20> 8 0 65535 67 69 0 0 2
p acl add 2 <traffic generator port 0 IP eg 202.16.100.20> 8 <traffic generator port 1 IP eg 172.16.40.20> 8 0 65535 0 65535 0 0 1
p acl add 2 <traffic generator port 1 IP eg 172.16.40.20> 8 <traffic generator port 0 IP eg 202.16.100.20> 8 0 65535 0 65535 0 0 0
p acl applyruleset
- Run below cmd to launch the VNF. Please make sure both hugepages and ports to be used are bind to dpdk.
cd <samplevnf>/VNFs/vFW/
./build/vFW -p 0x3 -f ./config/IPv4_swlb_acl_1LB_1t.cfg  -s ./config/IPv4_swlb_acl.tc.
step 4: Run Test using traffic geneator
On traffic generator system:
cd <trex eg v2.28/stl>
Update the bench.py to generate the traffic.

class STLBench(object):
ip_range = {}
ip_range['src'] = {'start': '<traffic generator port 0 IP eg 202.16.100.20>', 'end': '<traffic generator port 0 IP eg 202.16.100.20>'}
ip_range['dst'] = {'start': '<traffic generator port 1 IP eg 172.16.40.20>', 'end': '<traffic generator port 1 IP eg 172.16.40.20>'}
cd <trex eg v2.28>
Run the TRex server: sudo ./t-rex-64 -i -c 7
In another shell run TRex console: trex-console
The console can be run from another computer with -s argument, --help for more info.
Other options for TRex client are automation or GUI
In the console, run "tui" command, and then send the traffic with commands like:
start -f stl/bench.py -m 50% --port 0 3 -t size=590,vm=var1
For more details refer: https://trex-tgn.cisco.com/trex/doc/trex_stateless_bench.html
5.7. vCGNAPT - How to run¶
Step 3: Bind the datapath ports to DPDK
- Bind ports to DPDK
For DPDK versions 17.xx
1) cd <samplevnf>/dpdk
2) ./usertools/dpdk-devbind.py --status <--- List the network device
3) ./usertools/dpdk-devbind.py -b igb_uio <PCI Port 0> <PCI Port 1>
.. _More details: http://dpdk.org/doc/guides-17.05/linux_gsg/build_dpdk.html#binding-and-unbinding-network-ports-to-from-the-kernel-modules
- Prepare script to enalble VNF to route the packets
cd <samplevnf>/VNFs/vCGNAPT/config
Open -> sample_swlb_2port_2WT.tc Replace the bold items based on your setting.

link 0 config <VNF port 0 IP eg 202.16.100.10> 8
link 0 up
link 1 down
link 1 config <VNF port 0 IP eg 172.16.40.10> 8
link 1 up

; uncomment to enable static NAPT
;p <cgnapt pipeline id> entry addm <prv_ipv4/6> prvport> <pub_ip> <pub_port> <phy_port> <ttl> <no_of_entries> <end_prv_port> <end_pub_port>
;p 5 entry addm 202.16.100.20 1234 152.16.40.10 1 0 500 65535 1234 65535

; routeadd <net/host> <port #> <ipv4 nhip address in decimal> <Mask>
routeadd net 0 <traffic generator port 0 IP eg 202.16.100.20> 0xff000000
routeadd net 1 <traffic generator port 1 IP eg 172.16.40.20> 0xff000000

; IPv4 static ARP; disable if dynamic arp is enabled.
p 1 arpadd 0 <traffic generator port 0 IP eg 202.16.100.20> <traffic generator port 0 MAC>
p 1 arpadd 1  <traffic generator port 1 IP eg 172.16.40.20> <traffic generator port 1 MAC>

For dynamic cgnapt. Please use UDP_Replay as one of the traffic generator
   (TG1) (port 0) --> (port 0) VNF (CGNAPT) (Port 1) --> (port0)(UDPReplay)
- Run below cmd to launch the VNF. Please make sure both hugepages and ports to be used are bind to dpdk.
cd <samplevnf>/VNFs/vCGNAPT/
./build/vCGNAPT -p 0x3 -f ./config/sample_swlb_2port_2WT.cfg  -s ./config/sample_swlb_2port_2WT.tc
- Run UDP_replay to reflect the traffic on public side.
cmd: ./build/UDP_Replay -c 0x7 -n 4 -w <pci> -w <pci> -- --no-hw-csum -p <portmask> --config='(port, queue, cpucore)'
e.g ./build/UDP_Replay -c 0x7 -n 4 -w 0000:07:00.0 -w 0000:07:00.1 -- --no-hw-csum -p 0x3 --config='(0, 0, 1)(1, 0, 2)'
step 4: Run Test using traffic geneator
On traffic generator system:
cd <trex eg v2.28/stl>
Update the bench.py to generate the traffic.

class STLBench(object):
ip_range = {}
ip_range['src'] = {'start': '<traffic generator port 0 IP eg 202.16.100.20>', 'end': '<traffic generator port 0 IP eg 202.16.100.20>'}
ip_range['dst'] = {'start': '<traffic generator port 1 IP eg 172.16.40.20>', 'end': '<public ip e.g 152.16.40.10>'}
cd <trex eg v2.28>
Run the TRex server: sudo ./t-rex-64 -i -c 7
In another shell run TRex console: trex-console
The console can be run from another computer with -s argument, --help for more info.
Other options for TRex client are automation or GUI
In the console, run "tui" command, and then send the traffic with commands like:
start -f stl/bench.py -m 50% --port 0 3 -t size=590,vm=var1
For more details refer: https://trex-tgn.cisco.com/trex/doc/trex_stateless_bench.html
5.8. UDP_Replay - How to run¶
Step 3: Bind the datapath ports to DPDK
- Bind ports to DPDK
For DPDK versions 17.xx
1) cd <samplevnf>/dpdk
2) ./usertools/dpdk-devbind.py --status <--- List the network device
3) ./usertools/dpdk-devbind.py -b igb_uio <PCI Port 0> <PCI Port 1>
.. _More details: http://dpdk.org/doc/guides-17.05/linux_gsg/build_dpdk.html#binding-and-unbinding-network-ports-to-from-the-kernel-modules
- Run below cmd to launch the VNF. Please make sure both hugepages and ports to be used are bind to dpdk.
cd <samplevnf>/VNFs/UDP_Replay/
cmd: ./build/UDP_Replay -c 0x7 -n 4 -w <pci> -w <pci> -- --no-hw-csum -p <portmask> --config='(port, queue, cpucore)'
e.g ./build/UDP_Replay -c 0x7 -n 4 -w 0000:07:00.0 -w 0000:07:00.1 -- --no-hw-csum -p 0x3 --config='(0, 0, 1)(1, 0, 2)'
step 4: Run Test using traffic geneator
On traffic generator system:
cd <trex eg v2.28/stl>
Update the bench.py to generate the traffic.

class STLBench(object):
ip_range = {}
ip_range['src'] = {'start': '<traffic generator port 0 IP eg 202.16.100.20>', 'end': '<traffic generator port 0 IP eg 202.16.100.20>'}
ip_range['dst'] = {'start': '<traffic generator port 1 IP eg 172.16.40.20>', 'end': '<public ip e.g 152.16.40.10>'}
cd <trex eg v2.28>
Run the TRex server: sudo ./t-rex-64 -i -c 7
In another shell run TRex console: trex-console
The console can be run from another computer with -s argument, --help for more info.
Other options for TRex client are automation or GUI
In the console, run "tui" command, and then send the traffic with commands like:
start -f stl/bench.py -m 50% --port 0 3 -t size=590,vm=var1
For more details refer: https://trex-tgn.cisco.com/trex/doc/trex_stateless_bench.html
5.9. PROX - How to run¶
5.9.1. Description¶
This is PROX, the Packet pROcessing eXecution engine, part of Intel(R) Data Plane Performance Demonstrators, and formerly known as DPPD-BNG. PROX is a DPDK-based application implementing Telco use-cases such as a simplified BRAS/BNG, light-weight AFTR... It also allows configuring finer grained network functions like QoS, Routing, load-balancing...
5.10. PROX COMMANDS AND SCREENS¶
RUNTIME COMMAND DESCRIPTION EXAMPLE quit Stop all cores and quit help <substr> Show list of commands that have <substr> as a substring. If no substring is provided, all commands are shown. verbose <level> Set the verbosity level of some printed messages. Possible values are: 0 (default value, error messages only), 1 (+ warnings), 2 (+ info) and 3 (+ debugging) verbose 1 thread info <core_id> <task_id> Show task specific information update interval <value> Update statistics refresh rate, in msec (must be >=10). Default is 1 second update interval 500 rx tx info Print connections between tasks on all cores start <core list>|all <task_id> Start cores specified in <core list> or all cores. If <task_id> is not specified, all tasks for the specified cores will be started. start all start 1 start 1s0-4s0 stop <core list>|all <task_id> Stop cores specified in <core list> or all cores. If <task_id> is not specified, all tasks for the specified cores will be stopped. stop 1 dump <coreid> <taskid> <nbpkts> Create a hex dump of <nb_packets> from <task_id> on <core_id> showing how packets have changed between RX and TX. dump 2 1 5 dump_rx <coreid> <taskid> <nbpkts> Create a hex dump of <nb_packets> from <task_id> on <coreid> at RX dump_rx 2 1 5 dump_tx <coreid> <taskid> <nbpkts> Create a hex dump of <nb_packets> from <task_id> on <coreid> at TX dump_tx 2 1 5 rx distr start Start gathering statistical distribution of received packets rx distr stop Stop gathering statistical distribution of received packets rx distr reset Reset gathered statistical distribution of received packets rx distr show Display gathered statistical distribution of received packets rate <port id> <queue id> <rate> Set transmit rate in Mb/s. This does not include preamble, SFD and IFG rate 0 0 1000 count <core id> <task id> <count> Generate <count> packets, then pause generating count 1 0 5 pkt_size <coreid> <taskid> <pktsize> Set the packet size to <pkt_size> pkt_size 1 3 255 speed <core_id> <task_id> <speed percentage> Change the speed to <speed percentage> of a 10 Gbps line at which packets are being generated on core <core_id> in task <task_id> speed 1 0 50 speed_byte <core_id> <task_id> <speed> Change speed to <speed>. The speed is specified in units of bytes per sec set value <core_id> <task_id> <offset> <value> <value_len> Set <value_len> bytes to <value> at offset <offset> in packets generated on <core_id> <task_id> set value 4 1 14 10 1 reset values all Undo all set value commands on all cores/tasks reset values <core id> <task id> Undo all set value commands on specified core/task arp add <core id> <task id> <port id> <gre id> <svlan> <cvlan> <ip addr> <mac addr> <user> Add a single ARP entry into a CPE table on <core id>/<task id> rule add <core id> <task id> svlan_id&mask cvlan_id&mask ip_proto&mask source_ip/prefix destination_ip/prefix range dport_range action Add a rule to the ACL table on <core id>/<task id> route add <core id> <task id> <ip/prefix> <next hop id> Add a route to the routing table on core <core id> <task id> route add 10.0.16.0/24 9 reset stats Reset all statistics tot stats Print total RX and TX packets tot ierrors per sec Print total number of ierrors per second pps stats Print RX and TX packet rate in unit of packet per second lat stats <core id> <task id> Print min,max,avg latency as measured during last sampling interval lat stats 1 0 lat packets <core id> <task id> Print the latency for each of the last set of packets core stats <core id> <task id> Print rx/tx/drop for task <task id> running on core <core id> port_stats <port id> Print rate for no_mbufs, ierrors, rx_bytes, tx_bytes, rx_pkts, tx_pkts and totals for RX, TX, no_mbufs ierrors for port <port id> ring info all Get information about ring, such as ring size and number of elements in the ring ring info <core id> <task id> Get information about ring on core <core id> in task <task id>, such as ring size and number of elements in the ring ring info 1 0 port info <port id> [brief] Get port related information, such as MAC address, socket, number of descriptors..., . Adding brief after command prints short version of output. port info 1 port up <port id> Set the port up (all ports are up at startup) port up 1 port down <port id> Set the port down port down 1 port xstats <port id> Get extra statistics for the port port xstats 1 version Show version port_stats <port id> tx_pkts and totals for RX, TX, no_mbufs ierrors for port <port id>
While PROX is running, F1 to F6 change the view on the system. Pressing F1 switches to the main screen showing per core statistics. When PROX is started, this is the screen shown by default. Pressing F2 switches to show port-based information. Pressing F3 shows information (i.e. occupancy, memory usage, ...) about memory pools. If there are tasks with mode=lat, F4 displays latency measurements made during the last second by each of those tasks. F5 displays DPDK ring information. F6 is for L4 generation. If no command has been entered, numbers 1 to 6 can also be used to change the view on the system. This is provided to allow changing screens in environments that do not pass function keys to PROX.
Page Up and Page Down can be used to view per core statistics that would otherwise not fit on the screen. Escape quits PROX. The history of previously entered commands can be navigated using the Up and Down arrows. Statistics can be reset with F12.
5.11. COMMAND LINE OPTIONS¶
Run PROX with the “–help” argument to display the usage text and the list of supported options as shown below. PROX supports many compilation flags to enable or disable features. For these flags, refer to the Makefile. Refer to the README file for more information on how to run PROX for specific use cases.
Usage: ./build/prox [-f CONFIG_FILE] [-l LOG_FILE] [-p] [-o DISPLAY] [-v] [-a|-e] [-m|-s|-i] [-n] [-w DEF] [-q] [-k] [-d] [-z] [-r VAL] [-u] [-t]
      -f CONFIG_FILE : configuration file to load, ./prox.cfg by default
      -l LOG_FILE : log file name, ./prox.log by default
      -p : include PID in log file name if default log file is used
      -o DISPLAY: Set display to use, can be 'curses' (default), 'cli' or 'none'
      -v verbosity : initial logging verbosity
      -a : autostart all cores (by default)
      -e : don't autostart
      -n : Create NULL devices instead of using PCI devices, useful together with -i
      -m : list supported task modes and exit
      -s : check configuration file syntax and exit
      -i : check initialization sequence and exit
      -u : Listen on UDS /tmp/prox.sock
      -t : Listen on TCP port 8474
      -q : Pass argument to Lua interpreter, useful to define variables
      -w : define variable using syntax varname=value
           takes precedence over variables defined in CONFIG_FILE
      -k : Log statistics to file "stats_dump" in current directory
      -d : Run as daemon, the parent process will block until PROX is not initialized
      -z : Ignore CPU topology, implies -i
      -r : Change initial screen refresh rate. If set to a lower than 0.001 seconds,
                screen refreshing will be disabled
5.12. CONFIGURATION FILE FORMAT¶
The configuration file is divided into multiple sections, each of which is used to define some parameters and options. Sections are created using the [section name] syntax. The list of sections, where # represents an integer, is as follows:
[eal options]
[port #]
[variables]
[defaults]
[global]
[core #]
In each section, entries are created using the key=value syntax. Comments are created using the ; symbol: all characters from the ; symbol to the end of line are ignored. A # symbol at the beginning of the section name comments the whole section out: all entries in the section are treated as comments and are ignored. For example:
[#core 1]
; this is a comment
parameter name=parameter value ; this entry is ignored because the section is commented out
- [EAL OPTIONS]: The following parameters are supported:
-m  ; Specifies the amount of memory used. If not provided, all hugepages will be used.
-n  ; Specifies the number of memory channels. Use -n4 for latest Intel Xeon based platforms
-r  ; Specifies the number of memory ranks.
eal ; Specifies DPDK EAL extra options. Those options will be passed blindly to DPDK.
- [PORT #]: DPDK ports are usually referenced by their port_id, i.e. an integer starting from 0. Using port_id in the configuration file is tedious, since the same port_id can appear at different places (rx port, tx port, routing tables), and those ports might change (e.g. if cables are swapped). In order to make the configuration file easier to read and modify, DPDK ports are given a name with the name= option. The name serves as the reference, and in addition, it will show up in the display at runtime.
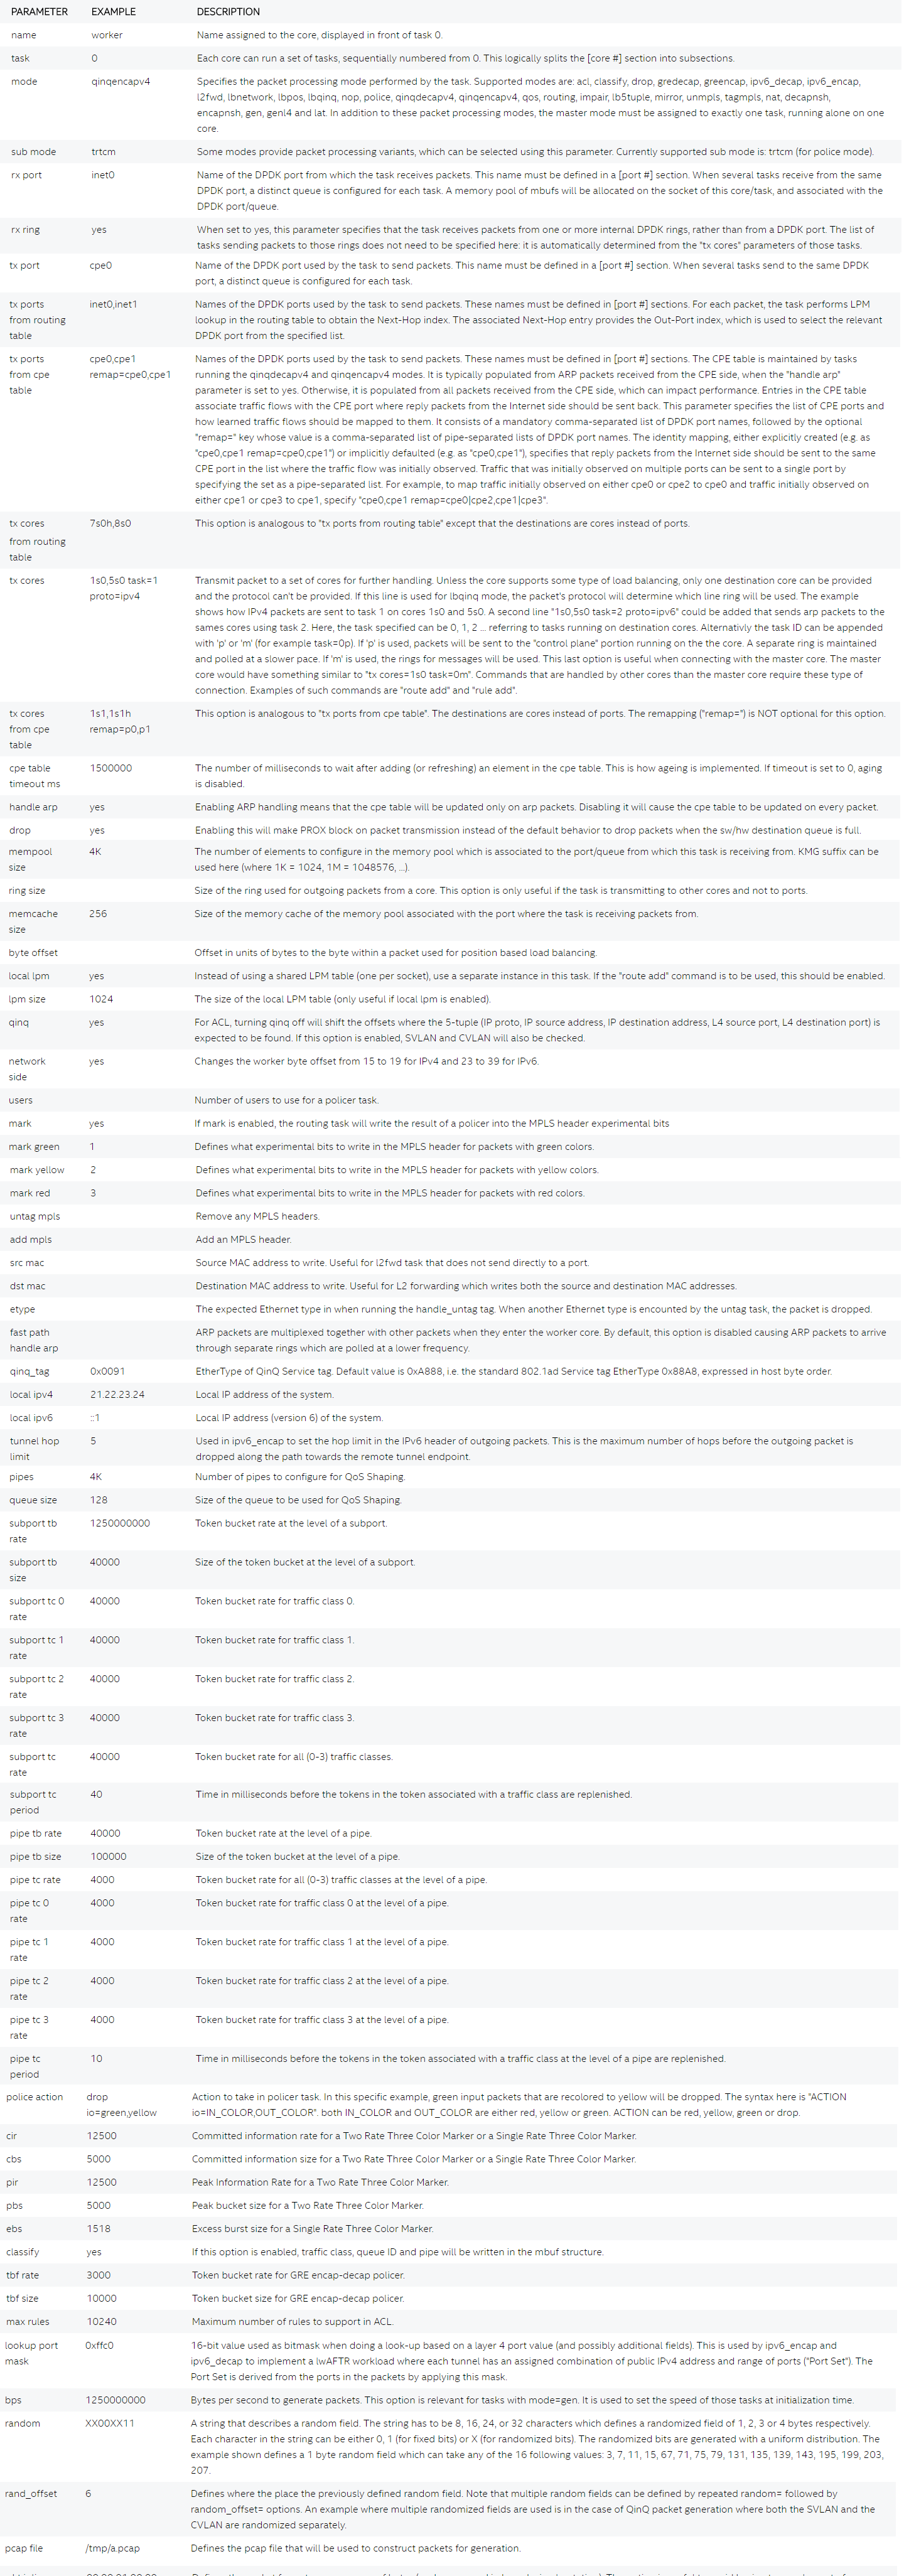
PARAMETER    EXAMPLE         DESCRIPTION
----------------------------------------------------------------------------
name         inet0           Use inet0 to later refer to this port
mac          hardware        value can be: hardware, random or a literal MAC address
rx desc      256             number of descriptors to allocate for reception
tx desc      256             number of descriptors to allocate for transmission
promiscuous  yes             enable promiscuous mode
strip crc    yes             enable CRC stripping
rss          yes             enable RSS
lsc          no              While lsc is disabled for drivers known to not provide support,
                                 this option explicitely overrides these settings.
rx_ring      dpdk_ring_name  use DPDK ring as an interface (receive side)
tx_ring      dpdk_ring_name  use DPDK ring as an interface (transmit side)
- [VARIABLES]: Variables can be defined in the configuration file using the $varname=value syntax. Variables defined on the command line (-w varname=value) take precedence and do not create conflicts with variables defined in the configuration file. Variables are used in the configuration file using the $varname syntax: each instance of $varname is replaced by its associated value. This is typically useful if the same parameter must be used at several places. For instance, you might want to have multiple load balancers, all transmitting to the same set of worker cores. The list of worker cores could then be defined once in a variable:
[variables]
$wk=1s0-5s0
Then, a load balancer definition would use the variable:
[core 6s0]
name=LB
task=0
mode=lbnetwork
tx cores=$wk task=0
...
And the section defining the worker cores would be:
[core $wk]
name=worker
task=0
mode=qinqencapv4
...
- [DEFAULTS]: The default value of some options can be overridden using the [defaults] section:
PARAMETER     EXAMPLE   DESCRIPTION
-----------------------------------
mempool       size      16K number of mbufs per task, relevant when task receives from a port.
                        this is the n argument provided to rte_mempool_create()
qinq tag      0xa888    Set qinq tag for all tasks. The result of adding this option is the
                        same as adding qinq tag= to each task
memcache size 128       number of mbufs cached per core, default is 256 this is the cache_size
                        argument provided to rte_mempool_create()
- [GLOBAL]: The following parameters are supported:
PARAMETER          EXAMPLE            DESCRIPTION
-------------------------------------------------
name               BNG                Name of the configuration, which will be shown in the title box at runtime.
start time         10                 Time in seconds after which average statistics will be started.
                                      Default value is 0.
duration time      30                 Runtime duration in seconds, counted after start time.
                                      This is typically useful to automate testing using
                                      different parameters: PROX automatically exits when the
                                      runtime duration has elapsed. Initialization and start time
                                      are not included in this runtime duration.
                                      For example, if start time is set to 10 and duration time is set to 30,
                                      the total execution time (after initialization) will be 40 seconds.
                                      Default value is 0, which means infinity and prevents PROX from automatically exiting.
shuffle            yes                When this parameter is set to yes, the order of mbufs
                                      within mempools is randomized to simulate a system that has
                                      been warmed up. Default value is no.
gre cfg            /path/to/file.csv  Path to CSV file that provides QinQ-to-GRE mapping.
                                      Default value is gre_table.csv in same directory as
                                      configuration file. Fields are GRE key and QinQ value (computed as SVLAN * 4096 + CVLAN).
pre cmd            ls                 Arbitrary system commands to run while reading cfg. This option can occur multiple times.
user cfg           /path/to/file.csv  Path to CSV file that provides QinQ-to-User mapping.
                                      Default value is user_table.csv in same directory as configuration file.
                                      Fields are SVLAN, CVLAN and User-Id.
next hop cfg       /path/to/file.csv  Path to CSV file that provides Next-Hop details.
                                      Default value is next_hop.csv in same directory as configuration file.
                                      Fields are Next-Hop index (as returned by LPM lookup),
                                      Out-Port index, Next-Hop IP (unused), Next-Hop MAC and MPLS label.
ipv4 cfg           /path/to/file.csv  Path to CSV file that provides IPv4 LPM routing table.
                                      Default value is ipv4.csv in same directory as configuration file.
                                      Fields are IPv4 subnet (in CIDR notation) and Next-Hop index.
dscp cfg           /path/to/file.csv  Path to CSV file that provides mapping for QoS classification,
                                      from DSCP to Traffic Class and Queue.
                                      Default value is dscp.csv in same directory as configuration file.
                                      Fields are DSCP (0-63), Traffic Class (0-3) and Queue (0-3).
ipv6 tunnel cfg    /path/to/file.csv  Path to CSV file that provides lwAFTR binding table.
                                      Default value is ipv6_tun_bind.csv in same directory as configuration file.
                                      Fields are lwB4 IPv6 address, next hop MAC address towards lwB4,
                                      IPv4 Public address and IPv4 Public Port Set.
acl cfg            /path/to/file.csv  Path to CSV file that provides ACL rules.
                                      Default value is rules.csv in same directory as configuration file.
                                      Fields are SVLAN value & mask, CVLAN value & mask, IP protocol value & mask,
                                      source IPv4 subnet (in CIDR notation), destination IPv4 subnet (in CIDR notation),
                                      source port range, destination port range, and action (drop, allow, rate limit).
unique mempool     yes
per socket
[CORE #]: Cores can be configured by means of a set of [core #] sections, where # represents either:
an absolute core number: e.g. on a 10-core, dual socket system with hyper-threading, cores are numbered from 0 to 39; a core number, the letter ‘s’, and a socket number: this allows selecting per-socket cores, independently from their interleaved numbering; a core number and the letter ‘h’: this allows selecting the hyper-thread sibling of the specified core; a dash-separated range of core numbers; a comma-separated list of core numbers; any combination of the above; or a variable whose value complies with the above syntax. The socket and hyper-thread syntax makes it easier to use the same configuration file on several platforms, even if their core numbering differs (e.g. interleaving rule or number of cores per socket).
Each core can be assigned with a set of tasks, each running one of the implemented packet processing modes.
The following parameters are supported:
5.12.1. Compiling and running this application¶
5.12.2. PREREQUISITES¶
DPDK must be installed prior to running make in the PROX directory. The README file shipped with PROX describes what versions of DPDK are supported, and if any patches are needed for the chosen DPDK version.
The following packages need to be installed. (Example for destributions that are using rpm)
sudo yum install net-tools wget gcc unzip libpcap-devel ncurses-devel libedit-devel pciutils lua-devel kernel-devel
Jump Start
The following instructions are here to help customers to start using PROX. It’s by no means a complete guide, for detailed instructions on how to install and use DPDK please refer to its documentation. Your mileage may vary depending on a particular Linux distribution and hardware in use.
Edit grub default configuration:
vi /etc/default/grub
Add the following to the kernel boot parameters
default_hugepagesz=1G hugepagesz=1G hugepages=8
Rebuild grub config and reboot the system:
grub2-mkconfig -o /boot/grub2/grub.cfg
reboot
Verify that hugepages are available
cat /proc/meminfo
...
HugePages_Total:  8
HugePages_Free:   8
Hugepagesize:     1048576 kB
...
Re-mount huge pages
mkdir -p /mnt/huge
umount `awk '/hugetlbfs/ { print $2 }' /proc/mounts` >/dev/null 2>&1
mount -t hugetlbfs nodev /mnt/huge/
This application supports DPDK 16.04, 16.11, 17.02 and 17.05. The following commands assume that the following variables have been set:
export RTE_SDK=/path/to/dpdk export RTE_TARGET=x86_64-native-linuxapp-gcc
5.12.3. PROX Compiation installation¶
- git clone https://git.opnfv.org/samplevnf
- cd samplevnf
- export RTE_SDK=`pwd`/dpdk
- export RTE_TARGET=x86_64-native-linuxapp-gcc
- git clone http://dpdk.org/git/dpdk
- cd dpdk
- git checkout v17.05
- make install T=$RTE_TARGET
- cd <samplevnf>/VNFs/DPPD-PROX
- make
or Auto build
* git clone https://git.opnfv.org/samplevnf
* cd samplevnf
* ./tools/vnf_build.sh -s -d='17.05' [-p=<proxy> if behind the proxy]
Load uio module
lsmod | grep -w "^uio" >/dev/null 2>&1 || sudo modprobe uio
sleep 1
Load igb_uio module
lsmod | grep -w "^igb_uio" >/dev/null 2>&1 || sudo insmod $RTE_SDK/$RTE_TARGET/kmod/igb_uio.ko
Discover network devices available on the system:
lspci | grep Ethernet
Prior launching PROX, ports that are to be used by it must be bound to the igb_uio driver.
The following command will bind all Intel® Ethernet Converged Network Adapter X710 ports to igb_uio:
lspci | grep X710 | cut -d' ' -f 1 | sudo xargs -I {} python2.7 $RTE_UNBIND --bind=igb_uio {}
The following command will bind all Intel® 82599 10 Gigabit Ethernet Controller ports to igb_uio:
lspci | grep 82599 | cut -d' ' -f 1 | sudo xargs -I {} python2.7 $RTE_UNBIND --bind=igb_uio {}
5.12.4. PROX compilation¶
The Makefile with this application expects RTE_SDK to point to the root directory of DPDK (e.g. export RTE_SDK=/root/dpdk). If RTE_TARGET has not been set, x86_64-native-linuxapp-gcc will be assumed.
5.12.5. Running PROX¶
After DPDK has been set up, run make from the directory where you have extracted this application. A build directory will be created containing the PROX executable. The usage of the application is shown below. Note that this application assumes that all required ports have been bound to the DPDK provided igb_uio driver. Refer to the “Getting Started Guide - DPDK” document for more details.
Usage: ./build/prox [-f CONFIG_FILE] [-l LOG_FILE] [-p] [-o DISPLAY] [-v] [-a|-e] [-m|-s|-i] [-n] [-w DEF] [-q] [-k] [-d] [-z] [-r VAL] [-u] [-t]
      -f CONFIG_FILE : configuration file to load, ./prox.cfg by default
      -l LOG_FILE : log file name, ./prox.log by default
      -p : include PID in log file name if default log file is used
      -o DISPLAY: Set display to use, can be 'curses' (default), 'cli' or 'none'
      -v verbosity : initial logging verbosity
      -a : autostart all cores (by default)
      -e : don't autostart
      -n : Create NULL devices instead of using PCI devices, useful together with -i
      -m : list supported task modes and exit
      -s : check configuration file syntax and exit
      -i : check initialization sequence and exit
      -u : Listen on UDS /tmp/prox.sock
      -t : Listen on TCP port 8474
      -q : Pass argument to Lua interpreter, useful to define variables
      -w : define variable using syntax varname=value
           takes precedence over variables defined in CONFIG_FILE
      -k : Log statistics to file "stats_dump" in current directory
      -d : Run as daemon, the parent process will block until PROX is not initialized
      -z : Ignore CPU topology, implies -i
      -r : Change initial screen refresh rate. If set to a lower than 0.001 seconds,
                screen refreshing will be disabled
While applications using DPDK typically rely on the core mask and the number of channels to be specified on the command line, this application is configured using a .cfg file. The core mask and number of channels is derived from this config. For example, to run the application from the source directory execute:
user@target:~$ ./build/prox -f ./config/nop.cfg
5.12.6. Provided example configurations¶
PROX can be configured either as the SUT (System Under Test) or as the Traffic Generator. Some example configuration files are provided, both in the config directory to run PROX as a SUT, and in the gen directory to run it as a Traffic Generator. A quick description of these example configurations is provided below. Additional details are provided in the example configuration files.
Basic configurations, mostly used as sanity check:
* config/nop.cfg
* config/nop-rings.cfg
* gen/nop-gen.cfg
Simplified BNG (Border Network Gateway) configurations, using different number of ports, with and without QoS, running on the host or in a VM:
* config/bng-4ports.cfg
* config/bng-8ports.cfg
* config/bng-qos-4ports.cfg
* config/bng-qos-8ports.cfg
* config/bng-1q-4ports.cfg
* config/bng-ovs-usv-4ports.cfg
* config/bng-no-cpu-topology-4ports.cfg
* gen/bng-4ports-gen.cfg
* gen/bng-8ports-gen.cfg
* gen/bng-ovs-usv-4ports-gen.cfg
Light-weight AFTR configurations:
* config/lw_aftr.cfg
* gen/lw_aftr-gen.cfg
6. REST API¶
6.1. Introduction¶
As the internet industry progresses creating REST API becomes more concrete with emerging best Practices. RESTful web services don’t follow a prescribed standard except fpr the protocol that is used which is HTTP, its important to build RESTful API in accordance with industry best practices to ease development & increase client adoption.
In REST Architecture everything is a resource. RESTful web services are light weight, highly scalable and maintainable and are very commonly used to create APIs for web-based applications.
Here are important points to be considered:
GET operations are read only and are safe.
PUT and DELETE operations are idempotent means their result will always same no matter how many times these operations are invoked.
PUT and POST operation are nearly same with the difference lying only in the result where PUT operation is idempotent and POST
operation can cause different result.
6.2. REST API in SampleVNF¶
In SampleVNF project VNF’s are run under different contexts like BareMetal, SRIOV, OVS & Openstack etc. It becomes difficult to interact with the VNF’s using the command line interface provided by the VNF’s currently.
Hence there is a need to provide a web interface to the VNF’s running in different environments through the REST api’s. REST can be used to modify or view resources on the server without performing any server-side operations.
REST api on VNF’s will help adapting with the new automation techniques being adapted in yardstick.
6.3. Web server integration with VNF’s¶
In order to implement REST api’s in VNF one of the first task is to identify a simple web server that needs to be integrated with VNF’s. For this purpose “civetweb” is identified as the web server That will be integrated with the VNF application.
CivetWeb is an easy to use, powerful, C/C++ embeddable web server with optional CGI, SSL and Lua support. CivetWeb can be used by developers as a library, to add web server functionality to an existing application.
Civetweb is a project forked out of Mongoose. CivetWeb uses an [MITlicense]. It can also be used by end users as a stand-alone web server. It is available as single executable, no installation is required.
In our project we will be integrating civetweb into each of our VNF’s. Civetweb exposes a few functions which are used to resgister custom handlers for different URI’s that are implemented. Typical usage is shown below
6.3.1. URI definition for different VNF’s¶
| URI | Method | Arguments | description |
| /vnf | GET | None | Displays top level methods available |
| /vnf/config | GET | None | Displays the current config set |
| /vnf/config | POST |
|
|
| /vnf/config/arp | GET | None | Displays ARP/ND info |
| /vnf/config/arp | POST |
|
|
| /vnf/config/link | GET | None | |
| /vnf/config/link | POST | link_id:<> state: <1/0> | |
| /vnf/config/link/<link id> | GET | None | |
| /vnf/config/link/<link id> | POST | ipv4/ipv6: <address> depth: <> | |
| /vnf/config/route | GET | None | Displays gateway route entries |
| /vnf/config/route | POST | portid: <> nhipv4/nhipv6: <addr> depth: <> type:”net/host” | Adds route entries for default gateway |
| /vnf/config/rules(vFW/vACL) | GET | None | Displays the methods /load/clear |
| /vnf/config/rules/load | GET | None | Displays if file was loaded |
| /vnf/config/rules/load | PUT | <script file with cmds> | Executes each command from script file |
| /vnf/config/rules/clear | GET | None | |
| /vnf/config/nat(vCGNAPT only) | GET | None | Displays the methods /load/clear |
| /vnf/config/nat/load | GET | None | Displays if file was loaded |
| /vnf/config/rules/load | PUT | <script file with cmds> | |
| /vnf/config/nat/clear | GET | None | |
| /vnf/log | GET | None |
|
| /vnf/dbg | GET | None | Will display methods supported like /pipelines/cmd |
| /vnf/dbg/pipelines | GET | None | Displays pipeline information(names) |
| /vnf/dbg/pipelines/<pipe id> | GET | None | Displays debug level for particular pipeline |
| /vnf/dbg/cmd | GET | None | Last executed command parameters |
| /vnf/dbg/cmd | POST |
|
PUT/POST - Command success/failure
6.4. API Usage¶
An application(say vFW) with REST API support is run as follows with just PORT MASK as input. The following environment variables need to be set before launching the application(To be run from samplevnf directory).
./build/vFW (Without the -f & -s option)
When VNF(vCGNAPT/vACL/vFW) is launched it waits for user to provide the /vnf/config REST method.
e.g curl -X POST -H "Content-Type:application/json" -d '{"pci_white_list": "0000:08:00.0 0000:08:00.1"}' http://<IP>/vnf/config

Note: the config is mostly implemented based on existing VNF's. if new parameters
      are required in the config we need to add that as part of the vnf_template.

Once the config is provided the application gets launched.

Note for CGNAPT we can add public_ip_port_range as follows, the following e.g gives
a multiport configuration with 4 ports, 2 load balancers, worker threads 10, multiple
public_ip_port_range being added, please note the "/" being used to seperate multiple
inputs for public_ip_port_range.

e.g curl -X POST -H "Content-Type:application/json" -d '{"pci_white_list": "0000:05:00.0 0000:05:00.2 0000:07:00.0 0000:07:00.2",
    "num_lb":"2", "num_worker":"10","public_ip_port_range_0": "04040000:(1, 65535)/04040001:(1, 65535)",
    "public_ip_port_range_1": "05050000:(1, 65535)/05050001:(1, 65535)" }' http://10.223.197.179/vnf/config
Check the Link IP’s using the REST API (vCGNAPT/vACL/vFW)
e.g curl <IP>/vnf/config/link

This would indicate the number of links enabled. You should enable all the links
by using following curl command for links 0 & 1

e.g curl -X POST -H "Content-Type:application/json" -d '{"linkid": "0", "state": "1"}'
http://<IP>/vnf/config/link
curl -X POST -H "Content-Type:application/json" -d '{"linkid": "1", "state": "1"}'
http://<IP>/vnf/config/link
Now that links are enabled we can configure IP’s using link method as follows (vCGNAPT/vACL/vFW)
e.g  curl -X POST -H "Content-Type:application/json" -d '{"ipv4":"<IP to be configured>","depth":"24"}'
http://<IP>/vnf/config/link/0
curl -X POST -H "Content-Type:application/json" -d '{"ipv4":"IP to be configured","depth":"24"}'
http://<IP>/vnf/config/link/1

Once the IP's are set in place time to add NHIP for ARP Table. This is done using for all the ports required.
/vnf/config/route

curl -X POST -H "Content-Type:application/json" -d '{"portid":"0", "nhipv4":"IPV4 address",
"depth":"8", "type":"net"}' http://<IP>/vnf/config/route
Adding arp entries we can use this method (vCGNAPT/vACL/vFW)
/vnf/config/arp

e.g
curl -X POST -H "Content-Type:application/json" -d '{"action":"add", "ipv4":"202.16.100.20",
            "portid":"0", "macaddr":"00:00:00:00:00:01"}'
            http://10.223.166.213/vnf/config/arp

curl -X POST -H "Content-Type:application/json" -d '{"action":"add", "ipv4":"172.16.40.20",
            "portid":"1", "macaddr":"00:00:00:00:00:02"}'
            http://10.223.166.213/vnf/config/arp
Adding route entries we can use this method (vCGNAPT/vACL/vFW)
/vnf/config/route

e.g curl -X POST -H "Content-Type:application/json" -d '{"type":"net", "depth":"8", "nhipv4":"202.16.100.20",
             "portid":"0"}' http://10.223.166.240/vnf/config/route
curl -X POST -H "Content-Type:application/json" -d '{"type":"net", "depth":8", "nhipv4":"172.16.100.20",
            "portid":"1"}' http://10.223.166.240/vnf/config/route
In order to load the rules a script file needs to be posting a script.(vACL/vFW)
/vnf/config/rules/load

Typical example for loading a script file is shown below
curl -X PUT -F 'image=@<path to file>' http://<IP>/vnf/config/rules/load

typically arpadd/routeadd commands can be provided as part of this to
add static arp entries & adding route entries providing the NHIP's.
The following REST api’s for runtime configuring through a script (vCGNAPT Only)
/vnf/config/rules/clear
/vnf/config/nat
/vnf/config/nat/load
For debug purpose following REST API’s could be used as described above.(vCGNAPT/vACL/vFW)
/vnf/dbg
e.g curl http://10.223.166.240/vnf/config/dbg

/vnf/dbg/pipelines
e.g curl http://10.223.166.240/vnf/config/dbg/pipelines

/vnf/dbg/pipelines/<pipe id>
e.g curl http://10.223.166.240/vnf/config/dbg/pipelines/<id>

/vnf/dbg/cmd
For stats we can use the following method (vCGNAPT/vACL/vFW)
/vnf/stats
e.g curl <IP>/vnf/stats
For quittiong the application (vCGNAPT/vACL/vFW)
/vnf/quit
e.g curl <IP>/vnf/quit
7. SampleVNF - Config files¶
The configuration files are created based on the DUT test scenarios. The example reference files are provided as part of the VNFs in the config folder.
Following parameters will define the config files.
- Load balancing type: Hardware or Software
- Traffic type: IPv4 or IPv6
- Number of Port Pairs: Single or Multi
Following are the example configuration files for sampleVNFs.
7.1. vCGNAPT Config files¶
The reference configuration files explained here are for Software and Hardware loadbalancing with IPv4 traffic type and single port pair. For other configurations liek IPv6 and Multi-port, refer to example config files provided as part of the source code in config(VNFs/vCGNAPT/config) folder of the VNFs.
- SWLB, IPv4, Single Port Pair, 1WT:
[EAL]
w = 05:00.0
w = 05:00.1

[PIPELINE0]
type = MASTER
core = 0

[PIPELINE1]
type = ARPICMP
core = 1
pktq_in = SWQ0
pktq_out = SWQ7

pktq_in_prv = RXQ0.0
prv_to_pub_map = (0, 1)

[PIPELINE2]
type = TIMER
core = 2
n_flows = 1048576

[PIPELINE3]
type = TXRX
core = 3
pipeline_txrx_type = RXRX
dest_if_offset = 176
pktq_in = RXQ0.0 RXQ1.0
pktq_out = SWQ1 SWQ2 SWQ0

[PIPELINE4]
type = LOADB
core = 4
pktq_in = SWQ1 SWQ2
pktq_out = SWQ3 SWQ4
outport_offset = 136; 8
n_vnf_threads = 1
prv_que_handler = (0,)

[PIPELINE5]
type = CGNAPT
core = 5
pktq_in = SWQ3 SWQ4
pktq_out = SWQ5 SWQ6
phyport_offset = 204
n_flows = 1048576
key_offset = 192;64
key_size = 8
hash_offset = 200;72
timer_period = 100
max_clients_per_ip = 65535
max_port_per_client = 10
public_ip_port_range = 98103214:(1, 65535)
vnf_set = (3,4,5)
pkt_type = ipv4
cgnapt_meta_offset = 128
prv_que_handler = (0,)

[PIPELINE6]
type = TXRX
core = 6
pipeline_txrx_type = TXTX
dest_if_offset = 176
pktq_in = SWQ5 SWQ6
pktq_out = TXQ0.0 TXQ1.0
- HWLB, IPv4, Single Port Pair, 1 WT:
This configuration doesn’t require LOADB and TXRX pipelines
[EAL]
w = 05:00.0
w = 05:00.1

[PIPELINE0]
type = MASTER
core = 0

[PIPELINE1]
type = ARPICMP
core = 1
pktq_in = SWQ0
pktq_out = TXQ0.0 TXQ1.0


pktq_in_prv = RXQ0.0
prv_to_pub_map = (0, 1)

[PIPELINE2]
type = TIMER
core = 2
n_flows = 1048576

[PIPELINE3]
type = CGNAPT
core = 3
pktq_in = RXQ0.0 RXQ1.0
pktq_out = TXQ0.1 TXQ1.1 SWQ0
phyport_offset = 204
n_flows = 1048576
key_offset = 192;64
key_size = 8
hash_offset = 200;72
timer_period = 100
max_clients_per_ip = 65535
max_port_per_client = 10
public_ip_port_range = 98103214:(1, 65535)
vnf_set = (3,4,5)
pkt_type = ipv4
cgnapt_meta_offset = 128
prv_que_handler = (0,)
7.2. vFW Config files¶
The reference configuration files explained here are for Software and Hardware loadbalancing with IPv4 traffic type and single port pair. For other configurations liek IPv6 and Multi-port, refer to example config files provided as part of the source code in config(VNFs/vFW/config) folder of the VNFs.
- SWLB, IPv4, Single Port Pair, 4WT:
[PIPELINE0]
type = MASTER
core = 0

[PIPELINE1]
type =  ARPICMP
core = 0

pktq_in  = SWQ2
pktq_out = TXQ0.0 TXQ1.0

; IPv4 ARP route table entries (dst_ip, mask, if_port, nh) hex values with no 0x
; arp_route_tbl = (ac102814,ff000000,1,ac102814) (ca106414,ff000000,0,ca106414)

; IPv6 ARP route table entries (dst_ip, mask, if_port, nh) hex values with no 0x
;nd_route_tbl =  (fec0::6a05:caff:fe30:21b0,64,0,fec0::6a05:caff:fe30:21b0)
;nd_route_tbl =  (2012::6a05:caff:fe30:2081,64,1,2012::6a05:caff:fe30:2081)

; egress (private interface) info
pktq_in_prv =  RXQ0.0

;for pub port <-> prv port mapping (prv, pub)
prv_to_pub_map = (0,1)
prv_que_handler = (0)

[PIPELINE2]
type = TXRX
core = 1
pktq_in  = RXQ0.0 RXQ1.0
pktq_out = SWQ0 SWQ1 SWQ2
pipeline_txrx_type = RXRX

[PIPELINE3]
type = LOADB
core = 2
pktq_in  = SWQ0 SWQ1
pktq_out = SWQ3 SWQ4 SWQ5 SWQ6 SWQ7 SWQ8 SWQ9 SWQ10
outport_offset = 136
n_vnf_threads = 4 ; Number of worker threads
prv_que_handler = (0)
n_lb_tuples = 5 ; tuple(src_ip,dst_ip, src_port, dst_port, protocol)
;loadb_debug = 0

[PIPELINE4]
type = VFW
core = 3
pktq_in  = SWQ3 SWQ4
pktq_out = SWQ11 SWQ12;TXQ0.0 TXQ1.0

n_rules = 4096 ; Max number of ACL rules
;n_flows gets round up to power of 2
n_flows = 1048576 ; Max number of connections/flows per vFW WT
traffic_type = 4 ; IPv4 Traffic
;traffic_type = 6 ; IPv6 Traffic
; tcp_time_wait controls timeout for closed connection, normally 120
tcp_time_wait = 10  ; TCP Connection WAIT timeout
tcp_be_liberal = 0
;udp_unreplied and udp_replied controls udp "connection" timeouts, normally 30/180
udp_unreplied = 180 ; UDP timeouts for unreplied traffic
udp_replied = 180 ; UDP timeout for replied traffic

[PIPELINE5]
type = VFW
core = 4
pktq_in  = SWQ5 SWQ6
pktq_out = SWQ13 SWQ14;TXQ0.0 TXQ1.0

n_rules = 4096
;n_flows gets round up to power of 2
n_flows = 1048576
traffic_type = 4 ; IPv4 Traffic
;traffic_type = 6 ; IPv6 Traffic
; tcp_time_wait controls timeout for closed connection, normally 120
tcp_time_wait = 10
tcp_be_liberal = 0
;udp_unreplied and udp_replied controls udp "connection" timeouts, normally 30/180
udp_unreplied = 180
udp_replied = 180

[PIPELINE6]
type = VFW
core = 5
pktq_in  = SWQ7 SWQ8
pktq_out = SWQ15 SWQ16

n_rules = 4096
;n_flows gets round up to power of 2
n_flows = 1048576
traffic_type = 4 ; IPv4 Traffic
;traffic_type = 6 ; IPv6 Traffic
; tcp_time_wait controls timeout for closed connection, normally 120
tcp_time_wait = 10
tcp_be_liberal = 0
;udp_unreplied and udp_replied controls udp "connection" timeouts, normally 30/180
udp_unreplied = 180
udp_replied = 180

[PIPELINE7]
type = VFW
core = 6
pktq_in  = SWQ9 SWQ10
pktq_out = SWQ17 SWQ18

n_rules = 4096
;n_flows gets round up to power of 2
n_flows = 1048576
traffic_type = 4 ; IPv4 Traffic
;traffic_type = 6 ; IPv6 Traffic
; tcp_time_wait controls timeout for closed connection, normally 120
tcp_time_wait = 10
tcp_be_liberal = 0
udp_unreplied = 180
udp_replied = 180

[PIPELINE8]
type = TXRX
core = 1h
pktq_in  = SWQ11 SWQ12 SWQ13 SWQ14 SWQ15 SWQ16 SWQ17 SWQ18
pktq_out = TXQ0.1 TXQ1.1 TXQ0.2 TXQ1.2 TXQ0.3 TXQ1.3 TXQ0.4 TXQ1.4
pipeline_txrx_type = TXTX
- HWLB, IPv4, Single Port Pair, 4 WT:
This configuration doesn’t require LOADB and TXRX pipelines
[PIPELINE0]
type = MASTER
core = 0

[PIPELINE1]
type =  ARPICMP
core = 0
pktq_in  = SWQ0 SWQ1 SWQ2 SWQ3
pktq_out = TXQ0.0 TXQ1.0

; egress (private interface) info
pktq_in_prv =  RXQ0.0

;for pub port <-> prv port mapping (prv, pub)
prv_to_pub_map = (0,1)
prv_que_handler = (0)

[PIPELINE2]
type = VFW
core = 1
pktq_in  = RXQ0.0 RXQ1.0
pktq_out = TXQ0.1 TXQ1.1 SWQ0

n_rules = 4096
;n_flows gets round up to power of 2
n_flows = 1048576

traffic_type = 4 ; IPv4 Traffic
;traffic_type = 6 ; IPv6 Traffic
; tcp_time_wait controls timeout for closed connection, normally 120
tcp_time_wait = 10
tcp_be_liberal = 0
;udp_unreplied and udp_replied controls udp "connection" timeouts, normally 30/180
udp_unreplied = 180
udp_replied = 180

[PIPELINE3]
type = VFW
core = 2
pktq_in  = RXQ0.1 RXQ1.1
pktq_out = TXQ0.2 TXQ1.2 SWQ1

n_rules = 4096
;n_flows gets round up to power of 2
n_flows = 1048576

traffic_type = 4 ; IPv4 Traffic
;traffic_type = 6 ; IPv6 Traffic
; tcp_time_wait controls timeout for closed connection, normally 120
tcp_time_wait = 10
tcp_be_liberal = 0
;udp_unreplied and udp_replied controls udp "connection" timeouts, normally 30/180
udp_unreplied = 180
udp_replied = 180

[PIPELINE4]
type = VFW
core = 3
pktq_in  = RXQ0.2 RXQ1.2
pktq_out = TXQ0.3 TXQ1.3 SWQ2

n_rules = 4096
;n_flows gets round up to power of 2
n_flows = 1048576

traffic_type = 4 ; IPv4 Traffic
;traffic_type = 6 ; IPv6 Traffic
; tcp_time_wait controls timeout for closed connection, normally 120
tcp_time_wait = 10
tcp_be_liberal = 0
;udp_unreplied and udp_replied controls udp "connection" timeouts, normally 30/180
udp_unreplied = 180
udp_replied = 180

[PIPELINE5]
type = VFW
core = 4
pktq_in  = RXQ0.3 RXQ1.3
pktq_out = TXQ0.4 TXQ1.4 SWQ3

n_rules = 4096
;n_flows gets round up to power of 2
n_flows = 1048576

traffic_type = 4 ; IPv4 Traffic
;traffic_type = 6 ; IPv6 Traffic
; tcp_time_wait controls timeout for closed connection, normally 120
tcp_time_wait = 10
tcp_be_liberal = 0
;udp_unreplied and udp_replied controls udp "connection" timeouts, normally 30/180
udp_unreplied = 180
udp_replied = 180
7.3. vACL Config files¶
The reference configuration files explained here are for Software and Hardware loadbalancing with IPv4 traffic type and single port pair. For other configurations liek IPv6 and Multi-port, refer to example config files provided as part of the source code in config(VNFs/vACL/config) folder of the VNFs.
- SWLB, IPv4, Single Port Pair, 1 WT:
[EAL]
# add pci whitelist eg below
w = 05:00.0  ; Network Ports binded to dpdk
w = 05:00.1  ; Network Ports binded to dpdk

[PIPELINE0]
type = MASTER
core = 0

[PIPELINE1]
type = ARPICMP
core = 0
pktq_in  = SWQ2
pktq_out = SWQ7
pktq_in_prv =  RXQ0.0
prv_to_pub_map = (0,1)
prv_que_handler = (0)

[PIPELINE2]
type = TXRX
core = 1
pktq_in  = RXQ0.0 RXQ1.0
pktq_out = SWQ0 SWQ1 SWQ2
pipeline_txrx_type = RXRX
dest_if_offset = 176

[PIPELINE3]
type = LOADB
core = 2
pktq_in  = SWQ0 SWQ1
pktq_out = SWQ3 SWQ4
outport_offset = 136
phyport_offset = 204
n_vnf_threads = 1
prv_que_handler = (0)

[PIPELINE4]
type = ACL
core = 3
pktq_in  = SWQ3 SWQ4
pktq_out = SWQ5 SWQ6
n_flows = 1000000
pkt_type = ipv4
traffic_type = 4

[PIPELINE5]
type = TXRX
core = 1h
pktq_in  = SWQ5 SWQ6 SWQ7
pktq_out = TXQ0.0 TXQ1.0
pipeline_txrx_type = TXTX
- SWLB, IPv4, Single Port Pair, 1 WT:
[EAL]
# add pci whitelist eg below
w = 05:00.0
w = 05:00.1

[PIPELINE0]
type = MASTER
core = 0

[PIPELINE1]
type = ARPICMP
core = 0
pktq_in  = SWQ0
pktq_out = TXQ0.0 TXQ1.0
pktq_in_prv =  RXQ0.0
prv_to_pub_map = (0,1)
prv_que_handler = (0)

[PIPELINE2]
type = ACL
core = 1
pktq_in  = RXQ0.0 RXQ1.0
pktq_out = TXQ0.1 TXQ1.1 SWQ0
n_flows = 1000000
pkt_type = ipv4
traffic_type = 4
8. CLI Command Reference¶
8.1. Introduction¶
This chapter provides a commonly used sampleVNFs CLI commmands description. The more detailed information and details will be available from the CLI prompt of the VNF.
8.2. Generic commands¶
8.2.1. routeadd¶
The routeadd command provides a mechanism to add the routing entries for the VNF.
The destination device me be directly(host) attached or attached to net. The parameter net or host should be used accordngly along with other information.
IPv4 interaface:
Syntax:

routeadd <net/host> <port #> <ipv4 nhip address in decimal> <Mask/NotApplicable>

Example:

routeadd net 0 202.16.100.20 0xffff0000
routeadd net 1 172.16.40.20 0xffff0000
routeadd host 0 202.16.100.20
routeadd host 1 172.16.40.20
IPv6 interaface:
Syntax:

routeadd <net/host> <port #> <ipv6 nhip address in hex> <Depth/NotApplicable>

Example:

routeadd net 0 fec0::6a05:caff:fe30:21b0 64
routeadd net 1 2012::6a05:caff:fe30:2081 64
routeadd host 0 fec0::6a05:caff:fe30:21b0
routeadd host 1 2012::6a05:caff:fe30:2081
The route can also be added to the VNF as a config parameters. This method is deprecated and not recommended to use but is supported for backward compatiblity.
IPv4 interaface:
Syntax:

ARP route table entries (ip, mask, if_port, nh) hex values with no 0x

Example:

arp_route_tbl = (c0106414,FFFF0000,0,c0106414)
arp_route_tbl = (ac102814,FFFF0000,1,ac102814)
IPv6 interaface:
Syntax:

ARP route table entries (ip, mask, if_port, nh) hex values with no 0x

Example:

nd_route_tbl = (0064:ff9b:0:0:0:0:9810:6414,120,0,0064:ff9b:0:0:0:0:9810:6414)
nd_route_tbl = (0064:ff9b:0:0:0:0:9810:2814,120,1,0064:ff9b:0:0:0:0:9810:2814)
8.2.2. arpadd¶
The arpadd command is provided to add the static arp entries to the VNF.
IPv4 interface:
Syntax:

p <arpicmp_pipe_id> arpadd <interface_id> <ip_address in deciaml> <mac addr in hex>

Example:

p 1 arpadd 0 202.16.100.20 00:ca:10:64:14:00
p 1 arpadd 1 172.16.40.20 00:ac:10:28:14:00
IPv6 interface:
Syntax:

p <arpicmp_pipe_id> arpadd <interface_id> <ip_address in deciaml> <mac addr in hex>

Example:

p 1 arpadd 0 0064:ff9b:0:0:0:0:9810:6414 00:00:00:00:00:01
p 1 arpadd 1 0064:ff9b:0:0:0:0:9810:2814 00:00:00:00:00:02
8.2.3. lbentry¶
Loadbalancer CLI commands for debug
LB Commands
-------------------------------------------------------------
Commands                       Description
-------------------------------------------------------------
p <pipe_id> lbentry dbg 0 0   To show received packets count
p <pipe_id> lbentry dbg 1 0   To reset received packets count
p <pipe_id> lbentry dbg 2 0   To set debug level
p <pipe_id> lbentry dbg 3 0   To display debug level
p <pipe_id> lbentry dbg 4 0   To display port statistics
8.2.4. arpls¶
The arpls command is used to list the arp and route entries.
Syntax:

P <pipe_id> arpls <0: IPv4, 1: IPv6>

Example:

p 1 arpls 0
p 1 arpls 1
8.3. vFW Specific commands¶
The following list of commands are specific to VFW pipeline.
8.3.1. action add¶
Refer to “action add” CLI command line help to get more details. Many options are available for this command for accept, fwd, count, conntrack etc.
8.3.2. applyruleset¶
This command must be executed to apply the ACL rules configured.
Syntax/Example:

p vfw applyruleset
8.3.3. add¶
This command is used to add teh ACL rules to vFW
Adding ACL rules for IPv4:
Syntax:

p vfw add <priority> <src_ip> <mask> <dst_ip> <mask> <src_port_start> <src_port_end> <dst_port_start> <dst_port_end> <protocol_mask> <action_id>
;Log info: Prio = 1 (SA = 202.0.0.0/8, DA = 192.0.0.0/8, SP = 0-65535, DP = 0-65535, Proto = 0 / 0x0) => Action ID = 1

Example:

p vfw add 2 202.16.100.20 8 172.16.40.20 8 0 65535 0 65535 0 0 1
p vfw add 2 172.16.40.20 8 202.16.100.20 8 0 65535 0 65535 0 0 0
Adding ACL rules for IPv6:
Syntax:

p vfw add <priority> <src_ip> <mask> <dst_ip> <mask> <src_port_start> <src_port_end> <dst_port_start> <dst_port_end> <protocol_mask> <action_id>

Example:

p vfw add 2 fec0::6a05:caff:fe30:21b0 64 2012::6a05:caff:fe30:2081 64 0 65535 0 65535 0 0 1
p vfw add 2 2012::6a05:caff:fe30:2081 64 fec0::6a05:caff:fe30:21b0 64 0 65535 0 65535 0 0 0
8.3.6. counterdump¶
Enable or disable the counterdump using the following commands
Syntax/Example:

p vfw counterdump start
p vfw counterdump stop
8.3.7. debug¶
Enable or Disable the dynamic debug logs
Syntax/Example:

Disable dbg logs
p vfw dbg 0

Enable dbg logs
p vfw dbg 1
8.3.8. firewall¶
Enable or disable the firewall basic filtering using following commands.
Syntax/Example:

To disable
p <pipe_id> vfw firewall 0

To enable
p <pipe_id> vfw firewall 1
8.3.9. synproxy¶
Enable or disable the synproxy using following commands.
Syntax/Example:

To disable
p <pipe_id> vfw synproxy 0

To enable
p <pipe_id> vfw synproxy 1
8.3.10. conntrack¶
Enable or disable the connection tracking per VFW pipeline
Syntax/Example:

To enable connection tracking
p action add <pipe_id> conntrack

To disable connection tracking
p action del <pipe_id> conntrack
8.3.11. loadrules¶
A new file containing ACL rules and actions. The existing ACL rules and actions are cleared.
Syntax:
p vfw loadrules <rule file>

Example:
p vfw loadrules ./config/acl_script_rules.tc
8.3.12. list¶
List the ACL rules in vFW
Syntax/Example:

List Active ACL rules
p vfw ls 0

List Standby ACL rules
p vfw ls 1
8.4. vACL Specific commands¶
Following are the typical commands used in vACL. Refer to CLI command line prompt for more details.
8.4.1. action add¶
Using pipeline CLI, an action can be added using the following command:
Syntax:
p action add <action-id> <action> <optional option>

Example:

Accept:
p action add 1 accept

Drop:
p action add 2 drop

Count:
p action add 1 count

fwd:
p action add 1 fwd 1
Where a port # must be specified

NAT:
p action add 3 nat 2
Where a port # must be specified

List Action:
p action ls <pipleine-id>
e.g. p action ls 2
8.4.2. add rules¶
Using pipeline CLI, an ACL rule can be added using the following command:
Syntax:
p acl add <priority> <src-ip> <mask> <dst-ip> <mask> <src-port-from> <src-port-to> <dst-port-from> <dst-port-to> <protocol> <protocol-mask> <action-id>

Example:
p acl add 1 0.0.0.0 0 0.0.0.0 0 0 65535 0 65535 0 0 1

UDP only with source and destination IP addresses:
p acl add 1 172.16.100.00 24 172.16.40.00 24 0 65535 0 65535 17 255 1
p acl add 1 172.16.40.00 24 172.16.100.00 24 0 65535 0 65535 17 255 1

UDP Only:
p acl add 1 0.0.0.0 0 0.0.0.0 0 0 65535 0 65535 17 255 1

Allow all packets:
-----------------
p acl add 1 0.0.0.0 0 0.0.0.0 0 0 65535 0 65535 0 0 1
8.4.3. list ACL rules¶
Using pipeline CLI, the list of current ACL rules can be viewed using:
Syntax:
p acl ls <pipe_id>

Example:
p acl ls 2
8.4.4. del an ACL rule¶
Using pipeline CLI, an ACL rule can be deleted using the following command:
Syntax:
p acl del <src-ip> <mask> <dst-ip> <mask> <src-port-from> <src-port-to> <dst-port-from> <dst-port-to> <protocol> <protocol-mask>

Example:
p acl del 0.0.0.0 0 0.0.0.0 0 0 65535 0 65535 0 0
8.4.7. loadrules¶
A new file containing ACL rules and actions. The existing ACL rules and actions are cleared.
Syntax:
p acl loadrules <rule file>

Example:
p acl loadrules ./config/acl_script_rules.tc
8.4.8. debug¶
Debug logs can be turn on or turn off using the following commands
Syntax/Example:

Turn on Debug:
p 2 acl dbg 1

Turn off Debug:
p 2 acl dbg 0
8.5. vCGNAT Specific commands¶
The following are the details of the CLI commands supported by vCGNAT. Refer to vCGNAPT application CLI command prompt help more details.
To add bulk vCGNAPT entries
p <pipe_id> entry addm <prv_ip/prv_ipv6> <prv_port> <pub_ip> <pub_port> <phy_port> <ttl> <no_of_entries> <end_prv_port> <end_pub_port>

To add single vCGNAPT entry
p <pipe_id> entry add <prv_ip/prv_ipv6> <prv_port> <pub_ip> <pub_port> <phy_port> <ttl>

To delete single vCGNAPT entry
p <pipe_id> entry del <prv_ip/prv_ipv6> <prv_port> <phy_port>

Displays all vCGNAPT static entries
p <pipe_id> entry ls

To display debug level , bulk entries added count
p <pipe_id> entry dbg 3 0 0

To show counters info
p <pipe_id> entry dbg 3 3 0

To show physical port statistics
p <pipe_id> entry dbg 6 0 0

To show SWQ number stats
p <pipe_id> entry dbg 6 1 <SWQ number>

For code instrumentation
p <pipe_id> entry dbg 7 0 0

Displays CGNAPT version
p <pipe_id> entry ver 1 0

To enable ipv6 traffic.
p <pipe_id> entry dbg 11 1 0

To disable ipv6 traffic.
p <pipe_id> entry dbg 11 0 0

To add Network Specific Preifx and depth in prefix table
p <pipe_id> nsp add <nsp_prefix/depth>

To delete Network Specific Preifx and depth in prefix table
p <pipe_id> nsp del <nsp_prefix/depth>

To show nsp prefix/depth configured/added in prefix table.
p <pipe_id> entry dbg 13 0 0

To show number of clients per public IP address
p <pipe_id> entry dbg 14 0 0

To show list of public IP addresses
p <pipe_id> entry dbg 15 0 0

To show number of clients per public IP address
p <pipe_id> numipcli

Enable dual stack.
p <pipe_id> entry dbg 11 1 0
9. Glossary¶
- API
- Application Programming Interface
- BNG
- Broadband Network Gateway
- DPDK
- Data Plane Development Kit
- DPI
- Deep Packet Inspection
- NFVI
- Network Function Virtualization Infrastructure
- NIC
- Network Interface Controller
- PROX
- Packet pROcessing eXecution engine
- SR-IOV
- Single Root IO Virtualization
- SUT
- System Under Test
- ToS
- Type of Service
- TRex
- Realistic traffic generator
- vACL
- Virtual Access Control List
- vCGNAPT
- Virtual Carrier Grade Network Address and port Translation
- vFW
- Virtual Firewall
- VM
- Virtual Machine
- VNF
- Virtual Network Function
- VNFC
- Virtual Network Function Component
10. References¶
10.1. OPNFV¶
- Yardstick wiki: https://wiki.opnfv.org/yardstick
- SampleVNF wiki: https://wiki.opnfv.org/samplevnf
10.2. References used in Test Cases¶
- TRex: https://trex-tgn.cisco.com/
- DPDKpktgen: https://github.com/Pktgen/Pktgen-DPDK/
- DPDK: http://dpdk.org
- DPDK supported NICs: http://dpdk.org/doc/nics
- fdisk: http://www.tldp.org/HOWTO/Partition/fdisk_partitioning.html
- fio: http://www.bluestop.org/fio/HOWTO.txt
- free: http://manpages.ubuntu.com/manpages/trusty/en/man1/free.1.html
- iperf3: https://iperf.fr/
- Lmbench man-pages: http://manpages.ubuntu.com/manpages/trusty/lat_mem_rd.8.html
- Memory bandwidth man-pages: http://manpages.ubuntu.com/manpages/trusty/bw_mem.8.html
- mpstat man-pages: http://manpages.ubuntu.com/manpages/trusty/man1/mpstat.1.html
- pktgen: https://www.kernel.org/doc/Documentation/networking/pktgen.txt
- RAMspeed: http://alasir.com/software/ramspeed/
- SR-IOV: https://wiki.openstack.org/wiki/SR-IOV-Passthrough-For-Networking
- Storperf: https://wiki.opnfv.org/display/storperf/Storperf
- unixbench: https://github.com/kdlucas/byte-unixbench/blob/master/UnixBench