OPNFV Documentation
Open Platform for NFV (OPNFV) facilitates the development and evolution of NFV components across various open source ecosystems. Through system level integration, deployment and testing, OPNFV creates a reference NFV platform to accelerate the transformation of enterprise and service provider networks. Participation is open to anyone, whether you are an employee of a member company or just passionate about network transformation.
Installation
Abstract
This an overview document for the installation of the Iruya release of OPNFV.
The Iruya release can be installed making use of one of the installer projects in OPNFV: Airship or Fuel. Each installer provides the ability to install a common OPNFV platform as well as integrating additional features delivered through a variety of scenarios by the OPNFV community.
Introduction
The OPNFV platform is comprised of a variety of upstream components that may be deployed on your infrastructure. A composition of components, tools and configurations is identified in OPNFV as a deployment scenario.
The various OPNFV scenarios provide unique features and capabilities that you may want to leverage, and it is important to understand your required target platform capabilities before installing and configuring your scenarios.
An OPNFV installation requires either a physical infrastructure environment as defined in the Pharos specification, or a virtual one. When configuring a physical infrastructure it is strongly advised to follow the Pharos configuration guidelines.
Scenarios
OPNFV scenarios are designed to host virtualised network functions (VNF’s) in a variety of deployment architectures and locations. Each scenario provides specific capabilities and/or components aimed at solving specific problems for the deployment of VNF’s.
A scenario may, for instance, include components such as OpenStack, OpenDaylight, OVS, KVM etc., where each scenario will include different source components or configurations.
To learn more about the scenarios supported in the Iruya release refer to the scenario description documents provided:
Installation Procedure
Detailed step by step instructions for working with an installation toolchain and installing the required scenario is provided by the installation projects. The projects providing installation support for the OPNFV Iruya release are: Airship and Fuel.
The instructions for each toolchain can be found in these links:
OPNFV Test Frameworks
If you have elected to install the OPNFV platform using the deployment toolchain provided by OPNFV, your system will have been validated once the installation is completed. The basic deployment validation only addresses a small part of capabilities in the platform and you may want to execute more exhaustive tests. Some investigation will be required to select the right test suites to run on your platform.
Many of the OPNFV test project provide user-guide documentation and installation instructions in this document
User Guide & Configuration Guide
Abstract
OPNFV is a collaborative project aimed at providing a variety of virtualisation deployments intended to host applications serving the networking and carrier industries. This document provides guidance and instructions for using platform features designed to support these applications that are made available in the OPNFV Iruya release.
This document is not intended to replace or replicate documentation from other upstream open source projects such as KVM, OpenDaylight, OpenStack, etc., but to highlight the features and capabilities delivered through the OPNFV project.
Introduction
OPNFV provides a suite of scenarios, infrastructure deployment options, which are able to be installed to host virtualised network functions (VNFs). This document intends to help users of the platform leverage the features and capabilities delivered by OPNFV.
OPNFVs’ Continuous Integration builds, deploys and tests combinations of virtual infrastructure components in what are defined as scenarios. A scenario may include components such as KVM, OpenDaylight, OpenStack, OVS, etc., where each scenario will include different source components or configurations. Scenarios are designed to enable specific features and capabilities in the platform that can be leveraged by the OPNFV user community.
Feature Overview
The following links outline the feature deliverables from participating OPNFV projects in the Iruya release. Each of the participating projects provides detailed descriptions about the delivered features including use cases, implementation, and configuration specifics.
The following Configuration Guides and User Guides assume that the reader already has some knowledge about a given project’s specifics and deliverables. These Guides are intended to be used following the installation with an OPNFV installer to allow users to deploy and implement feature delivered by OPNFV.
If you are unsure about the specifics of a given project, please refer to the OPNFV wiki page at http://wiki.opnfv.org for more details.
Feature Configuration Guides
Feature User Guides
Release Notes
Release notes as provided by participating projects in OPNFV are captured in this section. These include details of software versions used, known limitations, and outstanding trouble reports.
Testing Frameworks
Testing User Guides
This page provides the links to the installation, configuration and user guides of the different test projects.
Dovetail / OPNFV Verified Program
- OVP releases on a separate schedule from the rest of OPNFV. You may find the current status and latest documentation for OVP at http://verified.opnfv.org.
Testing Developer Guides
Testing group
Test Framework Overview
Testing developer guide
The OPNFV testing ecosystem is wide.
The goal of this guide consists in providing some guidelines for new developers involved in test areas.
For the description of the ecosystem, see [DEV1].
There are several ways to join test projects as a developer. In fact you may:
- Develop new test cases
- Develop frameworks
- Develop tooling (reporting, dashboards, graphs, middleware,...)
- Troubleshoot results
- Post-process results
These different tasks may be done within a specific project or as a shared resource accross the different projects.
If you develop new test cases, the best practice is to contribute upstream as much as possible. You may contact the testing group to know which project - in OPNFV or upstream - would be the best place to host the test cases. Such contributions are usually directly connected to a specific project, more details can be found in the user guides of the testing projects.
Each OPNFV testing project provides test cases and the framework to manage them. As a developer, you can obviously contribute to them. The developer guide of the testing projects shall indicate the procedure to follow.
Tooling may be specific to a project or generic to all the projects. For specific tooling, please report to the test project user guide. The tooling used by several test projects will be detailed in this document.
The best event to meet the testing community is probably the plugfest. Such an event is organized after each release. Most of the test projects are present.
The summit is also a good opportunity to meet most of the actors [DEV4].
The testing group is a self organized working group. The OPNFV projects dealing with testing are invited to participate in order to elaborate and consolidate a consistant test strategy (test case definition, scope of projects, resources for long duration, documentation, ...) and align tooling or best practices.
A weekly meeting is organized, the agenda may be amended by any participant. 2 slots have been defined (US/Europe and APAC). Agendas and minutes are public. See [DEV3] for details. The testing group IRC channel is #opnfv-testperf
All the test projects do not have the same maturity and/or number of contributors. The nature of the test projects may be also different. The following best practices may not be acurate for all the projects and are only indicative. Contact the testing group for further details.
Most of the projects have a similar structure, which can be defined as follows:
`-- home
  |-- requirements.txt
  |-- setup.py
  |-- tox.ini
  |
  |-- <project>
  |       |-- <api>
  |       |-- <framework>
  |       `-- <test cases>
  |
  |-- docker
  |     |-- Dockerfile
  |     `-- Dockerfile.aarch64.patch
  |-- <unit tests>
  `- docs
     |-- release
     |   |-- release-notes
     |   `-- results
     `-- testing
         |-- developer
         |     `-- devguide
         |-- user
               `-- userguide
Test projects are installing tools and triggering tests. When it is possible it is recommended to implement an API in order to perform the different actions.
Each test project should be able to expose and consume APIs from other test projects. This pseudo micro service approach should allow a flexible use of the different projects and reduce the risk of overlapping. In fact if project A provides an API to deploy a traffic generator, it is better to reuse it rather than implementing a new way to deploy it. This approach has not been implemented yet but the prerequisites consiting in exposing and API has already been done by several test projects.
Most of the test projects provide a docker as deliverable. Once connected, it is possible to prepare the environement and run tests through a CLI.
Dockerization has been introduced in Brahmaputra and adopted by most of the test projects. Docker containers are pulled on the jumphost of OPNFV POD. <TODO Jose/Mark/Alec>
It is recommended to control the quality of the code of the testing projects, and more precisely to implement some verifications before any merge:
- pep8
- pylint
- unit tests (python 2.7)
- unit tests (python 3.5)
The code of the test project must be covered by unit tests. The coverage shall be reasonable and not decrease when adding new features to the framework. The use of tox is recommended. It is possible to implement strict rules (no decrease of pylint score, unit test coverages) on critical python classes.
Several test projects integrate third party tooling for code quality check and/or traffic generation. Some of the tools can be listed as follows:
| Project | Tool | Comments |
|---|---|---|
| Bottlenecks | TODO | |
| Functest | Tempest Rally Refstack RobotFramework | OpenStack test tooling OpenStack test tooling OpenStack test tooling Used for ODL tests |
| QTIP | Unixbench RAMSpeed nDPI openSSL inxi | |
| Storperf | TODO | |
| VSPERF | TODO | |
| Yardstick | Moongen Trex Pktgen IxLoad, IxNet SPEC Unixbench RAMSpeed LMBench Iperf3 Netperf Pktgen-DPDK Testpmd L2fwd Fio Bonnie++ | Traffic generator Traffic generator Traffic generator Traffic generator Compute Compute Compute Compute Network Network Network Network Network Storage Storage |
The testing group defined several categories also known as tiers. These categories can be used to group test suites.
| Category | Description |
|---|---|
| Healthcheck | Simple and quick healthcheck tests case |
| Smoke | Set of smoke test cases/suites to validate the release |
| Features | Test cases that validate a specific feature on top of OPNFV. Those come from Feature projects and need a bit of support for integration |
| Components | Tests on a specific component (e.g. OpenStack, OVS, DPDK,..) It may extend smoke tests |
| Performance | Performance qualification |
| VNF | Test cases related to deploy an open source VNF including an orchestrator |
| Stress | Stress and robustness tests |
| In Service | In service testing |
The domains deal with the technical scope of the tests. It shall correspond to domains defined for the certification program:
- compute
- network
- storage
- hypervisor
- container
- vim
- mano
- vnf
- ...
One of the goals of the testing working group is to identify the poorly covered areas and avoid testing overlap. Ideally based on the declaration of the test cases, through the tags, domains and tier fields, it shall be possible to create heuristic maps.
Resiliency of NFV refers to the ability of the NFV framework to limit disruption and return to normal or at a minimum acceptable service delivery level in the face of a fault, failure, or an event that disrupts the normal operation [DEV5].
Reliability testing evaluates the ability of SUT to recover in face of fault, failure or disrupts in normal operation or simply the ability of SUT absorbing “disruptions”.
Reliability tests use different forms of faults as stimulus, and the test must measure the reaction in terms of the outage time or impairments to transmission.
Stress testing involves producing excess load as stimulus, and the test must measure the reaction in terms of unexpected outages or (more likely) impairments to transmission.
These kinds of “load” will cause “disruption” which could be easily found in system logs. It is the purpose to raise such “load” to evaluate the SUT if it could provide an acceptable level of service or level of confidence during such circumstances. In Danube and Euphrates, we only considered the stress test with excess load over OPNFV Platform.
In Danube, Bottlenecks and Yardstick project jointly implemented 2 stress tests (concurrently create/destroy VM pairs and do ping, system throughput limit) while Bottlenecks acts as the load manager calling yardstick to execute each test iteration. These tests are designed to test for breaking points and provide level of confidence of the system to users. Summary of the test cases are listed in the following addresses:
Stress test cases for OPNFV Euphrates (OS Ocata) release can be seen as extension/enhancement of those in D release. These tests are located in Bottlenecks/Yardstick repo (Bottlenecks as load manager while Yardstick execute each test iteration):
- VNF scale out/up tests (also plan to measure storage usage simultaneously): https://wiki.opnfv.org/pages/viewpage.action?pageId=12390101
- Life-cycle event with throughputs (measure NFVI to support concurrent network usage from different VM pairs): https://wiki.opnfv.org/display/DEV/Intern+Project%3A+Baseline+Stress+Test+Case+for+Bottlenecks+E+Release
In OPNFV E release, we also plan to do long duration testing over OS Ocata. A separate CI pipe testing OPNFV XCI (OSA) is proposed to accomplish the job. We have applied specific pod for the testing. Proposals and details are listed below:
- https://wiki.opnfv.org/display/testing/Euphrates+Testing+needs
- https://wiki.opnfv.org/download/attachments/2926539/testing%20evolution%20v1_4.pptx?version=1&modificationDate=1503937629000&api=v2
- https://wiki.opnfv.org/download/attachments/2926539/Testing%20over%20Long%20Duration%20POD.pptx?version=2&modificationDate=1502943821000&api=v2
The long duration testing is supposed to be started when OPNFV E release is published. A simple monitoring module for these tests is also planned to be added: https://wiki.opnfv.org/display/DEV/Intern+Project%3A+Monitoring+Stress+Testing+for+Bottlenecks+E+Release
On http://docs.opnfv.org! A section is dedicated to the testing projects. You will find the overview of the ecosystem and the links to the project documents.
Another source is the testing wiki on https://wiki.opnfv.org/display/testing
You may also contact the testing group on the IRC channel #opnfv-testperf or by mail at test-wg AT lists.opnfv.org (testing group) or opnfv-tech-discuss AT lists.opnfv.org (generic technical discussions).
As any project, the best solution is to contact the project. The project members with their email address can be found under https://git.opnfv.org/<project>/tree/INFO
You may also send a mail to the testing mailing list or use the IRC channel #opnfv-testperf
You should discuss this topic with the project you are working with. If you need access to an OPNFV community POD, it is possible to contact the infrastructure group. Depending on your needs (scenario/installer/tooling), it should be possible to find free time slots on one OPNFV community POD from the Pharos federation. Create a JIRA ticket to describe your needs on https://jira.opnfv.org/projects/INFRA. You must already be an OPNFV contributor. See https://wiki.opnfv.org/display/DEV/Developer+Getting+Started.
Please note that lots of projects have their own “how to contribute” or “get started” page on the OPNFV wiki.
It shall be discussed directly with the project you are working with. It is done through jenkins jobs calling testing project files but the way to onboard cases differ from one project to another.
If you have access to the test API swagger (access granted to contributors), you may use the swagger interface of the test API to declare your project. The URL is http://testresults.opnfv.org/test/swagger/spec.html.

Click on Spec, the list of available methods must be displayed.
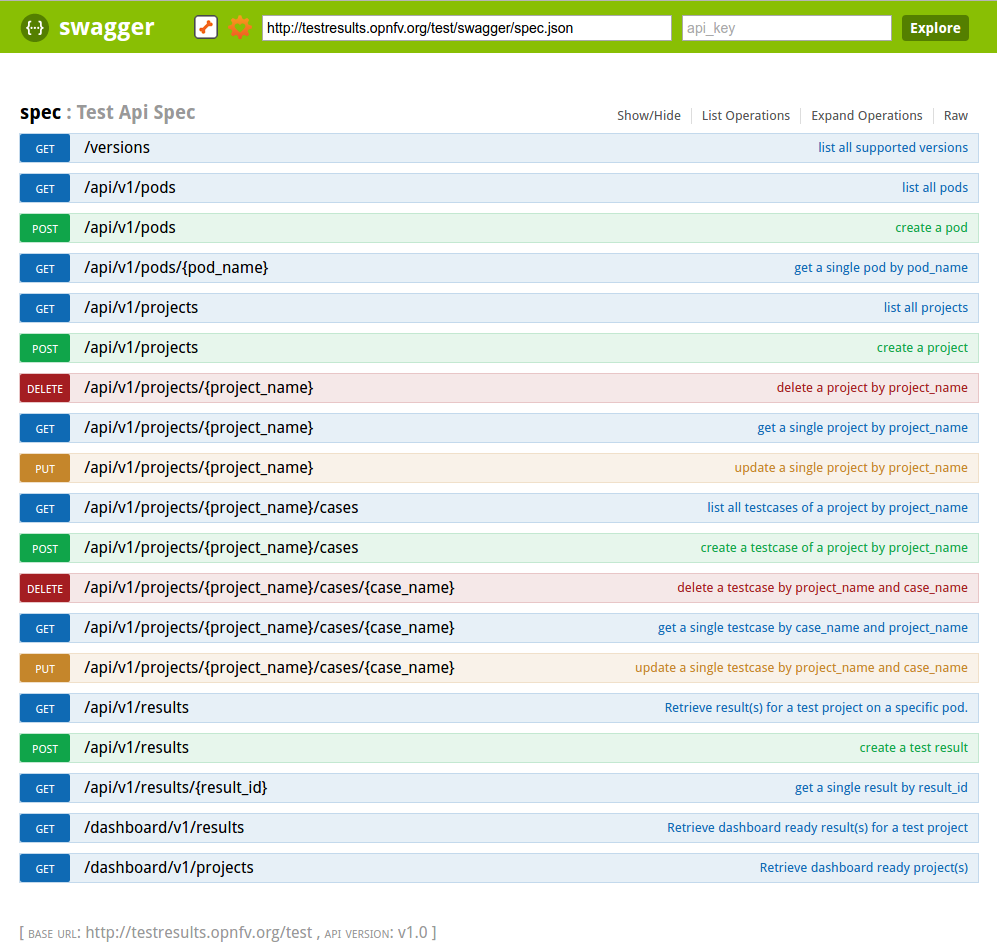
For the declaration of a new project use the POST /api/v1/projects method.
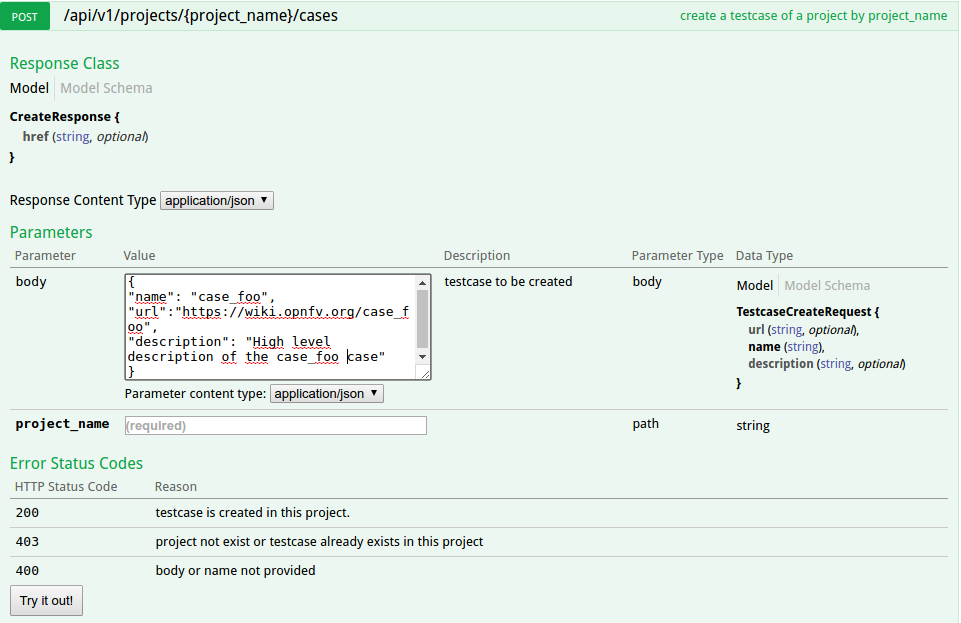
For the declaration of new test cases in an existing project, use the POST /api/v1/projects/{project_name}/cases method
The test database is used to collect test results. By default it is enabled only for CI tests from Production CI pods.
Please note that it is possible to create your own local database.
A dedicated database is for instance created for each plugfest.
The architecture and associated API is described in previous chapter. If you want to push your results from CI, you just have to call the API at the end of your script.
You can also reuse a python function defined in functest_utils.py [DEV2]
The Test API is now documented in this document (see sections above). You may also find autogenerated documentation in http://artifacts.opnfv.org/releng/docs/testapi.html A web protal is also under construction for certification at http://testresults.opnfv.org/test/#/
See table above.
The main ambiguity could be between features and VNF. In fact sometimes you have to spawn VMs to demonstrate the capabilities of the feature you introduced. We recommend to declare your test in the feature category.
VNF category is really dedicated to test including:
- creation of resources
- deployement of an orchestrator/VNFM
- deployment of the VNF
- test of the VNFM
- free resources
The goal is not to study a particular feature on the infrastructure but to have a whole end to end test of a VNF automatically deployed in CI. Moreover VNF are run in weekly jobs (one a week), feature tests are in daily jobs and use to get a scenario score.
Logs and configuration files can be pushed to artifact server from the CI under http://artifacts.opnfv.org/<project name>
Bottlenecks
Dovetail / OPNFV Verified Program
- OVP releases on a separate schedule from the rest of OPNFV. You may find the current status and latest documentation for OVP at http://verified.opnfv.org.
Functest
StorPerf
VSPERF
Yardstick
Infrastructure
Infrastructure Overview
OPNFV develops, operates, and maintains infrastructure which is used by the OPNFV Community for development, integration, and testing purposes. OPNFV Infrastructure Working Group (Infra WG) oversees the OPNFV Infrastructure, ensures it is kept in a state which serves the community in best possible way and always up to date.
Infra WG is working towards a model whereby we have a seamless pipeline for handing resource requests from the OPNFV community for both development and Continuous Integration perspectives. Automation of requests and integration to existing automation tools is a primary driver in reaching this model. In the Infra WG, we imagine a model where the Infrastructure Requirements that are specified by a Feature, Installer or otherrelevant projects within OPNFV are requested, provisioned, used, reported on and subsequently torn down with no (or minimal) user intervention at the physical/infrastructure level.
Objectives of the Infra WG are
- Deliver efficiently dimensions resources to OPNFV community needs on request in a timely manner that ensure maximum usage (capacity) and maximum density (distribution of workloads)
- Satisfy the needs of the twice-yearly release projects, this includes being able to handle load (amount of projects and requests) as well as need (topology and different layouts)
- Support OPNFV community users. As the INFRA group, we are integral to all aspects of the OPNFV Community (since it starts with the Hardware) - this can mean troubleshooting any element within the stack
- Provide a method to expand and adapt as OPNFV community needs grow and provide this to Hosting Providers (lab providers) for input in growth forecast so they can better judge how best to contribute with their resources.
- Work with reporting and other groups to ensure we have adequate feedback to the end-users of the labs on how their systems, code, feature performs.
The details of what is provided as part of the infrastructure can be seen in following chapters.
Hardware Infrastructure
TBD
Software Infrastructure
Continuous Integration - CI
Please see the details of CI from the chapters below.
Cross Community Continuous Integration - XCI
Please see the details of XCI from the chapters below.
Developer Guide
Documentation Guide
Documentation Guide
This page intends to cover the documentation handling for OPNFV. OPNFV projects are expected to create a variety of document types.
Getting Started with Documentation for Your Project
OPNFV documentation is automated and integrated into our git & gerrit toolchains.
We use RST document templates in our repositories and automatically render to HTML and PDF versions of the documents in our artifact store.
The LFN documenatation guide explains how to enable your documenation build.
Licencing your documentation
All contributions to the OPNFV project are done in accordance with the OPNFV licensing requirements. Documentation in OPNFV is contributed in accordance with the Creative Commons 4.0 and the SPDX licence. All documentation files need to be licensed using the text below. The license may be applied in the first lines of all contributed RST files:
.. This work is licensed under a Creative Commons Attribution 4.0 International License.
.. SPDX-License-Identifier: CC-BY-4.0
.. (c) <optionally add copywriters name>

These lines will not be rendered in the html and pdf files.
How and where to store the document content files in your repository
All documentation for your project should be structured and stored in the <repo>/docs/ directory. The documentation toolchain will
look in these directories and be triggered on events in these directories when generating documents.
Document structure and contribution
A general structure is proposed for storing and handling documents that are common across many projects but also for documents that may be
project specific. The documentation is divided into three areas Release, Testing and Infrastructure. Templates for these areas can be found
under opnfvdocs/docs/templates/.
Project teams are encouraged to use templates provided by the opnfvdocs project to ensure that there is consistency across the community. Following representation shows the expected structure:
docs/
├── release
│   ├── installation
│   ├── user and configuration guide
│   └── release notes
├── testing
│   ├── user guide
│   ├── developer guide
├── infrastructure
│   ├── infrastructure overview
│   ├── continuous integration (CI)
│   ├── cross community continuous integration (XCI)
Release documentation
Release documentation is the set of documents that are published for each OPNFV release. These documents are created and developed following the OPNFV release process and milestones and should reflect the content of the OPNFV release.
Installation Instruction: <repo>/docs/release/installation
- This document is shall describe how to get started and install OPNFV’
User Guide: <repo>/docs/release/userguide
- This document shall describe the usage of a OPNFV component’
Configuration Guide: <repo>/docs/release/configguide
- Brief introduction to configure a OPNFV component’
Release Notes: <repo>/docs/release/release-notes
- Applicable for all projects participating in a release’
Testing documentation
Documentation created by test projects can be stored under two different sub directories /user or /developemnt. Release notes will be stored under <repo>/docs/release/release-notes
User documentation: <repo>/testing/user/
Will collect the documentation of the test projects allowing the end user to perform testing towards a OPNFV SUT
e.g. Functest/Yardstick/Vsperf/Storperf/Bottlenecks/Qtip installation/config & user guides.
Development documentation: <repo>/testing/developent/
Will collect documentation to explain how to create your own test case and leverage existing testing frameworks e.g. developer guides.
Infrastructure Documentation
Infrastructure documentation can be stored under <repo>/docs/ folder of
corresponding infrastructure project.
Including your Documentation
In your project repository
Add your documentation to your repository in the folder structure and according to the templates listed above. The documentation templates you will require are available in opnfvdocs/docs/templates/ repository, you should copy the relevant templates to your <repo>/docs/ directory in your repository. For instance if you want to document userguide, then your steps shall be as follows:
git clone ssh://<your_id>@gerrit.opnfv.org:29418/opnfvdocs.git
cp -p opnfvdocs/docs/userguide/* <my_repo>/docs/userguide/
You should then add the relevant information to the template that will explain the documentation. When you are done writing, you can commit the documentation to the project repository.
git add .
git commit --signoff --all
git review
In OPNFVDocs Composite Documentation
To include your project specific documentation in the composite documentation, first identify where your project documentation should be included. Say your project userguide should figure in the ‘OPNFV Userguide’, then:
vim opnfvdocs/docs/release/userguide.introduction.rst
This opens the text editor. Identify where you want to add the userguide. If the userguide is to be added to the toctree, simply include the path to it, example:
.. toctree::
    :maxdepth: 1

 submodules/functest/docs/userguide/index
 submodules/bottlenecks/docs/userguide/index
 submodules/yardstick/docs/userguide/index
 <submodules/path-to-your-file>
As Hyperlink
It’s pretty common to want to reference another location in the OPNFV documentation and it’s pretty easy to do with reStructuredText. This is a quick primer, more information is in the Sphinx section on Cross-referencing arbitrary locations.
Within a single document, you can reference another section simply by:
This is a reference to `The title of a section`_
Assuming that somewhere else in the same file there a is a section title something like:
The title of a section
^^^^^^^^^^^^^^^^^^^^^^
It’s typically better to use :ref: syntax and labels to provide
links as they work across files and are resilient to sections being
renamed. First, you need to create a label something like:
.. _a-label:

The title of a section
^^^^^^^^^^^^^^^^^^^^^^
Note
The underscore (_) before the label is required.
Then you can reference the section anywhere by simply doing:
This is a reference to :ref:`a-label`
or:
This is a reference to :ref:`a section I really liked <a-label>`
Note
When using :ref:-style links, you don’t need a trailing
underscore (_).
Because the labels have to be unique, it usually makes sense to prefix
the labels with the project name to help share the label space, e.g.,
sfc-user-guide instead of just user-guide.
Once you have made these changes you need to push the patch back to the opnfvdocs team for review and integration.
git add .
git commit --signoff --all
git review
Be sure to add the project leader of the opnfvdocs project as a reviewer of the change you just pushed in gerrit.
‘doc8’ Validation
It is recommended that all rst content is validated by doc8 standards. To validate your rst files using doc8, install doc8.
sudo pip install doc8
doc8 can now be used to check the rst files. Execute as,
doc8 --ignore D000,D001 <file>
Testing: Build Documentation Locally
Composite OPNFVDOCS documentation
To build whole documentation under opnfvdocs/, follow these steps:
Install virtual environment.
sudo pip install virtualenv
cd /local/repo/path/to/project
Download the OPNFVDOCS repository.
git clone https://gerrit.opnfv.org/gerrit/opnfvdocs
Change directory to opnfvdocs & install requirements.
cd opnfvdocs
sudo pip install -r etc/requirements.txt
Update submodules, build documentation using tox & then open using any browser.
cd opnfvdocs
git submodule update --init
tox -edocs
firefox docs/_build/html/index.html
Note
Make sure to run tox -edocs and not just tox.
Individual project documentation
To test how the documentation renders in HTML, follow these steps:
Install virtual environment.
sudo pip install virtualenv
cd /local/repo/path/to/project
Download the opnfvdocs repository.
git clone https://gerrit.opnfv.org/gerrit/opnfvdocs
Change directory to opnfvdocs & install requirements.
cd opnfvdocs
sudo pip install -r etc/requirements.txt
Move the conf.py file to your project folder where RST files have been kept:
mv opnfvdocs/docs/conf.py <path-to-your-folder>/
Move the static files to your project folder:
mv opnfvdocs/_static/ <path-to-your-folder>/
Build the documentation from within your project folder:
sphinx-build -b html <path-to-your-folder> <path-to-output-folder>
Your documentation shall be built as HTML inside the specified output folder directory.
Note
Be sure to remove the conf.py, the static/ files and the output folder from the <project>/docs/. This is for testing only. Only commit the rst files and related content.
Addendum
Index File
The index file must relatively refence your other rst files in that directory.
Here is an example index.rst :
*******************
Documentation Title
*******************

.. toctree::
   :numbered:
   :maxdepth: 2

   documentation-example
Source Files
Document source files have to be written in reStructuredText format (rst). Each file would be build as an html page.
Here is an example source rst file :
=============
Chapter Title
=============

Section Title
=============

Subsection Title
----------------

Hello!
Writing RST Markdown
See http://sphinx-doc.org/rest.html .
Hint: You can add dedicated contents by using ‘only’ directive with build type (‘html’ and ‘singlehtml’) for OPNFV document. But, this is not encouraged to use since this may make different views.
.. only:: html
    This line will be shown only in html version.
Verify Job
The verify job name is docs-verify-rtd-{branch}.
When you send document changes to gerrit, jenkins will create your documents in HTML formats (normal and single-page) to verify that new document can be built successfully. Please check the jenkins log and artifact carefully. You can improve your document even though if the build job succeeded.
Merge Job
The merge job name is docs-merge-rtd-{branch}.
Once the patch is merged, jenkins will automatically trigger building of the new documentation. This might take about 15 minutes while readthedocs builds the documentatation. The newly built documentation shall show up as appropriate placed in docs.opnfv.org/{branch}/path-to-file.
Found a typo or any other feedback? Send an email to users@opnfv.org or talk to us on IRC.