Open Platform for NFV (OPNFV) facilitates the development and evolution of NFV components across various open source ecosystems. Through system level integration, deployment and testing, OPNFV creates a reference NFV platform to accelerate the transformation of enterprise and service provider networks. Participation is open to anyone, whether you are an employee of a member company or just passionate about network transformation.
Network Functions Virtualization (NFV) is transforming the networking industry via software-defined infrastructures and open source is the proven method for quickly developing software for commercial products and services that can move markets. Open Platform for NFV (OPNFV) facilitates the development and evolution of NFV components across various open source ecosystems. Through system level integration, deployment and testing, OPNFV constructs a reference NFV platform to accelerate the transformation of enterprise and service provider networks. As an open source project, OPNFV is uniquely positioned to bring together the work of standards bodies, open source communities, service providers and commercial suppliers to deliver a de facto NFV platform for the industry.
By integrating components from upstream projects, the community is able to conduct performance and use case-based testing on a variety of solutions to ensure the platform’s suitability for NFV use cases. OPNFV also works upstream with other open source communities to bring contributions and learnings from its work directly to those communities in the form of blueprints, patches, bugs, and new code.
OPNFV focuses on building NFV Infrastructure (NFVI) and Virtualised Infrastructure Management (VIM) by integrating components from upstream projects such as OpenDaylight, ONOS, Tungsen Fabric, OVN, OpenStack, Kubernetes, Ceph Storage, KVM, Open vSwitch, and Linux. More recently, OPNFV has extended its portfolio of forwarding solutions to include DPDK, fd.io and ODP, is able to run on both Intel and ARM commercial and white-box hardware, support VM, Container and BareMetal workloads, and includes Management and Network Orchestration MANO components primarily for application composition and management in the Fraser release.
These capabilities, along with application programmable interfaces (APIs) to other NFV elements, form the basic infrastructure required for Virtualized Network Functions (VNF) and MANO components.
Concentrating on these components while also considering proposed projects on additional topics (such as the MANO components and applications themselves), OPNFV aims to enhance NFV services by increasing performance and power efficiency improving reliability, availability and serviceability, and delivering comprehensive platform instrumentation.
The OPNFV project addresses a number of aspects in the development of a consistent virtualisation platform including common hardware requirements, software architecture, MANO and applications.
OPNFV Platform Overview Diagram
To address these areas effectively, the OPNFV platform architecture can be decomposed into the following basic building blocks:
The infrastructure working group oversees such topics as lab management, workflow, definitions, metrics and tools for OPNFV infrastructure.
Fundamental to the WG is the Pharos Specification which provides a set of defined lab infrastructures over a geographically and technically diverse federated global OPNFV lab.
Labs may instantiate bare-metal and virtual environments that are accessed remotely by the community and used for OPNFV platform and feature development, build, deploy and testing. No two labs are the same and the heterogeneity of the Pharos environment provides the ideal platform for establishing hardware and software abstractions providing well understood performance characteristics.
Community labs are hosted by OPNFV member companies on a voluntary basis. The Linux Foundation also hosts an OPNFV lab that provides centralized CI and other production resources which are linked to community labs.
The Lab-as-a-service (LaaS) offering provides developers to readily access NFV infrastructure on demand. Ongoing lab capabilities will include the ability easily automate deploy and test of any OPNFV install scenario in any lab environment using a concept called “Dynamic CI”.
The OPNFV software platform is comprised exclusively of open source implementations of platform component pieces. OPNFV is able to draw from the rich ecosystem of NFV related technologies available in open source communities, and then integrate, test, measure and improve these components in conjunction with our upstream communities.
OPNFV derives it’s virtual infrastructure management from one of our largest upstream ecosystems OpenStack. OpenStack provides a complete reference cloud management system and associated technologies. While the OpenStack community sustains a broad set of projects, not all technologies are relevant in the NFV domain, the OPNFV community consumes a sub-set of OpenStack projects and the usage and composition may vary depending on the installer and scenario.
For details on the scenarios available in OPNFV and the specific composition of components refer to the OPNFV User Guide & Configuration Guide.
OPNFV now also has initial support for containerized VNFs.
OPNFV currently uses Linux on all target machines, this can include Ubuntu, Centos or SUSE Linux. The specific version of Linux used for any deployment is documented in the installation guide.
OPNFV, as an NFV focused project, has a significant investment on networking technologies and provides a broad variety of integrated open source reference solutions. The diversity of controllers able to be used in OPNFV is supported by a similarly diverse set of forwarding technologies.
There are many SDN controllers available today relevant to virtual environments where the OPNFV community supports and contributes to a number of these. The controllers being worked on by the community during this release of OPNFV include:
OPNFV extends Linux virtual networking capabilities by using virtual switching and routing components. The OPNFV community proactively engages with the following open source communities to address performance, scale and resiliency needs apparent in carrier networks.
OPNFV integrates open source MANO projects for NFV orchestration and VNF management. New MANO projects are constantly being added.
A typical OPNFV deployment starts with three controller nodes running in a high availability configuration including control plane components from OpenStack, SDN controllers, etc. and a minimum of two compute nodes for deployment of workloads (VNFs). A detailed description of the hardware requirements required to support the 5 node configuration can be found in pharos specification: Pharos Project
In addition to the deployment on a highly available physical infrastructure, OPNFV can be deployed for development and lab purposes in a virtual environment. In this case each of the hosts is provided by a virtual machine and allows control and workload placement using nested virtualization.
The initial deployment is done using a staging server, referred to as the “jumphost”. This server-either physical or virtual-is first installed with the installation program that then installs OpenStack and other components on the controller nodes and compute nodes. See the OPNFV User Guide & Configuration Guide for more details.
The OPNFV community has set out to address the needs of virtualization in the carrier network and as such platform validation and measurements are a cornerstone to the iterative releases and objectives.
To simplify the complex task of feature, component and platform validation and characterization the testing community has established a fully automated method for addressing all key areas of platform validation. This required the integration of a variety of testing frameworks in our CI systems, real time and automated analysis of results, storage and publication of key facts for each run as shown in the following diagram.

The OPNFV community relies on its testing community to establish release criteria for each OPNFV release. With each release cycle the testing criteria become more stringent and better representative of our feature and resiliency requirements. Each release establishes a set of deployment scenarios to validate, the testing infrastructure and test suites need to accommodate these features and capabilities.
The release criteria as established by the testing teams include passing a set of test cases derived from the functional testing project ‘functest,’ a set of test cases derived from our platform system and performance test project ‘yardstick,’ and a selection of test cases for feature capabilities derived from other test projects such as bottlenecks, vsperf, cperf and storperf. The scenario needs to be able to be deployed, pass these tests, and be removed from the infrastructure iteratively in order to fulfill the release criteria.
Functest provides a functional testing framework incorporating a number of test suites and test cases that test and verify OPNFV platform functionality. The scope of Functest and relevant test cases can be found in the Functest User Guide
Functest provides both feature project and component test suite integration, leveraging OpenStack and SDN controllers testing frameworks to verify the key components of the OPNFV platform are running successfully.
Yardstick is a testing project for verifying the infrastructure compliance when running VNF applications. Yardstick benchmarks a number of characteristics and performance vectors on the infrastructure making it a valuable pre-deployment NFVI testing tools.
Yardstick provides a flexible testing framework for launching other OPNFV testing projects.
There are two types of test cases in Yardstick:
The OPNFV community is developing a set of test suites intended to evaluate a set of reference behaviors and capabilities for NFV systems developed externally from the OPNFV ecosystem to evaluate and measure their ability to provide the features and capabilities developed in the OPNFV ecosystem.
The Dovetail project will provide a test framework and methodology able to be used on any NFV platform, including an agreed set of test cases establishing an evaluation criteria for exercising an OPNFV compatible system. The Dovetail project has begun establishing the test framework and will provide a preliminary methodology for the Fraser release. Work will continue to develop these test cases to establish a stand alone compliance evaluation solution in future releases.
Besides the test suites and cases for release verification, additional testing is performed to validate specific features or characteristics of the OPNFV platform. These testing framework and test cases may include some specific needs; such as extended measurements, additional testing stimuli, or tests simulating environmental disturbances or failures.
These additional testing activities provide a more complete evaluation of the OPNFV platform. Some of the projects focused on these testing areas include:
Bottlenecks provides a framework to find system limitations and bottlenecks, providing root cause isolation capabilities to facilitate system evaluation.
NFVbench is a lightweight end-to-end dataplane benchmarking framework project. It includes traffic generator(s) and measures a number of packet performance related metrics.
QTIP boils down NFVI compute and storage performance into one single metric for easy comparison. QTIP crunches these numbers based on five different categories of compute metrics and relies on Storperf for storage metrics.
Storperf measures the performance of external block storage. The goal of this project is to provide a report based on SNIA’s (Storage Networking Industry Association) Performance Test Specification.
VSPERF provides an automated test-framework and comprehensive test suite for measuring data-plane performance of the NFVI including switching technology, physical and virtual network interfaces. The provided test cases with network topologies can be customized while also allowing individual versions of Operating System, vSwitch and hypervisor to be specified.
This an overview document for the installation of the Gambia release of OPNFV.
The Gambia release can be installed making use of any of the installer projects in OPNFV: Apex, Compass4Nfv or Fuel. Each installer provides the ability to install a common OPNFV platform as well as integrating additional features delivered through a variety of scenarios by the OPNFV community.
The OPNFV platform is comprised of a variety of upstream components that may be deployed on your infrastructure. A composition of components, tools and configurations is identified in OPNFV as a deployment scenario.
The various OPNFV scenarios provide unique features and capabilities that you may want to leverage, and it is important to understand your required target platform capabilities before installing and configuring your scenarios.
An OPNFV installation requires either a physical infrastructure environment as defined in the Pharos specification, or a virtual one. When configuring a physical infrastructure it is strongly advised to follow the Pharos configuration guidelines.
OPNFV scenarios are designed to host virtualised network functions (VNF’s) in a variety of deployment architectures and locations. Each scenario provides specific capabilities and/or components aimed at solving specific problems for the deployment of VNF’s.
A scenario may, for instance, include components such as OpenStack, OpenDaylight, OVS, KVM etc., where each scenario will include different source components or configurations.
To learn more about the scenarios supported in the Fraser release refer to the scenario description documents provided:
Detailed step by step instructions for working with an installation toolchain and installing the required scenario are provided by the installation projects. The projects providing installation support for the OPNFV Gambia release are: Apex, Compass4nfv and Fuel.
The instructions for each toolchain can be found in these links:
If you have elected to install the OPNFV platform using the deployment toolchain provided by OPNFV, your system will have been validated once the installation is completed. The basic deployment validation only addresses a small part of capabilities in the platform and you may want to execute more exhaustive tests. Some investigation will be required to select the right test suites to run on your platform.
Many of the OPNFV test project provide user-guide documentation and installation instructions in this document
OPNFV is a collaborative project aimed at providing a variety of virtualisation deployments intended to host applications serving the networking and carrier industries. This document provides guidance and instructions for using platform features designed to support these applications that are made available in the OPNFV Gambia release.
This document is not intended to replace or replicate documentation from other upstream open source projects such as KVM, OpenDaylight, OpenStack, etc., but to highlight the features and capabilities delivered through the OPNFV project.
OPNFV provides a suite of scenarios, infrastructure deployment options, which are able to be installed to host virtualised network functions (VNFs). This document intends to help users of the platform leverage the features and capabilities delivered by OPNFV.
OPNFVs’ Continuous Integration builds, deploys and tests combinations of virtual infrastructure components in what are defined as scenarios. A scenario may include components such as KVM, OpenDaylight, OpenStack, OVS, etc., where each scenario will include different source components or configurations. Scenarios are designed to enable specific features and capabilities in the platform that can be leveraged by the OPNFV user community.
The following links outline the feature deliverables from participating OPNFV projects in the Gambia release. Each of the participating projects provides detailed descriptions about the delivered features including use cases, implementation, and configuration specifics.
The following Configuration Guides and User Guides assume that the reader already has some knowledge about a given project’s specifics and deliverables. These Guides are intended to be used following the installation with an OPNFV installer to allow users to deploy and implement feature delivered by OPNFV.
If you are unsure about the specifics of a given project, please refer to the OPNFV wiki page at http://wiki.opnfv.org for more details.
Release notes as provided by participating projects in OPNFV are captured in this section. These include details of software versions used, known limitations, and outstanding trouble reports.
Bottlenecks Release Notes
Clover Release Notes
Compass4nfv Release Notes
Daisy4nfv Release Notes
FDS Release Notes
NFVBench Release Notes
Orchestra Release Notes
ONOSFW Release Notes
Promise Release Notes
SampleVNF Release Notes
StorPerf Release Notes
VSPERF Release Notes
Testing is one of the key activities in OPNFV and includes unit, feature, component, system level testing for development, automated deployment, performance characterization and stress testing.
Test projects are dedicated to provide frameworks, tooling and test-cases categorized as functional, performance or compliance testing. Test projects fulfill different roles such as verifying VIM functionality, benchmarking components and platforms or analysis of measured KPIs for OPNFV release scenarios.
Feature projects also provide their own test suites that either run independently or within a test project.
This document details the OPNFV testing ecosystem, describes common test components used by individual OPNFV projects and provides links to project specific documentation.
The OPNFV testing projects are represented in the following diagram:
The major testing projects are described in the table below:
| Project | Description |
|---|---|
| Bottlenecks | This project aims to find system bottlenecks by testing and verifying OPNFV infrastructure in a staging environment before committing it to a production environment. Instead of debugging a deployment in production environment, an automatic method for executing benchmarks which plans to validate the deployment during staging is adopted. This project forms a staging framework to find bottlenecks and to do analysis of the OPNFV infrastructure. |
| CPerf | SDN Controller benchmarks and performance testing, applicable to controllers in general. Collaboration of upstream controller testing experts, external test tool developers and the standards community. Primarily contribute to upstream/external tooling, then add jobs to run those tools on OPNFV’s infrastructure. |
| Dovetail | This project intends to define and provide a set of OPNFV related validation criteria/tests that will provide input for the OPNFV Complaince Verification Program. The Dovetail project is executed with the guidance and oversight of the Complaince and Certification (C&C) committee and work to secure the goals of the C&C committee for each release. The project intends to incrementally define qualification criteria that establish the foundations of how one is able to measure the ability to utilize the OPNFV platform, how the platform itself should behave, and how applications may be deployed on the platform. |
| Functest | This project deals with the functional testing of the VIM and NFVI. It leverages several upstream test suites (OpenStack, ODL, ONOS, etc.) and can be used by feature project to launch feature test suites in CI/CD. The project is used for scenario validation. |
| NFVbench | NFVbench is a compact and self contained data plane performance measurement tool for OpensStack based NFVi platforms. It is agnostic of the NFVi distribution, Neutron networking implementation and hardware. It runs on any Linux server with a DPDK compliant NIC connected to the NFVi platform data plane and bundles a highly efficient software traffic generator. Provides a fully automated measurement of most common packet paths at any level of scale and load using RFC-2544. Available as a Docker container with simple command line and REST interfaces. Easy to use as it takes care of most of the guesswork generally associated to data plane benchmarking. Can run in any lab or in production environments. |
| QTIP | QTIP as the project for “Platform Performance Benchmarking” in OPNFV aims to provide user a simple indicator for performance, supported by comprehensive testing data and transparent calculation formula. It provides a platform with common services for performance benchmarking which helps users to build indicators by themselves with ease. |
| StorPerf | The purpose of this project is to provide a tool to measure block and object storage performance in an NFVI. When complemented with a characterization of typical VF storage performance requirements, it can provide pass/fail thresholds for test, staging, and production NFVI environments. |
| VSPERF | VSPERF is an OPNFV project that provides an automated test-framework and comprehensive test suite based on Industry Test Specifications for measuring NFVI data-plane performance. The data-path includes switching technologies with physical and virtual network interfaces. The VSPERF architecture is switch and traffic generator agnostic and test cases can be easily customized. Software versions and configurations including the vSwitch (OVS or VPP) as well as the network topology are controlled by VSPERF (independent of OpenStack). VSPERF is used as a development tool for optimizing switching technologies, qualification of packet processing components and for pre-deployment evaluation of the NFV platform data-path. |
| Yardstick | The goal of the Project is to verify the infrastructure compliance when running VNF applications. NFV Use Cases described in ETSI GS NFV 001 show a large variety of applications, each defining specific requirements and complex configuration on the underlying infrastructure and test tools.The Yardstick concept decomposes typical VNF work-load performance metrics into a number of characteristics/performance vectors, which each of them can be represented by distinct test-cases. |
Any test project running in the global OPNFV lab infrastructure and is integrated with OPNFV CI can push test results to the community Test Database using a common Test API. This database can be used to track the evolution of testing and analyse test runs to compare results across installers, scenarios and between technically and geographically diverse hardware environments.
Results from the databse are used to generate a dashboard with the current test status for each testing project. Please note that you can also deploy the Test Database and Test API locally in your own environment.
The management of test results can be summarized as follows:
+-------------+    +-------------+    +-------------+
|             |    |             |    |             |
|   Test      |    |   Test      |    |   Test      |
| Project #1  |    | Project #2  |    | Project #N  |
|             |    |             |    |             |
+-------------+    +-------------+    +-------------+
         |               |               |
         V               V               V
     +---------------------------------------------+
     |                                             |
     |           Test Rest API front end           |
     |    http://testresults.opnfv.org/test        |
     |                                             |
     +---------------------------------------------+
         ^                |                     ^
         |                V                     |
         |     +-------------------------+      |
         |     |                         |      |
         |     |    Test Results DB      |      |
         |     |         Mongo DB        |      |
         |     |                         |      |
         |     +-------------------------+      |
         |                                      |
         |                                      |
   +----------------------+        +----------------------+
   |                      |        |                      |
   | Testing Dashboards   |        |  Test Landing page   |
   |                      |        |                      |
   +----------------------+        +----------------------+
A Mongo DB Database was introduced for the Brahmaputra release. The following collections are declared in this database:
- pods: the list of pods used for production CI
- projects: the list of projects providing test cases
- test cases: the test cases related to a given project
- results: the results of the test cases
- scenarios: the OPNFV scenarios tested in CI
This database can be used by any project through the Test API. Please note that projects may also use additional databases. The Test Database is mainly use to collect CI test results and generate scenario trust indicators. The Test Database is also cloned for OPNFV Plugfests in order to provide a private datastore only accessible to Plugfest participants.
The Test API is used to declare pods, projects, test cases and test results. Pods correspond to a cluster of machines (3 controller and 2 compute nodes in HA mode) used to run the tests and are defined in the Pharos project. The results pushed in the database are related to pods, projects and test cases. Trying to push results generated from a non-referenced pod will return an error message by the Test API.
For detailed information, please go to http://artifacts.opnfv.org/releng/docs/testapi.html
The code of the Test API is hosted in the releng-testresults repository [TST2]. The static documentation of the Test API can be found at [TST3]. The Test API has been dockerized and may be installed locally in your lab.
The deployment of the Test API has been automated. A jenkins job manages:
- the unit tests of the Test API
- the creation of a new docker file
- the deployment of the new Test API
- the archive of the old Test API
- the backup of the Mongo DB
PUT/DELETE/POST operations of the TestAPI now require token based authorization. The token needs to be added in the request using a header ‘X-Auth-Token’ for access to the database.
e.g:
headers['X-Auth-Token']
The value of the header i.e the token can be accessed in the jenkins environment variable TestApiToken. The token value is added as a masked password.
headers['X-Auth-Token'] = os.environ.get('TestApiToken')
The above example is in Python. Token based authentication has been added so that only CI pods running Jenkins jobs can access the database. Please note that currently token authorization is implemented but is not yet enabled.
The reporting page for the test projects is http://testresults.opnfv.org/reporting/
This page provides reporting per OPNFV release and per testing project.
An evolution of the reporting page is planned to unify test reporting by creating a landing page that shows the scenario status in one glance (this information was previously consolidated manually on a wiki page). The landing page will be displayed per scenario and show:
- the status of the deployment
- the score from each test suite. There is no overall score, it is determined
by each test project. * a trust indicator
Until the Colorado release, each testing project managed the list of its test cases. This made it very hard to have a global view of the available test cases from the different test projects. A common view was possible through the API but it was not very user friendly. Test cases per project may be listed by calling:
http://testresults.opnfv.org/test/api/v1/projects/<project_name>/cases
with project_name: bottlenecks, functest, qtip, storperf, vsperf, yardstick
A test case catalog has now been realized [TST4]. Roll over the project then click to get the list of test cases, and then click on the case to get more details.
The Test Dashboard is used to provide a consistent view of the results collected in CI. The results shown on the dashboard are post processed from the Database, which only contains raw results. The dashboard can be used in addition to the reporting page (high level view) to allow the creation of specific graphs according to what the test owner wants to show.
In Brahmaputra, a basic dashboard was created in Functest. In Colorado, Yardstick used Grafana (time based graphs) and ELK (complex graphs). Since Danube, the OPNFV testing community decided to adopt the ELK framework and to use Bitergia for creating highly flexible dashboards [TST5].

Power consumption is a key driver for NFV. As an end user is interested to know which application is good or bad regarding power consumption and explains why he/she has to plug his/her smartphone every day, we would be interested to know which VNF is power consuming.
Power consumption is hard to evaluate empirically. It is however possible to collect information and leverage Pharos federation to try to detect some profiles/footprints. In fact thanks to CI, we know that we are running a known/deterministic list of cases. The idea is to correlate this knowledge with the power consumption to try at the end to find statistical biais.
The energy recorder high level architecture may be described as follows:
The energy monitoring system in based on 3 software components:
- Power info collector: poll server to collect instantaneous power consumption information
- Energy recording API + influxdb: On one leg receive servers consumption and
on the other, scenarios notfication. It then able to establish te correlation between consumption and scenario and stores it into a time-series database (influxdb) * Python SDK: A Python SDK using decorator to send notification to Energy recording API from testcases scenarios
It collects instantaneous power consumption information and send it to Event API in charge of data storing. The collector use different connector to read the power consumption on remote servers:
- IPMI: this is the basic method and is manufacturer dependent. Depending on manufacturer, refreshing delay may vary (generally for 10 to 30 sec.)
- RedFish: redfish is an industry RESTFUL API for hardware managment. Unfortunatly it is not yet supported by many suppliers.
- ILO: HP RESTFULL API: This connector support as well 2.1 as 2.4 version of HP-ILO
IPMI is supported by at least:
- HP
- IBM
- Dell
- Nokia
- Advantech
- Lenovo
- Huawei
Redfish API has been successfully tested on:
- HP
- Dell
- Huawei (E9000 class servers used in OPNFV Community Labs are IPMI 2.0
compliant and use Redfish login Interface through Browsers supporting JRE1.7/1.8)
Several test campaigns done with physical Wattmeter showed that IPMI results were notvery accurate but RedFish were. So if Redfish is available, it is highly recommended to use it.
To run the server power consumption collector agent, you need to deploy a docker container locally on your infrastructure.
This container requires:
- Connectivy on the LAN where server administration services (ILO, eDrac, IPMI,...) are configured and IP access to the POD’s servers
- Outgoing HTTP access to the Event API (internet)
Build the image by typing:
curl -s https://raw.githubusercontent.com/bherard/energyrecorder/master/docker/server-collector.dockerfile|docker build -t energyrecorder/collector -
Create local folder on your host for logs and config files:
mkdir -p /etc/energyrecorder
mkdir -p /var/log/energyrecorder
In /etc/energyrecorder create a configuration for logging in a file named collector-logging.conf:
curl -s https://raw.githubusercontent.com/bherard/energyrecorder/master/server-collector/conf/collector-logging.conf.sample > /etc/energyrecorder/collector-logging.conf
Check configuration for this file (folders, log levels.....) In /etc/energyrecorder create a configuration for the collector in a file named collector-settings.yaml:
curl -s https://raw.githubusercontent.com/bherard/energyrecorder/master/server-collector/conf/collector-settings.yaml.sample > /etc/energyrecorder/collector-settings.yaml
Define the “PODS” section and their “servers” section according to the environment to monitor. Note: The “environment” key should correspond to the pod name, as defined in the “NODE_NAME” environment variable by CI when running.
IMPORTANT NOTE: To apply a new configuration, you need to kill the running container an start a new one (see below)
To run the container, you have to map folder located on the host to folders in the container (config, logs):
docker run -d --name energy-collector --restart=always -v /etc/energyrecorder:/usr/local/energyrecorder/server-collector/conf -v /var/log/energyrecorder:/var/log/energyrecorder energyrecorder/collector
An event API to insert contextual information when monitoring energy (e.g. start Functest, start Tempest, destroy VM, ..) It is associated with an influxDB to store the power consumption measures It is hosted on a shared environment with the folling access points:
| Component | Connectivity |
|---|---|
| Energy recording API documentation | http://energy.opnfv.fr/resources/doc/ |
| influxDB (data) | http://energy.opnfv.fr:8086 |
In you need, you can also host your own version of the Energy recording API (in such case, the Python SDK may requires a settings update) If you plan to use the default shared API, following steps are not required.
First, you need to buid an image:
curl -s https://raw.githubusercontent.com/bherard/energyrecorder/master/docker/recording-api.dockerfile|docker build -t energyrecorder/api -
Create local folder on your host for logs and config files:
mkdir -p /etc/energyrecorder
mkdir -p /var/log/energyrecorder
mkdir -p /var/lib/influxdb
In /etc/energyrecorder create a configuration for logging in a file named webapp-logging.conf:
curl -s https://raw.githubusercontent.com/bherard/energyrecorder/master/recording-api/conf/webapp-logging.conf.sample > /etc/energyrecorder/webapp-logging.conf
Check configuration for this file (folders, log levels.....)
In /etc/energyrecorder create a configuration for the collector in a file named webapp-settings.yaml:
curl -s https://raw.githubusercontent.com/bherard/energyrecorder/master/recording-api/conf/webapp-settings.yaml.sample > /etc/energyrecorder/webapp-settings.yaml
Normaly included configuration is ready to use except username/passwer for influx (see run-container.sh bellow). Use here the admin user.
IMPORTANT NOTE: To apply a new configuration, you need to kill the running container an start a new one (see bellow)
To run the container, you have to map folder located on the host to folders in the container (config, logs):
docker run -d --name energyrecorder-api -p 8086:8086 -p 8888:8888 -v /etc/energyrecorder:/usr/local/energyrecorder/web.py/conf -v /var/log/energyrecorder/:/var/log/energyrecorder -v /var/lib/influxdb:/var/lib/influxdb energyrecorder/webapp admin-influx-user-name admin-password readonly-influx-user-name user-password
with
| Parameter name | Description |
|---|---|
|
Influx user with admin grants to create |
| Influx password to set to admin user | |
| Influx user with readonly grants to create | |
| Influx password to set to readonly user |
NOTE: Local folder /var/lib/influxdb is the location web influx data are stored. You may used anything else at your convience. Just remember to define this mapping properly when running the container.
a Python SDK - almost not intrusive, based on python decorator to trigger call to the event API.
It is currently hosted in Functest repo but if other projects adopt it, a dedicated project could be created and/or it could be hosted in Releng.
import the energy library:
import functest.energy.energy as energy
Notify that you want power recording in your testcase:
@energy.enable_recording
def run(self):
    self.do_some_stuff1()
    self.do_some_stuff2()
If you want to register additional steps during the scenarios you can to it in 2 different ways.
Notify step on method definition:
@energy.set_step("step1")
def do_some_stuff1(self):
...
@energy.set_step("step2")
def do_some_stuff2(self):
Notify directly from code:
@energy.enable_recording
def run(self):
  Energy.set_step("step1")
  self.do_some_stuff1()
  ...
  Energy.set_step("step2")
  self.do_some_stuff2()
Settings delivered in the project git are ready to use and assume that you will use the sahre energy recording API. If you want to use an other instance, you have to update the key “energy_recorder.api_url” in <FUNCTEST>/functest/ci/config_functest.yaml” by setting the proper hostname/IP
Here is an example of result comming from LF POD2. This sequence represents several CI runs in a raw. (0 power corresponds to hard reboot of the servers)
You may connect http://energy.opnfv.fr:3000 for more results (ask for credentials to infra team).
For more information or to participate in the OPNFV test community please see the following:
wiki: https://wiki.opnfv.org/testing
mailing list: test-wg@lists.opnfv.org
IRC channel: #opnfv-testperf
| Project | Documentation links |
|---|---|
| Bottlenecks | https://wiki.opnfv.org/display/bottlenecks/Bottlenecks |
| CPerf | https://wiki.opnfv.org/display/cperf |
| Dovetail | https://wiki.opnfv.org/display/dovetail |
| Functest | https://wiki.opnfv.org/display/functest/ |
| NFVbench | https://wiki.opnfv.org/display/nfvbench/ |
| QTIP | https://wiki.opnfv.org/display/qtip |
| StorPerf | https://wiki.opnfv.org/display/storperf/Storperf |
| VSPERF | https://wiki.opnfv.org/display/vsperf |
| Yardstick | https://wiki.opnfv.org/display/yardstick/Yardstick |
[TST1]: OPNFV web site
[TST2]: TestAPI code repository link in releng-testresults
[TST3]: TestAPI autogenerated documentation
[TST4]: Testcase catalog
[TST5]: Testing group dashboard
This page provides the links to the installation, configuration and user guides of the different test projects.
The OPNFV testing ecosystem is wide.
The goal of this guide consists in providing some guidelines for new developers involved in test areas.
For the description of the ecosystem, see [DEV1].
There are several ways to join test projects as a developer. In fact you may:
- Develop new test cases
- Develop frameworks
- Develop tooling (reporting, dashboards, graphs, middleware,...)
- Troubleshoot results
- Post-process results
These different tasks may be done within a specific project or as a shared resource accross the different projects.
If you develop new test cases, the best practice is to contribute upstream as much as possible. You may contact the testing group to know which project - in OPNFV or upstream - would be the best place to host the test cases. Such contributions are usually directly connected to a specific project, more details can be found in the user guides of the testing projects.
Each OPNFV testing project provides test cases and the framework to manage them. As a developer, you can obviously contribute to them. The developer guide of the testing projects shall indicate the procedure to follow.
Tooling may be specific to a project or generic to all the projects. For specific tooling, please report to the test project user guide. The tooling used by several test projects will be detailed in this document.
The best event to meet the testing community is probably the plugfest. Such an event is organized after each release. Most of the test projects are present.
The summit is also a good opportunity to meet most of the actors [DEV4].
The testing group is a self organized working group. The OPNFV projects dealing with testing are invited to participate in order to elaborate and consolidate a consistant test strategy (test case definition, scope of projects, resources for long duration, documentation, ...) and align tooling or best practices.
A weekly meeting is organized, the agenda may be amended by any participant. 2 slots have been defined (US/Europe and APAC). Agendas and minutes are public. See [DEV3] for details. The testing group IRC channel is #opnfv-testperf
All the test projects do not have the same maturity and/or number of contributors. The nature of the test projects may be also different. The following best practices may not be acurate for all the projects and are only indicative. Contact the testing group for further details.
Most of the projects have a similar structure, which can be defined as follows:
`-- home
  |-- requirements.txt
  |-- setup.py
  |-- tox.ini
  |
  |-- <project>
  |       |-- <api>
  |       |-- <framework>
  |       `-- <test cases>
  |
  |-- docker
  |     |-- Dockerfile
  |     `-- Dockerfile.aarch64.patch
  |-- <unit tests>
  `- docs
     |-- release
     |   |-- release-notes
     |   `-- results
     `-- testing
         |-- developer
         |     `-- devguide
         |-- user
               `-- userguide
Test projects are installing tools and triggering tests. When it is possible it is recommended to implement an API in order to perform the different actions.
Each test project should be able to expose and consume APIs from other test projects. This pseudo micro service approach should allow a flexible use of the different projects and reduce the risk of overlapping. In fact if project A provides an API to deploy a traffic generator, it is better to reuse it rather than implementing a new way to deploy it. This approach has not been implemented yet but the prerequisites consiting in exposing and API has already been done by several test projects.
Most of the test projects provide a docker as deliverable. Once connected, it is possible to prepare the environement and run tests through a CLI.
Dockerization has been introduced in Brahmaputra and adopted by most of the test projects. Docker containers are pulled on the jumphost of OPNFV POD. <TODO Jose/Mark/Alec>
It is recommended to control the quality of the code of the testing projects, and more precisely to implement some verifications before any merge:
- pep8
- pylint
- unit tests (python 2.7)
- unit tests (python 3.5)
The code of the test project must be covered by unit tests. The coverage shall be reasonable and not decrease when adding new features to the framework. The use of tox is recommended. It is possible to implement strict rules (no decrease of pylint score, unit test coverages) on critical python classes.
Several test projects integrate third party tooling for code quality check and/or traffic generation. Some of the tools can be listed as follows:
| Project | Tool | Comments |
|---|---|---|
| Bottlenecks | TODO | |
| Functest | Tempest Rally Refstack RobotFramework | OpenStack test tooling OpenStack test tooling OpenStack test tooling Used for ODL tests |
| QTIP | Unixbench RAMSpeed nDPI openSSL inxi | |
| Storperf | TODO | |
| VSPERF | TODO | |
| Yardstick | Moongen Trex Pktgen IxLoad, IxNet SPEC Unixbench RAMSpeed LMBench Iperf3 Netperf Pktgen-DPDK Testpmd L2fwd Fio Bonnie++ | Traffic generator Traffic generator Traffic generator Traffic generator Compute Compute Compute Compute Network Network Network Network Network Storage Storage |
The testing group defined several categories also known as tiers. These categories can be used to group test suites.
| Category | Description |
|---|---|
| Healthcheck | Simple and quick healthcheck tests case |
| Smoke | Set of smoke test cases/suites to validate the release |
| Features | Test cases that validate a specific feature on top of OPNFV. Those come from Feature projects and need a bit of support for integration |
| Components | Tests on a specific component (e.g. OpenStack, OVS, DPDK,..) It may extend smoke tests |
| Performance | Performance qualification |
| VNF | Test cases related to deploy an open source VNF including an orchestrator |
| Stress | Stress and robustness tests |
| In Service | In service testing |
The domains deal with the technical scope of the tests. It shall correspond to domains defined for the certification program:
- compute
- network
- storage
- hypervisor
- container
- vim
- mano
- vnf
- ...
One of the goals of the testing working group is to identify the poorly covered areas and avoid testing overlap. Ideally based on the declaration of the test cases, through the tags, domains and tier fields, it shall be possible to create heuristic maps.
Resiliency of NFV refers to the ability of the NFV framework to limit disruption and return to normal or at a minimum acceptable service delivery level in the face of a fault, failure, or an event that disrupts the normal operation [DEV5].
Reliability testing evaluates the ability of SUT to recover in face of fault, failure or disrupts in normal operation or simply the ability of SUT absorbing “disruptions”.
Reliability tests use different forms of faults as stimulus, and the test must measure the reaction in terms of the outage time or impairments to transmission.
Stress testing involves producing excess load as stimulus, and the test must measure the reaction in terms of unexpected outages or (more likely) impairments to transmission.
These kinds of “load” will cause “disruption” which could be easily found in system logs. It is the purpose to raise such “load” to evaluate the SUT if it could provide an acceptable level of service or level of confidence during such circumstances. In Danube and Euphrates, we only considered the stress test with excess load over OPNFV Platform.
In Danube, Bottlenecks and Yardstick project jointly implemented 2 stress tests (concurrently create/destroy VM pairs and do ping, system throughput limit) while Bottlenecks acts as the load manager calling yardstick to execute each test iteration. These tests are designed to test for breaking points and provide level of confidence of the system to users. Summary of the test cases are listed in the following addresses:
Stress test cases for OPNFV Euphrates (OS Ocata) release can be seen as extension/enhancement of those in D release. These tests are located in Bottlenecks/Yardstick repo (Bottlenecks as load manager while Yardstick execute each test iteration):
- VNF scale out/up tests (also plan to measure storage usage simultaneously): https://wiki.opnfv.org/pages/viewpage.action?pageId=12390101
- Life-cycle event with throughputs (measure NFVI to support concurrent
network usage from different VM pairs): https://wiki.opnfv.org/display/DEV/Intern+Project%3A+Baseline+Stress+Test+Case+for+Bottlenecks+E+Release
In OPNFV E release, we also plan to do long duration testing over OS Ocata. A separate CI pipe testing OPNFV XCI (OSA) is proposed to accomplish the job. We have applied specific pod for the testing. Proposals and details are listed below:
- https://wiki.opnfv.org/display/testing/Euphrates+Testing+needs
- https://wiki.opnfv.org/download/attachments/2926539/testing%20evolution%20v1_4.pptx?version=1&modificationDate=1503937629000&api=v2
- https://wiki.opnfv.org/download/attachments/2926539/Testing%20over%20Long%20Duration%20POD.pptx?version=2&modificationDate=1502943821000&api=v2
The long duration testing is supposed to be started when OPNFV E release is published. A simple monitoring module for these tests is also planned to be added: https://wiki.opnfv.org/display/DEV/Intern+Project%3A+Monitoring+Stress+Testing+for+Bottlenecks+E+Release
On http://docs.opnfv.org! A section is dedicated to the testing projects. You will find the overview of the ecosystem and the links to the project documents.
Another source is the testing wiki on https://wiki.opnfv.org/display/testing
You may also contact the testing group on the IRC channel #opnfv-testperf or by mail at test-wg AT lists.opnfv.org (testing group) or opnfv-tech-discuss AT lists.opnfv.org (generic technical discussions).
As any project, the best solution is to contact the project. The project members with their email address can be found under https://git.opnfv.org/<project>/tree/INFO
You may also send a mail to the testing mailing list or use the IRC channel #opnfv-testperf
You should discuss this topic with the project you are working with. If you need access to an OPNFV community POD, it is possible to contact the infrastructure group. Depending on your needs (scenario/installer/tooling), it should be possible to find free time slots on one OPNFV community POD from the Pharos federation. Create a JIRA ticket to describe your needs on https://jira.opnfv.org/projects/INFRA. You must already be an OPNFV contributor. See https://wiki.opnfv.org/display/DEV/Developer+Getting+Started.
Please note that lots of projects have their own “how to contribute” or “get started” page on the OPNFV wiki.
It shall be discussed directly with the project you are working with. It is done through jenkins jobs calling testing project files but the way to onboard cases differ from one project to another.
If you have access to the test API swagger (access granted to contributors), you may use the swagger interface of the test API to declare your project. The URL is http://testresults.opnfv.org/test/swagger/spec.html.

Click on Spec, the list of available methods must be displayed.
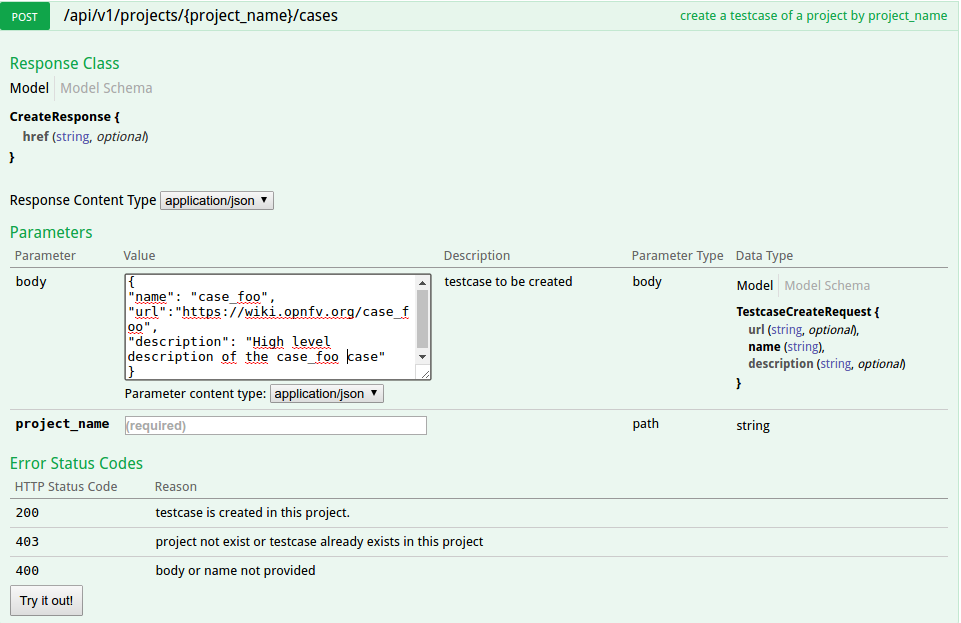
For the declaration of a new project use the POST /api/v1/projects method. For the declaration of new test cases in an existing project, use the POST
/api/v1/projects/{project_name}/cases method
The test database is used to collect test results. By default it is enabled only for CI tests from Production CI pods.
Please note that it is possible to create your own local database.
A dedicated database is for instance created for each plugfest.
The architecture and associated API is described in previous chapter. If you want to push your results from CI, you just have to call the API at the end of your script.
You can also reuse a python function defined in functest_utils.py [DEV2]
The Test API is now documented in this document (see sections above). You may also find autogenerated documentation in http://artifacts.opnfv.org/releng/docs/testapi.html A web protal is also under construction for certification at http://testresults.opnfv.org/test/#/
See table above.
The main ambiguity could be between features and VNF. In fact sometimes you have to spawn VMs to demonstrate the capabilities of the feature you introduced. We recommend to declare your test in the feature category.
VNF category is really dedicated to test including:
- creation of resources
- deployement of an orchestrator/VNFM
- deployment of the VNF
- test of the VNFM
- free resources
The goal is not to study a particular feature on the infrastructure but to have a whole end to end test of a VNF automatically deployed in CI. Moreover VNF are run in weekly jobs (one a week), feature tests are in daily jobs and use to get a scenario score.
Logs and configuration files can be pushed to artifact server from the CI under http://artifacts.opnfv.org/<project name>
This page intends to cover the documentation handling for OPNFV. OPNFV projects are expected to create a variety of document types, according to the nature of the project. Some of these are common to projects that develop/integrate features into the OPNFV platform, e.g. Installation Instructions and User/Configurations Guides. Other document types may be project-specific.
OPNFV documentation is automated and integrated into our git & gerrit toolchains.
We use RST document templates in our repositories and automatically render to HTML and PDF versions of the documents in our artifact store, our Wiki is also able to integrate these rendered documents directly allowing projects to use the revision controlled documentation process for project information, content and deliverables. Read this page which elaborates on how documentation is to be included within opnfvdocs.
All contributions to the OPNFV project are done in accordance with the OPNFV licensing requirements. Documentation in OPNFV is contributed in accordance with the Creative Commons 4.0 and the `SPDX https://spdx.org/>`_ licence. All documentation files need to be licensed using the text below. The license may be applied in the first lines of all contributed RST files:
.. This work is licensed under a Creative Commons Attribution 4.0 International License.
.. SPDX-License-Identifier: CC-BY-4.0
.. (c) <optionally add copywriters name>

These lines will not be rendered in the html and pdf files.
All documentation for your project should be structured and stored in the <repo>/docs/ directory. The documentation toolchain will
look in these directories and be triggered on events in these directories when generating documents.
A general structure is proposed for storing and handling documents that are common across many projects but also for documents that may be
project specific. The documentation is divided into three areas Release, Development and Testing. Templates for these areas can be found
under opnfvdocs/docs/templates/.
Project teams are encouraged to use templates provided by the opnfvdocs project to ensure that there is consistency across the community. Following representation shows the expected structure:
docs/
├── development
│   ├── design
│   ├── overview
│   └── requirements
├── release
│   ├── configguide
│   ├── installation
│   ├── release-notes
│   ├── scenarios
│   │   └── scenario.name
│   └── userguide
├── testing
│   ├── developer
│   └── user
└── infrastructure
    ├── hardware-infrastructure
    ├── software-infrastructure
    ├── continuous-integration
    └── cross-community-continuous-integration
Release documentation is the set of documents that are published for each OPNFV release. These documents are created and developed
following the OPNFV release process and milestones and should reflect the content of the OPNFV release.
These documents have a master index.rst file in the <opnfvdocs> repository and extract content from other repositories.
To provide content into these documents place your <content>.rst files in a directory in your repository that matches the master document
and add a reference to that file in the correct place in the corresponding index.rst file in opnfvdocs/docs/release/.
Platform Overview: opnfvdocs/docs/release/overview
Installation Instruction: <repo>/docs/release/installation
User Guide: <repo>/docs/release/userguide
Configuration Guide: <repo>/docs/release/configguide
Release Notes: <repo>/docs/release/release-notes
Documentation created by test projects can be stored under two different sub directories /user or /developemnt. Release notes will be stored under <repo>/docs/release/release-notes
User documentation: <repo>/testing/user/
Will collect the documentation of the test projects allowing the end user to perform testing towards a OPNFV SUT
e.g. Functest/Yardstick/Vsperf/Storperf/Bottlenecks/Qtip installation/config & user guides.
Development documentation: <repo>/testing/developent/
Will collect documentation to explain how to create your own test case and leverage existing testing frameworks e.g. developer guides.
Project specific documents such as design documentation, project overview or requirement documentation can be stored under /docs/development. Links to generated documents will be dislayed under Development Documentaiton section on docs.opnfv.org. You are encouraged to establish the following basic structure for your project as needed:
Requirement Documentation: <repo>/docs/development/requirements/
Design Documentation: <repo>/docs/development/design
Project overview: <repo>/docs/development/overview
Infrastructure documentation can be stored under <repo>/docs/ folder of
corresponding infrastructure project.
Add your documentation to your repository in the folder structure and according to the templates listed above. The documentation templates you will require are available in opnfvdocs/docs/templates/ repository, you should copy the relevant templates to your <repo>/docs/ directory in your repository. For instance if you want to document userguide, then your steps shall be as follows:
git clone ssh://<your_id>@gerrit.opnfv.org:29418/opnfvdocs.git
cp -p opnfvdocs/docs/userguide/* <my_repo>/docs/userguide/
You should then add the relevant information to the template that will explain the documentation. When you are done writing, you can commit the documentation to the project repository.
git add .
git commit --signoff --all
git review
opnfvdocs/docs/submodule/ as follows:
To include your project specific documentation in the composite documentation, first identify where your project documentation should be included. Say your project userguide should figure in the ‘OPNFV Userguide’, then:
vim opnfvdocs/docs/release/userguide.introduction.rst
This opens the text editor. Identify where you want to add the userguide. If the userguide is to be added to the toctree, simply include the path to it, example:
.. toctree::
    :maxdepth: 1

 submodules/functest/docs/userguide/index
 submodules/bottlenecks/docs/userguide/index
 submodules/yardstick/docs/userguide/index
 <submodules/path-to-your-file>
It’s pretty common to want to reference another location in the OPNFV documentation and it’s pretty easy to do with reStructuredText. This is a quick primer, more information is in the Sphinx section on Cross-referencing arbitrary locations.
Within a single document, you can reference another section simply by:
This is a reference to `The title of a section`_
Assuming that somewhere else in the same file there a is a section title something like:
The title of a section
^^^^^^^^^^^^^^^^^^^^^^
It’s typically better to use :ref: syntax and labels to provide
links as they work across files and are resilient to sections being
renamed. First, you need to create a label something like:
.. _a-label:

The title of a section
^^^^^^^^^^^^^^^^^^^^^^
Note
The underscore (_) before the label is required.
Then you can reference the section anywhere by simply doing:
This is a reference to :ref:`a-label`
or:
This is a reference to :ref:`a section I really liked <a-label>`
Note
When using :ref:-style links, you don’t need a trailing
underscore (_).
Because the labels have to be unique, it usually makes sense to prefix
the labels with the project name to help share the label space, e.g.,
sfc-user-guide instead of just user-guide.
Once you have made these changes you need to push the patch back to the opnfvdocs team for review and integration.
git add .
git commit --signoff --all
git review
Be sure to add the project leader of the opnfvdocs project as a reviewer of the change you just pushed in gerrit.
It is recommended that all rst content is validated by doc8 standards. To validate your rst files using doc8, install doc8.
sudo pip install doc8
doc8 can now be used to check the rst files. Execute as,
doc8 --ignore D000,D001 <file>
To build whole documentation under opnfvdocs/, follow these steps:
Install virtual environment.
sudo pip install virtualenv
cd /local/repo/path/to/project
Download the OPNFVDOCS repository.
git clone https://gerrit.opnfv.org/gerrit/opnfvdocs
Change directory to opnfvdocs & install requirements.
cd opnfvdocs
sudo pip install -r etc/requirements.txt
Update submodules, build documentation using tox & then open using any browser.
cd opnfvdocs
git submodule update --init
tox -edocs
firefox docs/_build/html/index.html
Note
Make sure to run tox -edocs and not just tox.
To test how the documentation renders in HTML, follow these steps:
Install virtual environment.
sudo pip install virtualenv
cd /local/repo/path/to/project
Download the opnfvdocs repository.
git clone https://gerrit.opnfv.org/gerrit/opnfvdocs
Change directory to opnfvdocs & install requirements.
cd opnfvdocs
sudo pip install -r etc/requirements.txt
Move the conf.py file to your project folder where RST files have been kept:
mv opnfvdocs/docs/conf.py <path-to-your-folder>/
Move the static files to your project folder:
mv opnfvdocs/_static/ <path-to-your-folder>/
Build the documentation from within your project folder:
sphinx-build -b html <path-to-your-folder> <path-to-output-folder>
Your documentation shall be built as HTML inside the specified output folder directory.
Note
Be sure to remove the conf.py, the static/ files and the output folder from the <project>/docs/. This is for testing only. Only commit the rst files and related content.
Clone the opnfvdocs repository and your submodule to .gitmodules following the convention of the file
cd docs/submodules/
git submodule add https://gerrit.opnfv.org/gerrit/$reponame
git submodule init $reponame/
git submodule update $reponame/
git add .
git commit -sv
git review
git rm docs/submodules/$reponame rm -rf .git/modules/$reponame git config -f .git/config –remove-section submodule.$reponame 2> /dev/null git add . git commit -sv git review
Moving away from submodules.
At the cost of some release-time overhead, there are several benefits the transition provides projects:
To make the transition the following steps need to be taken across three repositories:
In your project repo:
Add the following files:
docs/conf.py
from docs_conf.conf import * # noqa: F401,F403
docs/conf.yaml
---
project_cfg: opnfv
project: Example
docs/requirements.txt
lfdocs-conf
sphinx_opnfv_theme
# Uncomment the following line if your project uses Sphinx to document
# HTTP APIs
# sphinxcontrib-httpdomain
tox.ini
[tox]
minversion = 1.6
envlist =
    docs,
    docs-linkcheck
skipsdist = true

[testenv:docs]
deps = -rdocs/requirements.txt
commands =
    sphinx-build -b html -n -d {envtmpdir}/doctrees ./docs/ {toxinidir}/docs/_build/html
    echo "Generated docs available in {toxinidir}/docs/_build/html"
whitelist_externals = echo

[testenv:docs-linkcheck]
deps = -rdocs/requirements.txt
commands = sphinx-build -b linkcheck -d {envtmpdir}/doctrees ./docs/ {toxinidir}/docs/_build/linkcheck
.gitignore
.tox/ docs/_build/*
docs/index.rst
If this file doesn’t exist, it will need to be created along any other missing index file for directories (release, development). Any example of the file’s content looks like this:
.. This work is licensed under a Creative Commons Attribution 4.0 International License.
.. SPDX-License-Identifier: CC-BY-4.0
.. (c) Open Platform for NFV Project, Inc. and its contributors

.. _<project-name>:

==============
<project-name>
==============

.. toctree::
   :numbered:
   :maxdepth: 2

   release/release-notes/index
   release/installation/index
   release/userguide/index
   scenarios/index
You can verify the build works by running:
tox -e docs
In the releng repository:
Update your project’s job file jjb/<project>/<projects-jobs.yaml with the following (taken from this guide):
---
- project:
    name: PROJECT
    project: PROJECT
    project-name: 'PROJECT'

    project-pattern: 'PROJECT'
    rtd-build-url: RTD_BUILD_URL
    rtd-token: RTD_TOKEN

    jobs:
      - '{project-name}-rtd-jobs'
You can either send an email to helpdesk in order to get a copy of RTD_BUILD_URL and RTD_TOKEN, ping aricg or bramwelt in #opnfv-docs on Freenode, or add Aric Gardner or Trevor Bramwell to your patch as a reviewer and they will pass along the token and build URL.
In the opnfvdocs repository:
Add an intersphinx link to the opnfvdocs repo configuration:
docs/conf.py
intersphinx_mapping['<project>'] = ('http://opnfv-<project>.readthedocs.io', None)
If the project exists on ReadTheDocs, and the previous build was merged in and ran, you can verify the linking is working currectly by finding the following line in the output of tox -e docs:
loading intersphinx inventory from https://opnfv-<project>.readthedocs.io/en/latest/objects.inv...
Ensure all references in opnfvdocs are using :ref: or :doc: and not directly specifying submodule files with ../submodules/<project>.
For example:
.. toctree::

   ../submodules/releng/docs/overview.rst
Would become:
.. toctree::

   :ref:`Releng Overview <releng:overview>`
Some more examples can be seen here.
Remove the submodule from opnfvdocs, replacing <project> with your project and commit the change:
git rm docs/submodules/<project>
git commit -s
git review
The index file must relatively refence your other rst files in that directory.
Here is an example index.rst :
*******************
Documentation Title
*******************

.. toctree::
   :numbered:
   :maxdepth: 2

   documentation-example
Document source files have to be written in reStructuredText format (rst). Each file would be build as an html page.
Here is an example source rst file :
=============
Chapter Title
=============

Section Title
=============

Subsection Title
----------------

Hello!
See http://sphinx-doc.org/rest.html .
Hint: You can add dedicated contents by using ‘only’ directive with build type (‘html’ and ‘singlehtml’) for OPNFV document. But, this is not encouraged to use since this may make different views.
.. only:: html
    This line will be shown only in html version.
The verify job name is docs-verify-rtd-{branch}.
When you send document changes to gerrit, jenkins will create your documents in HTML formats (normal and single-page) to verify that new document can be built successfully. Please check the jenkins log and artifact carefully. You can improve your document even though if the build job succeeded.
The merge job name is docs-merge-rtd-{branch}.
Once the patch is merged, jenkins will automatically trigger building of the new documentation. This might take about 15 minutes while readthedocs builds the documentatation. The newly built documentation shall show up as appropriate placed in docs.opnfv.org/{branch}/path-to-file.
This document will explain how to install the Fraser release of OPNFV with JOID including installing JOID, configuring JOID for your environment, and deploying OPNFV with different SDN solutions in HA, or non-HA mode.
JOID as Juju OPNFV Infrastructure Deployer allows you to deploy different combinations of OpenStack release and SDN solution in HA or non-HA mode. For OpenStack, JOID currently supports Ocata and Pike. For SDN, it supports Openvswitch, OpenContrail, OpenDayLight, and ONOS. In addition to HA or non-HA mode, it also supports deploying from the latest development tree.
JOID heavily utilizes the technology developed in Juju and MAAS.
Juju is a state-of-the-art, open source modelling tool for operating software in the cloud. Juju allows you to deploy, configure, manage, maintain, and scale cloud applications quickly and efficiently on public clouds, as well as on physical servers, OpenStack, and containers. You can use Juju from the command line or through its beautiful GUI. (source: Juju Docs)
MAAS is Metal As A Service. It lets you treat physical servers like virtual machines (instances) in the cloud. Rather than having to manage each server individually, MAAS turns your bare metal into an elastic cloud-like resource. Machines can be quickly provisioned and then destroyed again as easily as you can with instances in a public cloud. ... In particular, it is designed to work especially well with Juju, the service and model management service. It’s a perfect arrangement: MAAS manages the machines and Juju manages the services running on those machines. (source: MAAS Docs)
The MAAS server is installed and configured on Jumphost with Ubuntu 16.04 LTS server with access to the Internet. Another VM is created to be managed by MAAS as a bootstrap node for Juju. The rest of the resources, bare metal or virtual, will be registered and provisioned in MAAS. And finally the MAAS environment details are passed to Juju for use.
Minimum 2 Networks:
JOID supports multiple isolated networks for data as well as storage based on your network requirement for OpenStack.
No DHCP server should be up and configured. Configure gateways only on eth0 and eth1 networks to access the network outside your lab.
The Jumphost requirements are outlined below:
Besides Jumphost, a minimum of 5 physical servers for bare metal environment.
NOTE: Above configuration is minimum. For better performance and usage of the OpenStack, please consider higher specs for all nodes.
Make sure all servers are connected to top of rack switch and configured accordingly.
Before proceeding, make sure that your hardware infrastructure satisfies the Setup Requirements.
Make sure you have at least two networks configured:
You may configure other networks, e.g. for data or storage, based on your network options for Openstack.
Install Ubuntu 16.04 (Xenial) LTS server on Jumphost (one of the physical nodes).
Tip
Use ubuntu as username as password, as this matches the MAAS
credentials installed later.
During the OS installation, install the OpenSSH server package to allow SSH connections to the Jumphost.
If the data size of the image is too big or slow (e.g. when mounted through a slow virtual console), you can also use the Ubuntu mini ISO. Install packages: standard system utilities, basic Ubuntu server, OpenSSH server, Virtual Machine host.
If you have issues with blank console after booting, see
this SO answer and set
nomodeset, (removing quiet splash can also be useful to see log
during booting) either through console in recovery mode or via SSH (if
installed).
Install git and bridge-utils packages
sudo apt install git bridge-utils
Configure bridges for each network to be used.
Example /etc/network/interfaces file:
source /etc/network/interfaces.d/*

# The loopback network interface (set by Ubuntu)
auto lo
iface lo inet loopback

# Admin network interface
iface eth0 inet manual
auto brAdmin
iface brAdmin inet static
        bridge_ports eth0
        address 10.5.1.1
        netmask 255.255.255.0

# Ext. network for floating IPs
iface eth1 inet manual
auto brExt
iface brExt inet static
        bridge_ports eth1
        address 10.5.15.1
        netmask 255.255.255.0
Note
If you choose to use the separate network for management, public, data and storage, then you need to create bridge for each interface. In case of VLAN tags, use the appropriate network on Jumphost depending on the VLAN ID on the interface.
Note
Both of the networks need to have Internet connectivity. If only one
of your interfaces has Internet access, you can setup IP forwarding.
For an example how to accomplish that, see the script in Nokia pod 1
deployment (labconfig/nokia/pod1/setup_ip_forwarding.sh).
All configuration for the JOID deployment is specified in a labconfig.yaml
file. Here you describe all your physical nodes, their roles in OpenStack,
their network interfaces, IPMI parameters etc. It’s also where you configure
your OPNFV deployment and MAAS networks/spaces.
You can find example configuration files from already existing nodes in the
repository.
First of all, download JOID to your Jumphost. We recommend doing this in your home directory.
git clone https://gerrit.opnfv.org/gerrit/p/joid.git
Tip
You can select the stable version of your choice by specifying the git branch, for example:
git clone -b stable/fraser https://gerrit.opnfv.org/gerrit/p/joid.git
Create a directory in joid/labconfig/<company_name>/<pod_number>/ and
create or copy a labconfig.yaml configuration file to that directory.
For example:
# All JOID actions are done from the joid/ci directory
cd joid/ci
mkdir -p ../labconfig/your_company/pod1
cp ../labconfig/nokia/pod1/labconfig.yaml ../labconfig/your_company/pod1/
Example labconfig.yaml configuration file:
lab:
  location: your_company
  racks:
  - rack: pod1
    nodes:
    - name: rack-1-m1
      architecture: x86_64
      roles: [network,control]
      nics:
      - ifname: eth0
        spaces: [admin]
        mac: ["12:34:56:78:9a:bc"]
      - ifname: eth1
        spaces: [floating]
        mac: ["12:34:56:78:9a:bd"]
      power:
        type: ipmi
        address: 192.168.10.101
        user: admin
        pass: admin
    - name: rack-1-m2
      architecture: x86_64
      roles: [compute,control,storage]
      nics:
      - ifname: eth0
        spaces: [admin]
        mac: ["23:45:67:89:ab:cd"]
      - ifname: eth1
        spaces: [floating]
        mac: ["23:45:67:89:ab:ce"]
      power:
        type: ipmi
        address: 192.168.10.102
        user: admin
        pass: admin
    - name: rack-1-m3
      architecture: x86_64
      roles: [compute,control,storage]
      nics:
      - ifname: eth0
        spaces: [admin]
        mac: ["34:56:78:9a:bc:de"]
      - ifname: eth1
        spaces: [floating]
        mac: ["34:56:78:9a:bc:df"]
      power:
        type: ipmi
        address: 192.168.10.103
        user: admin
        pass: admin
    - name: rack-1-m4
      architecture: x86_64
      roles: [compute,storage]
      nics:
      - ifname: eth0
        spaces: [admin]
        mac: ["45:67:89:ab:cd:ef"]
      - ifname: eth1
        spaces: [floating]
        mac: ["45:67:89:ab:ce:f0"]
      power:
        type: ipmi
        address: 192.168.10.104
        user: admin
        pass: admin
    - name: rack-1-m5
      architecture: x86_64
      roles: [compute,storage]
      nics:
      - ifname: eth0
        spaces: [admin]
        mac: ["56:78:9a:bc:de:f0"]
      - ifname: eth1
        spaces: [floating]
        mac: ["56:78:9a:bc:df:f1"]
      power:
        type: ipmi
        address: 192.168.10.105
        user: admin
        pass: admin
    floating-ip-range: 10.5.15.6,10.5.15.250,10.5.15.254,10.5.15.0/24
    ext-port: "eth1"
    dns: 8.8.8.8
opnfv:
    release: d
    distro: xenial
    type: noha
    openstack: pike
    sdncontroller:
    - type: nosdn
    storage:
    - type: ceph
      disk: /dev/sdb
    feature: odl_l2
    spaces:
    - type: admin
      bridge: brAdmin
      cidr: 10.5.1.0/24
      gateway:
      vlan:
    - type: floating
      bridge: brExt
      cidr: 10.5.15.0/24
      gateway: 10.5.15.1
      vlan:
Once you have prepared the configuration file, you may begin with the automatic MAAS deployment.
This section will guide you through the MAAS deployment. This is the first of two JOID deployment steps.
Note
For all the commands in this document, please do not use a root user
account to run but instead use a non-root user account. We recommend using
the ubuntu user as described above.
If you have already enabled maas for your environment and installed it then there is no need to enabled it again or install it. If you have patches from previous MAAS install, then you can apply them here.
Pre-installed MAAS without using the 03-maasdeploy.sh script is not
supported. We strongly suggest to use 03-maasdeploy.sh script to deploy
the MAAS and JuJu environment.
With the labconfig.yaml configuration file ready, you can start the MAAS
deployment. In the joid/ci directory, run the following command:
# in joid/ci directory
./03-maasdeploy.sh custom <absolute path of config>/labconfig.yaml
If you prefer, you can also host your labconfig.yaml file remotely and JOID
will download it from there. Just run
# in joid/ci directory
./03-maasdeploy.sh custom http://<web_site_location>/labconfig.yaml
This step will take approximately 30 minutes to a couple of hours depending on your environment. This script will do the following:
Already during deployment, once MAAS is installed, configured and launched,
you can visit the MAAS Web UI and observe the progress of the deployment.
Simply open the IP of your jumphost in a web browser and navigate to the
/MAAS directory (e.g. http://10.5.1.1/MAAS in our example). You can
login with username ubuntu and password ubuntu. In the Nodes page,
you can see the bootstrap node and the bare metal servers and their status.
Hint
If you need to re-run this step, first undo the performed actions by running
# in joid/ci
./cleanvm.sh
./cleanmaas.sh
# now you can run the ./03-maasdeploy.sh script again
This section will guide you through the Juju an OPNFV deployment. This is the second of two JOID deployment steps.
JOID allows you to deploy different combinations of OpenStack and SDN solutions in HA or no-HA mode. For OpenStack, it supports Pike and Ocata. For SDN, it supports Open vSwitch, OpenContrail, OpenDaylight and ONOS (Open Network Operating System). In addition to HA or no-HA mode, it also supports deploying the latest from the development tree (tip).
To deploy OPNFV on the previously deployed MAAS system, use the deploy.sh
script. For example:
# in joid/ci directory
./deploy.sh -d xenial -m openstack -o pike -s nosdn -f none -t noha -l custom
The above command starts an OPNFV deployment with Ubuntu Xenial (16.04) distro,
OpenStack model, Pike version of OpenStack, Open vSwitch (and no other SDN),
no special features, no-HA OpenStack mode and with custom labconfig. I.e. this
corresponds to the os-nosdn-nofeature-noha OPNFV deployment scenario.
Note
You can see the usage info of the script by running
./deploy.sh --help
Possible script arguments are as follows.
Ubuntu distro to deploy
[-d <trusty|xenial>]
trusty: Ubuntu 16.04.xenial: Ubuntu 17.04.Model to deploy
[-m <openstack|kubernetes>]
JOID introduces two various models to deploy.
openstack: Openstack, which will be used for KVM/LXD
container-based workloads.kubernetes: Kubernetes model will be used for docker-based
workloads.Version of Openstack deployed
[-o <pike|ocata>]
pike: Pike version of OpenStack.ocata: Ocata version of OpenStack.SDN controller
[-s <nosdn|odl|opencontrail|onos|canal>]
nosdn: Open vSwitch only and no other SDN.odl: OpenDayLight Boron version.opencontrail: OpenContrail SDN.onos: ONOS framework as SDN.cana;: canal CNI plugin for kubernetes.Feature to deploy (comma separated list)
[-f <lxd|dvr|sfc|dpdk|ipv6|none>]
none: No special feature will be enabled.ipv6: IPv6 will be enabled for tenant in OpenStack.lxd: With this feature hypervisor will be LXD rather than KVM.dvr: Will enable distributed virtual routing.dpdk: Will enable DPDK feature.sfc: Will enable sfc feature only supported with ONOS deployment.lb: Load balancing in case of Kubernetes will be enabled.ceph: Ceph storage Kubernetes will be enabled.Mode of Openstack deployed
[-t <noha|ha|tip>]
noha: No High Availability.ha: High Availability.tip: The latest from the development tree.Where to deploy
[-l <custom|default|...>]
custom: For bare metal deployment where labconfig.yaml was provided
externally and not part of JOID package.default: For virtual deployment where installation will be done on
KVM created using 03-maasdeploy.sh.Architecture
[-a <amd64|ppc64el|aarch64>]
amd64: Only x86 architecture will be used. Future version will
support arm64 as well.This step may take up to a couple of hours, depending on your configuration, internet connectivity etc. You can check the status of the deployment by running this command in another terminal:
watch juju status --format tabular
Hint
If you need to re-run this step, first undo the performed actions by running
# in joid/ci
./clean.sh
# now you can run the ./deploy.sh script again
Following OPNFV scenarios can be deployed using JOID. Separate yaml bundle will be created to deploy the individual scenario.
| Scenario | Owner | Known Issues |
|---|---|---|
| os-nosdn-nofeature-ha | Joid | |
| os-nosdn-nofeature-noha | Joid | |
| os-odl_l2-nofeature-ha | Joid | Floating ips are not working on this deployment. |
| os-nosdn-lxd-ha | Joid | Yardstick team is working to support. |
| os-nosdn-lxd-noha | Joid | Yardstick team is working to support. |
| os-onos-nofeature-ha | ONOSFW | |
| os-onos-sfc-ha | ONOSFW | |
| k8-nosdn-nofeature-noha | Joid | No support from Functest and Yardstick |
| k8-nosdn-lb-noha | Joid | No support from Functest and Yardstick |
By default debug is enabled in script and error messages will be printed on ssh terminal where you are running the scripts.
Logs are indispensable when it comes time to troubleshoot. If you want to see
all the service unit deployment logs, you can run juju debug-log in another
terminal. The debug-log command shows the consolidated logs of all Juju agents
(machine and unit logs) running in the environment.
To view a single service unit deployment log, use juju ssh to access to the
deployed unit. For example to login into nova-compute unit and look for
/var/log/juju/unit-nova-compute-0.log for more info:
ubuntu@R4N4B1:~$ juju ssh nova-compute/0
Warning: Permanently added '172.16.50.60' (ECDSA) to the list of known hosts.
Warning: Permanently added '3-r4n3b1-compute.maas' (ECDSA) to the list of known hosts.
Welcome to Ubuntu 16.04.1 LTS (GNU/Linux 3.13.0-77-generic x86_64)

* Documentation:  https://help.ubuntu.com/
<skipped>
Last login: Tue Feb  2 21:23:56 2016 from bootstrap.maas
ubuntu@3-R4N3B1-compute:~$ sudo -i
root@3-R4N3B1-compute:~# cd /var/log/juju/
root@3-R4N3B1-compute:/var/log/juju# ls
machine-2.log  unit-ceilometer-agent-0.log  unit-ceph-osd-0.log  unit-neutron-contrail-0.log  unit-nodes-compute-0.log  unit-nova-compute-0.log  unit-ntp-0.log
root@3-R4N3B1-compute:/var/log/juju#
Note
By default Juju will add the Ubuntu user keys for authentication into the deployed server and only ssh access will be available.
Once you resolve the error, go back to the jump host to rerun the charm hook with
$ juju resolved --retry <unit>
If you would like to start over, run
juju destroy-environment <environment name> to release the resources, then
you can run deploy.sh again.
To access of any of the nodes or containers, use
juju ssh <service name>/<instance id>
For example:
juju ssh openstack-dashboard/0
juju ssh nova-compute/0
juju ssh neutron-gateway/0
You can see the available nodes and containers by running
juju status
All charm log files are available under /var/log/juju.
If you have questions, you can join the JOID channel #opnfv-joid on
Freenode.
The following are the common issues we have collected from the community:
The right variables are not passed as part of the deployment procedure.
./deploy.sh -o pike -s nosdn -t ha -l custom -f none
If you have not setup MAAS with 03-maasdeploy.sh then the
./clean.sh command could hang, the juju status command may hang
because the correct MAAS API keys are not mentioned in cloud listing for
MAAS.
_Solution_: Please make sure you have an MAAS cloud listed using juju clouds and the correct MAAS API key has been added.
Deployment times out: use the command juju status and make sure all
service containers receive an IP address and they are executing code.
Ensure there is no service in the error state.
In case the cleanup process hangs,run the juju destroy-model command manually.
Direct console access via the OpenStack GUI can be quite helpful if you
need to login to a VM but cannot get to it over the network.
It can be enabled by setting the console-access-protocol in the
nova-cloud-controller to vnc. One option is to directly edit the
juju-deployer bundle and set it there prior to deploying OpenStack.
nova-cloud-controller:
  options:
    console-access-protocol: vnc
To access the console, just click on the instance in the OpenStack GUI and select the Console tab.
The virtual deployment of JOID is very simple and does not require any special configuration. To deploy a virtual JOID environment follow these few simple steps:
Install a clean Ubuntu 16.04 (Xenial) server on the machine. You can use the tips noted in the first step of the Jumphost installation and configuration for bare metal deployment. However, no specialized configuration is needed, just make sure you have Internet connectivity.
Run the MAAS deployment for virtual deployment without customized labconfig file:
# in joid/ci directory
./03-maasdeploy.sh
Run the Juju/OPNFV deployment with your desired configuration parameters,
but with -l default -i 1 for virtual deployment. For example to deploy
the Kubernetes model:
# in joid/ci directory
./deploy.sh -d xenial -s nosdn -t noha -f none -m kubernetes -l default -i 1
Now you should have a working JOID deployment with three virtual nodes. In case of any issues, refer to the Troubleshoot section.
Once Juju deployment is complete, use juju status to verify that all
deployed units are in the _Ready_ state.
Find the OpenStack dashboard IP address from the juju status output, and
see if you can login via a web browser. The domain, username and password are
admin_domain, admin and openstack.
Optionally, see if you can log in to the Juju GUI. Run juju gui to see the
login details.
If you deploy OpenDaylight, OpenContrail or ONOS, find the IP address of the web UI and login. Please refer to each SDN bundle.yaml for the login username/password.
Note
If the deployment worked correctly, you can get easier access to the web
dashboards with the setupproxy.sh script described in the next section.
MAAS, Juju and OpenStack/Kubernetes all come with their own web-based dashboards. However, they might be on private networks and require SSH tunnelling to see them. To simplify access to them, you can use the following script to configure the Apache server on Jumphost to work as a proxy to Juju and OpenStack/Kubernetes dashboards. Furthermore, this script also creates JOID deployment homepage with links to these dashboards, listing also their access credentials.
Simply run the following command after JOID has been deployed.
# run in joid/ci directory
# for OpenStack model:
./setupproxy.sh openstack
# for Kubernetes model:
./setupproxy.sh kubernetes
You can also use the -v argument for more verbose output with xtrace.
After the script has finished, it will print out the addresses and credentials to the dashboards. You can also find the JOID deployment homepage if you open the Jumphost’s IP address in your web browser.
At the end of the deployment, the admin-openrc with OpenStack login
credentials will be created for you. You can source the file and start
configuring OpenStack via CLI.
. ~/joid_config/admin-openrc
The script openstack.sh under joid/ci can be used to configure the
OpenStack after deployment.
./openstack.sh <nosdn> custom xenial pike
Below commands are used to setup domain in heat.
juju run-action heat/0 domain-setup
Upload cloud images and creates the sample network to test.
joid/juju/get-cloud-images
joid/juju/joid-configure-openstack
The script k8.sh under joid/ci would be used to show the Kubernetes
workload and create sample pods.
./k8.sh
At the end of the deployment, the admin-openrc with OpenStack login
credentials will be created for you. You can source the file and start
configuring OpenStack via CLI.
cat ~/joid_config/admin-openrc
export OS_USERNAME=admin
export OS_PASSWORD=openstack
export OS_TENANT_NAME=admin
export OS_AUTH_URL=http://172.16.50.114:5000/v2.0
export OS_REGION_NAME=RegionOne
We have prepared some scripts to help your configure the OpenStack cloud that you just deployed. In each SDN directory, for example joid/ci/opencontrail, there is a ‘scripts’ folder where you can find the scripts. These scripts are created to help you configure a basic OpenStack Cloud to verify the cloud. For more information on OpenStack Cloud configuration, please refer to the OpenStack Cloud Administrator Guide: http://docs.openstack.org/user-guide-admin/. Similarly, for complete SDN configuration, please refer to the respective SDN administrator guide.
Each SDN solution requires slightly different setup. Please refer to the README
in each SDN folder. Most likely you will need to modify the openstack.sh
and cloud-setup.sh scripts for the floating IP range, private IP network,
and SSH keys. Please go through openstack.sh, glance.sh and
cloud-setup.sh and make changes as you see fit.
Let’s take a look at those for the Open vSwitch and briefly go through each script so you know what you need to change for your own environment.
$ ls ~/joid/juju
configure-juju-on-openstack  get-cloud-images  joid-configure-openstack
Let’s first look at openstack.sh. First there are 3 functions defined,
configOpenrc(), unitAddress(), and unitMachine().
configOpenrc() {
  cat <<-EOF
      export SERVICE_ENDPOINT=$4
      unset SERVICE_TOKEN
      unset SERVICE_ENDPOINT
      export OS_USERNAME=$1
      export OS_PASSWORD=$2
      export OS_TENANT_NAME=$3
      export OS_AUTH_URL=$4
      export OS_REGION_NAME=$5
EOF
}

unitAddress() {
  if [[ "$jujuver" < "2" ]]; then
      juju status --format yaml | python -c "import yaml; import sys; print yaml.load(sys.stdin)[\"services\"][\"$1\"][\"units\"][\"$1/$2\"][\"public-address\"]" 2> /dev/null
  else
      juju status --format yaml | python -c "import yaml; import sys; print yaml.load(sys.stdin)[\"applications\"][\"$1\"][\"units\"][\"$1/$2\"][\"public-address\"]" 2> /dev/null
  fi
}

unitMachine() {
  if [[ "$jujuver" < "2" ]]; then
      juju status --format yaml | python -c "import yaml; import sys; print yaml.load(sys.stdin)[\"services\"][\"$1\"][\"units\"][\"$1/$2\"][\"machine\"]" 2> /dev/null
  else
      juju status --format yaml | python -c "import yaml; import sys; print yaml.load(sys.stdin)[\"applications\"][\"$1\"][\"units\"][\"$1/$2\"][\"machine\"]" 2> /dev/null
  fi
}
The function configOpenrc() creates the OpenStack login credentials, the function unitAddress() finds the IP address of the unit, and the function unitMachine() finds the machine info of the unit.
create_openrc() {
   keystoneIp=$(keystoneIp)
   if [[ "$jujuver" < "2" ]]; then
       adminPasswd=$(juju get keystone | grep admin-password -A 5 | grep value | awk '{print $2}' 2> /dev/null)
   else
       adminPasswd=$(juju config keystone | grep admin-password -A 5 | grep value | awk '{print $2}' 2> /dev/null)
   fi

   configOpenrc admin $adminPasswd admin http://$keystoneIp:5000/v2.0 RegionOne > ~/joid_config/admin-openrc
   chmod 0600 ~/joid_config/admin-openrc
}
This finds the IP address of the keystone unit 0, feeds in the OpenStack admin credentials to a new file name ‘admin-openrc’ in the ‘~/joid_config/’ folder and change the permission of the file. It’s important to change the credentials here if you use a different password in the deployment Juju charm bundle.yaml.
neutron net-show ext-net > /dev/null 2>&1 || neutron net-create ext-net \
                                               --router:external=True \
                                               --provider:network_type flat \
                                               --provider:physical_network physnet1
neutron subnet-show ext-subnet > /dev/null 2>&1 || neutron subnet-create ext-net \
  --name ext-subnet --allocation-pool start=$EXTNET_FIP,end=$EXTNET_LIP \
  --disable-dhcp --gateway $EXTNET_GW $EXTNET_NET
This section will create the ext-net and ext-subnet for defining the for floating ips.
openstack congress datasource create nova "nova" \
  --config username=$OS_USERNAME \
  --config tenant_name=$OS_TENANT_NAME \
  --config password=$OS_PASSWORD \
  --config auth_url=http://$keystoneIp:5000/v2.0
This section will create the congress datasource for various services. Each service datasource will have entry in the file.
folder=/srv/data/
sudo mkdir $folder || true

if grep -q 'virt-type: lxd' bundles.yaml; then
   URLS=" \
   http://download.cirros-cloud.net/0.3.4/cirros-0.3.4-x86_64-lxc.tar.gz \
   http://cloud-images.ubuntu.com/xenial/current/xenial-server-cloudimg-amd64-root.tar.gz "

else
   URLS=" \
   http://cloud-images.ubuntu.com/precise/current/precise-server-cloudimg-amd64-disk1.img \
   http://cloud-images.ubuntu.com/trusty/current/trusty-server-cloudimg-amd64-disk1.img \
   http://cloud-images.ubuntu.com/xenial/current/xenial-server-cloudimg-amd64-disk1.img \
   http://mirror.catn.com/pub/catn/images/qcow2/centos6.4-x86_64-gold-master.img \
   http://cloud.centos.org/centos/7/images/CentOS-7-x86_64-GenericCloud.qcow2 \
   http://download.cirros-cloud.net/0.3.4/cirros-0.3.4-x86_64-disk.img "
fi

for URL in $URLS
do
FILENAME=${URL##*/}
if [ -f $folder/$FILENAME ];
then
   echo "$FILENAME already downloaded."
else
   wget  -O  $folder/$FILENAME $URL
fi
done
This section of the file will download the images to jumphost if not found to be used with openstack VIM.
Note
The image downloading and uploading might take too long and time out. In this case, use juju ssh glance/0 to log in to the glance unit 0 and run the script again, or manually run the glance commands.
source ~/joid_config/admin-openrc
First, source the the admin-openrc file.
Upload the images into Glance to be used for creating the VM.
# adjust tiny image
nova flavor-delete m1.tiny
nova flavor-create m1.tiny 1 512 8 1
Adjust the tiny image profile as the default tiny instance is too small for Ubuntu.
# configure security groups
neutron security-group-rule-create --direction ingress --ethertype IPv4 --protocol icmp --remote-ip-prefix 0.0.0.0/0 default
neutron security-group-rule-create --direction ingress --ethertype IPv4 --protocol tcp --port-range-min 22 --port-range-max 22 --remote-ip-prefix 0.0.0.0/0 default
Open up the ICMP and SSH access in the default security group.
# import key pair
keystone tenant-create --name demo --description "Demo Tenant"
keystone user-create --name demo --tenant demo --pass demo --email demo@demo.demo

nova keypair-add --pub-key id_rsa.pub ubuntu-keypair
Create a project called ‘demo’ and create a user called ‘demo’ in this project. Import the key pair.
# configure external network
neutron net-create ext-net --router:external --provider:physical_network external --provider:network_type flat --shared
neutron subnet-create ext-net --name ext-subnet --allocation-pool start=10.5.8.5,end=10.5.8.254 --disable-dhcp --gateway 10.5.8.1 10.5.8.0/24
This section configures an external network ‘ext-net’ with a subnet called ‘ext-subnet’. In this subnet, the IP pool starts at 10.5.8.5 and ends at 10.5.8.254. DHCP is disabled. The gateway is at 10.5.8.1, and the subnet mask is 10.5.8.0/24. These are the public IPs that will be requested and associated to the instance. Please change the network configuration according to your environment.
# create vm network
neutron net-create demo-net
neutron subnet-create --name demo-subnet --gateway 10.20.5.1 demo-net 10.20.5.0/24
This section creates a private network for the instances. Please change accordingly.
neutron router-create demo-router

neutron router-interface-add demo-router demo-subnet

neutron router-gateway-set demo-router ext-net
This section creates a router and connects this router to the two networks we just created.
# create pool of floating ips
i=0
while [ $i -ne 10 ]; do
  neutron floatingip-create ext-net
  i=$((i + 1))
done
Finally, the script will request 10 floating IPs.
This script can be used to do juju bootstrap on openstack so that Juju can be used as model tool to deploy the services and VNF on top of openstack using the JOID.
By default, running the script ./03-maasdeploy.sh will automatically create the KVM VMs on a single machine and configure everything for you.
if [ ! -e ./labconfig.yaml ]; then
    virtinstall=1
    labname="default"
    cp ../labconfig/default/labconfig.yaml ./
    cp ../labconfig/default/deployconfig.yaml ./
Please change joid/ci/labconfig/default/labconfig.yaml accordingly. The MAAS deployment script will do the following: 1. Create bootstrap VM. 2. Install MAAS on the jumphost. 3. Configure MAAS to enlist and commission VM for Juju bootstrap node.
Later, the 03-massdeploy.sh script will create three additional VMs and register them into the MAAS Server:
if [ "$virtinstall" -eq 1 ]; then
          sudo virt-install --connect qemu:///system --name $NODE_NAME --ram 8192 --cpu host --vcpus 4 \
                   --disk size=120,format=qcow2,bus=virtio,io=native,pool=default \
                   $netw $netw --boot network,hd,menu=off --noautoconsole --vnc --print-xml | tee $NODE_NAME

          nodemac=`grep  "mac address" $NODE_NAME | head -1 | cut -d '"' -f 2`
          sudo virsh -c qemu:///system define --file $NODE_NAME
          rm -f $NODE_NAME
          maas $PROFILE machines create autodetect_nodegroup='yes' name=$NODE_NAME \
              tags='control compute' hostname=$NODE_NAME power_type='virsh' mac_addresses=$nodemac \
              power_parameters_power_address='qemu+ssh://'$USER'@'$MAAS_IP'/system' \
              architecture='amd64/generic' power_parameters_power_id=$NODE_NAME
          nodeid=$(maas $PROFILE machines read | jq -r '.[] | select(.hostname == '\"$NODE_NAME\"').system_id')
          maas $PROFILE tag update-nodes control add=$nodeid || true
          maas $PROFILE tag update-nodes compute add=$nodeid || true

fi
If your bare metal servers support IPMI, they can be discovered and enlisted automatically by the MAAS server. You need to configure bare metal servers to PXE boot on the network interface where they can reach the MAAS server. With nodes set to boot from a PXE image, they will start, look for a DHCP server, receive the PXE boot details, boot the image, contact the MAAS server and shut down.
During this process, the MAAS server will be passed information about the node, including the architecture, MAC address and other details which will be stored in the database of nodes. You can accept and commission the nodes via the web interface. When the nodes have been accepted the selected series of Ubuntu will be installed.
Juju and MAAS together allow you to assign different roles to servers, so that hardware and software can be configured according to their roles. We have briefly mentioned and used this feature in our example. Please visit Juju Machine Constraints https://jujucharms.com/docs/stable/charms-constraints and MAAS tags https://maas.ubuntu.com/docs/tags.html for more information.
When you have limited access policy in your environment, for example, when only the Jump Host has Internet access, but not the rest of the servers, we provide tools in JOID to support the offline installation.
The following package set is provided to those wishing to experiment with a ‘disconnected from the internet’ setup when deploying JOID utilizing MAAS. These instructions provide basic guidance as to how to accomplish the task, but it should be noted that due to the current reliance of MAAS and DNS, that behavior and success of deployment may vary depending on infrastructure setup. An official guided setup is in the roadmap for the next release:
Get the packages from here: https://launchpad.net/~thomnico/+archive/ubuntu/ubuntu-cloud-mirrors
Note
The mirror is quite large 700GB in size, and does not mirror SDN repo/ppa.
Additionally to make juju use a private repository of charms instead of using an external location are provided via the following link and configuring environments.yaml to use cloudimg-base-url: https://github.com/juju/docs/issues/757
./deploy.sh -o pike -s nosdn -t ha -l custom -f none -d xenial -m openstack
./deploy.sh -l custom -f none -m kubernetes
./deploy.sh -l custom -f lb -m kubernetes
./deploy.sh -s ovn -l custom -f lb -m kubernetes
./deploy.sh -o pike -s ocl -t ha -l custom -f none -d xenial -m openstack
./deploy.sh -s canal -l custom -f lb -m kubernetes
./deploy.sh -l custom -f lb,ceph -m kubernetes
This document will explain how to install OPNFV Fraser with JOID including installing JOID, configuring JOID for your environment, and deploying OPNFV with different SDN solutions in HA, or non-HA mode. Prerequisites include
NOTE: Above configuration is minimum. For better performance and usage of the OpenStack, please consider higher specs for all nodes.
Make sure all servers are connected to top of rack switch and configured accordingly. No DHCP server should be up and configured. Configure gateways only on eth0 and eth1 networks to access the network outside your lab.
JOID as Juju OPNFV Infrastructure Deployer allows you to deploy different combinations of OpenStack release and SDN solution in HA or non-HA mode. For OpenStack, JOID supports Juno and Liberty. For SDN, it supports Openvswitch, OpenContrail, OpenDayLight, and ONOS. In addition to HA or non-HA mode, it also supports deploying from the latest development tree.
JOID heavily utilizes the technology developed in Juju and MAAS. Juju is a state-of-the-art, open source, universal model for service oriented architecture and service oriented deployments. Juju allows you to deploy, configure, manage, maintain, and scale cloud services quickly and efficiently on public clouds, as well as on physical servers, OpenStack, and containers. You can use Juju from the command line or through its powerful GUI. MAAS (Metal-As-A-Service) brings the dynamism of cloud computing to the world of physical provisioning and Ubuntu. Connect, commission and deploy physical servers in record time, re-allocate nodes between services dynamically, and keep them up to date; and in due course, retire them from use. In conjunction with the Juju service orchestration software, MAAS will enable you to get the most out of your physical hardware and dynamically deploy complex services with ease and confidence.
For more info on Juju and MAAS, please visit https://jujucharms.com/ and http://maas.ubuntu.com.
The MAAS server is installed and configured on Jumphost with Ubuntu 16.04 LTS with access to the Internet. Another VM is created to be managed by MAAS as a bootstrap node for Juju. The rest of the resources, bare metal or virtual, will be registered and provisioned in MAAS. And finally the MAAS environment details are passed to Juju for use.
We will use 03-maasdeploy.sh to automate the deployment of MAAS clusters for use as a Juju provider. MAAS-deployer uses a set of configuration files and simple commands to build a MAAS cluster using virtual machines for the region controller and bootstrap hosts and automatically commission nodes as required so that the only remaining step is to deploy services with Juju. For more information about the maas-deployer, please see https://launchpad.net/maas-deployer.
Let’s get started on the Jump Host node.
The MAAS server is going to be installed and configured on a Jumphost machine. We need to create bridges on the Jump Host prior to setting up the MAAS.
NOTE: For all the commands in this document, please do not use a ‘root’ user account to run. Please create a non root user account. We recommend using the ‘ubuntu’ user.
Install the bridge-utils package on the Jump Host and configure a minimum of two bridges, one for the Admin network, the other for the Public network:
$ sudo apt-get install bridge-utils

$ cat /etc/network/interfaces
# This file describes the network interfaces available on your system
# and how to activate them. For more information, see interfaces(5).

# The loopback network interface
auto lo
iface lo inet loopback

iface p1p1 inet manual

auto brAdm
iface brAdm inet static
    address 172.16.50.51
    netmask 255.255.255.0
    bridge_ports p1p1

iface p1p2 inet manual

auto brPublic
iface brPublic inet static
    address 10.10.15.1
    netmask 255.255.240.0
    gateway 10.10.10.1
    dns-nameservers 8.8.8.8
    bridge_ports p1p2
NOTE: If you choose to use separate networks for management, data, and storage, then you need to create a bridge for each interface. In case of VLAN tags, make the appropriate network on jump-host depend upon VLAN ID on the interface.
NOTE: The Ethernet device names can vary from one installation to another. Please change the Ethernet device names according to your environment.
MAAS has been integrated in the JOID project. To get the JOID code, please run
$ sudo apt-get install git
$ git clone https://gerrit.opnfv.org/gerrit/p/joid.git
To set up your own environment, create a directory in joid/ci/maas/<company name>/<pod number>/ and copy an existing JOID environment over. For example:
$ cd joid/ci
$ mkdir -p ../labconfig/myown/pod
$ cp ../labconfig/cengn/pod2/labconfig.yaml ../labconfig/myown/pod/
Now let’s configure labconfig.yaml file. Please modify the sections in the labconfig as per your lab configuration.
## Change the name of the lab you want maas name will get firmat as per location and rack name ## location: myown racks: - rack: pod
# Define one network and control and two control, compute and storage # and rest for compute and storage for backward compaibility. again # server with more disks should be used for compute and storage only. nodes: # DCOMP4-B, 24cores, 64G, 2disk, 4TBdisk - name: rack-2-m1
architecture: x86_64 roles: [network,control] nics: - ifname: eth0
spaces: [admin] mac: [“0c:c4:7a:3a:c5:b6”]
- ifname: eth1 spaces: [floating] mac: [“0c:c4:7a:3a:c5:b7”]
- power:
- type: ipmi address: <bmc ip> user: <bmc username> pass: <bmc password>
## repeate the above section for number of hardware nodes you have it.
release: d distro: xenial type: noha openstack: pike sdncontroller: - type: nosdn storage: - type: ceph
disk: /dev/sdb
feature: odl_l2
spaces: - type: admin
bridge: brAdm cidr: 10.120.0.0/24 gateway: 10.120.0.254 vlan:
Next we will use the 03-maasdeploy.sh in joid/ci to kick off maas deployment.
Now run the 03-maasdeploy.sh script with the environment you just created
~/joid/ci$ ./03-maasdeploy.sh custom ../labconfig/mylab/pod/labconfig.yaml
This will take approximately 30 minutes to couple of hours depending on your environment. This script will do the following: 1. Create 1 VM (KVM). 2. Install MAAS on the Jumphost. 3. Configure MAAS to enlist and commission a VM for Juju bootstrap node. 4. Configure MAAS to enlist and commission bare metal servers. 5. Download and load 16.04 images to be used by MAAS.
When it’s done, you should be able to view the MAAS webpage (in our example http://172.16.50.2/MAAS) and see 1 bootstrap node and bare metal servers in the ‘Ready’ state on the nodes page.
During the installation process, please carefully review the error messages.
Join IRC channel #opnfv-joid on freenode to ask question. After the issues are resolved, re-running 03-maasdeploy.sh will clean up the VMs created previously. There is no need to manually undo what’s been done.
JOID allows you to deploy different combinations of OpenStack release and SDN solution in HA or non-HA mode. For OpenStack, it supports Juno and Liberty. For SDN, it supports Open vSwitch, OpenContrail, OpenDaylight and ONOS (Open Network Operating System). In addition to HA or non-HA mode, it also supports deploying the latest from the development tree (tip).
The deploy.sh script in the joid/ci directoy will do all the work for you. For example, the following deploys OpenStack Pike with OpenvSwitch in a HA mode.
~/joid/ci$ ./deploy.sh -o pike -s nosdn -t ha -l custom -f none -m openstack
The deploy.sh script in the joid/ci directoy will do all the work for you. For example, the following deploys Kubernetes with Load balancer on the pod.
~/joid/ci$ ./deploy.sh -m openstack -f lb
Take a look at the deploy.sh script. You will find we support the following for each option:
[-s]
  nosdn: Open vSwitch.
  odl: OpenDayLight Lithium version.
  opencontrail: OpenContrail.
  onos: ONOS framework as SDN.
[-t]
  noha: NO HA mode of OpenStack.
  ha: HA mode of OpenStack.
  tip: The tip of the development.
[-o]
  ocata: OpenStack Ocata version.
  pike: OpenStack Pike version.
[-l]
  default: For virtual deployment where installation will be done on KVM created using ./03-maasdeploy.sh
  custom: Install on bare metal OPNFV defined by labconfig.yaml
[-f]
  none: no special feature will be enabled.
  ipv6: IPv6 will be enabled for tenant in OpenStack.
  dpdk: dpdk will be enabled.
  lxd: virt-type will be lxd.
  dvr: DVR will be enabled.
  lb: Load balancing in case of Kubernetes will be enabled.
[-d]
  xenial: distro to be used is Xenial 16.04
[-a]
  amd64: Only x86 architecture will be used. Future version will support arm64 as well.
[-m]
  openstack: Openstack model will be deployed.
  kubernetes: Kubernetes model will be deployed.
The script will call 01-bootstrap.sh to bootstrap the Juju VM node, then it will call 02-deploybundle.sh with the corrosponding parameter values.
./02-deploybundle.sh $opnfvtype $openstack $opnfvlab $opnfvsdn $opnfvfeature $opnfvdistro
Python script GenBundle.py would be used to create bundle.yaml based on the template defined in the config_tpl/juju2/ directory.
By default debug is enabled in the deploy.sh script and error messages will be printed on the SSH terminal where you are running the scripts. It could take an hour to a couple of hours (maximum) to complete.
You can check the status of the deployment by running this command in another terminal:
$ watch juju status --format tabular
This will refresh the juju status output in tabular format every 2 seconds.
Next we will show you what Juju is deploying and to where, and how you can modify based on your own needs.
The magic behind Juju is a collection of software components called charms. They contain all the instructions necessary for deploying and configuring cloud-based services. The charms publicly available in the online Charm Store represent the distilled DevOps knowledge of experts.
A bundle is a set of services with a specific configuration and their corresponding relations that can be deployed together in a single step. Instead of deploying a single service, they can be used to deploy an entire workload, with working relations and configuration. The use of bundles allows for easy repeatability and for sharing of complex, multi-service deployments.
For OPNFV, we have created the charm bundles for each SDN deployment. They are stored in each directory in ~/joid/ci.
We use Juju to deploy a set of charms via a yaml configuration file. You can find the complete format guide for the Juju configuration file here: http://pythonhosted.org/juju-deployer/config.html
In the ‘services’ subsection, here we deploy the ‘Ubuntu Xenial charm from the charm store,’ You can deploy the same charm and name it differently such as the second service ‘nodes-compute.’ The third service we deploy is named ‘ntp’ and is deployed from the NTP Trusty charm from the Charm Store. The NTP charm is a subordinate charm, which is designed for and deployed to the running space of another service unit.
The tag here is related to what we define in the deployment.yaml file for the MAAS. When ‘constraints’ is set, Juju will ask its provider, in this case MAAS, to provide a resource with the tags. In this case, Juju is asking one resource tagged with control and one resource tagged with compute from MAAS. Once the resource information is passed to Juju, Juju will start the installation of the specified version of Ubuntu.
In the next subsection, we define the relations between the services. The beauty of Juju and charms is you can define the relation of two services and all the service units deployed will set up the relations accordingly. This makes scaling out a very easy task. Here we add the relation between NTP and the two bare metal services.
Once the relations are established, Juju considers the deployment complete and moves to the next.
juju deploy bundles.yaml
It will start the deployment , which will retry the section,
nova-cloud-controller:
  branch: lp:~openstack-charmers/charms/trusty/nova-cloud-controller/next
  num_units: 1
  options:
    network-manager: Neutron
  to:
    - "lxc:nodes-api=0"
We define a service name ‘nova-cloud-controller,’ which is deployed from the next branch of the nova-cloud-controller Trusty charm hosted on the Launchpad openstack-charmers team. The number of units to be deployed is 1. We set the network-manager option to ‘Neutron.’ This 1-service unit will be deployed to a LXC container at service ‘nodes-api’ unit 0.
To find out what other options there are for this particular charm, you can go to the code location at http://bazaar.launchpad.net/~openstack-charmers/charms/trusty/nova-cloud-controller/next/files and the options are defined in the config.yaml file.
Once the service unit is deployed, you can see the current configuration by running juju get:
$ juju config nova-cloud-controller
You can change the value with juju config, for example:
$ juju config nova-cloud-controller network-manager=’FlatManager’
Charms encapsulate the operation best practices. The number of options you need to configure should be at the minimum. The Juju Charm Store is a great resource to explore what a charm can offer you. Following the nova-cloud-controller charm example, here is the main page of the recommended charm on the Charm Store: https://jujucharms.com/nova-cloud-controller/trusty/66
If you have any questions regarding Juju, please join the IRC channel #opnfv-joid on freenode for JOID related questions or #juju for general questions.
Once juju-deployer is complete, use juju status –format tabular to verify that all deployed units are in the ready state.
Find the Openstack-dashboard IP address from the juju status output, and see if you can login via a web browser. The username and password is admin/openstack.
Optionally, see if you can log in to the Juju GUI. The Juju GUI is on the Juju bootstrap node, which is the second VM you define in the 03-maasdeploy.sh file. The username and password is admin/admin.
If you deploy OpenDaylight, OpenContrail or ONOS, find the IP address of the web UI and login. Please refer to each SDN bundle.yaml for the login username/password.
Logs are indispensable when it comes time to troubleshoot. If you want to see all the service unit deployment logs, you can run juju debug-log in another terminal. The debug-log command shows the consolidated logs of all Juju agents (machine and unit logs) running in the environment.
To view a single service unit deployment log, use juju ssh to access to the deployed unit. For example to login into nova-compute unit and look for /var/log/juju/unit-nova-compute-0.log for more info.
$ juju ssh nova-compute/0
Example:
ubuntu@R4N4B1:~$ juju ssh nova-compute/0
Warning: Permanently added '172.16.50.60' (ECDSA) to the list of known hosts.
Warning: Permanently added '3-r4n3b1-compute.maas' (ECDSA) to the list of known hosts.
Welcome to Ubuntu 16.04.1 LTS (GNU/Linux 3.13.0-77-generic x86_64)

* Documentation:  https://help.ubuntu.com/
<skipped>
Last login: Tue Feb  2 21:23:56 2016 from bootstrap.maas
ubuntu@3-R4N3B1-compute:~$ sudo -i
root@3-R4N3B1-compute:~# cd /var/log/juju/
root@3-R4N3B1-compute:/var/log/juju# ls
machine-2.log  unit-ceilometer-agent-0.log  unit-ceph-osd-0.log  unit-neutron-contrail-0.log  unit-nodes-compute-0.log  unit-nova-compute-0.log  unit-ntp-0.log
root@3-R4N3B1-compute:/var/log/juju#
NOTE: By default Juju will add the Ubuntu user keys for authentication into the deployed server and only ssh access will be available.
Once you resolve the error, go back to the jump host to rerun the charm hook with:
$ juju resolved --retry <unit>
If you would like to start over, run juju destroy-environment <environment name> to release the resources, then you can run deploy.sh again.
The following are the common issues we have collected from the community:
./deploy.sh -o pike -s nosdn -t ha -l custom -f none
If you have setup maas not with 03-maasdeploy.sh then the ./clean.sh command could hang, the juju status command may hang because the correct MAAS API keys are not mentioned in cloud listing for MAAS. Solution: Please make sure you have an MAAS cloud listed using juju clouds. and the correct MAAS API key has been added.
use the command juju status –format=tabular and make sure all service containers receive an IP address and they are executing code. Ensure there is no service in the error state.
In case the cleanup process hangs,run the juju destroy-model command manually.
Direct console access via the OpenStack GUI can be quite helpful if you need to login to a VM but cannot get to it over the network.
It can be enabled by setting the console-access-protocol in the nova-cloud-controller to vnc. One option is to directly edit the juju-deployer bundle and set it there prior to deploying OpenStack.
nova-cloud-controller:
options:
  console-access-protocol: vnc
To access the console, just click on the instance in the OpenStack GUI and select the Console tab.
At the end of the deployment, the admin-openrc with OpenStack login credentials will be created for you. You can source the file and start configuring OpenStack via CLI.
~/joid_config$ cat admin-openrc
export OS_USERNAME=admin
export OS_PASSWORD=openstack
export OS_TENANT_NAME=admin
export OS_AUTH_URL=http://172.16.50.114:5000/v2.0
export OS_REGION_NAME=RegionOne
We have prepared some scripts to help your configure the OpenStack cloud that you just deployed. In each SDN directory, for example joid/ci/opencontrail, there is a ‘scripts’ folder where you can find the scripts. These scripts are created to help you configure a basic OpenStack Cloud to verify the cloud. For more information on OpenStack Cloud configuration, please refer to the OpenStack Cloud Administrator Guide: http://docs.openstack.org/user-guide-admin/. Similarly, for complete SDN configuration, please refer to the respective SDN administrator guide.
Each SDN solution requires slightly different setup. Please refer to the README in each SDN folder. Most likely you will need to modify the openstack.sh and cloud-setup.sh scripts for the floating IP range, private IP network, and SSH keys. Please go through openstack.sh, glance.sh and cloud-setup.sh and make changes as you see fit.
Let’s take a look at those for the Open vSwitch and briefly go through each script so you know what you need to change for your own environment.
~/joid/juju$ ls
configure-juju-on-openstack  get-cloud-images  joid-configure-openstack
Let’s first look at ‘openstack.sh’. First there are 3 functions defined, configOpenrc(), unitAddress(), and unitMachine().
configOpenrc() {
  cat <<-EOF
      export SERVICE_ENDPOINT=$4
      unset SERVICE_TOKEN
      unset SERVICE_ENDPOINT
      export OS_USERNAME=$1
      export OS_PASSWORD=$2
      export OS_TENANT_NAME=$3
      export OS_AUTH_URL=$4
      export OS_REGION_NAME=$5
EOF
}

unitAddress() {
  if [[ "$jujuver" < "2" ]]; then
      juju status --format yaml | python -c "import yaml; import sys; print yaml.load(sys.stdin)[\"services\"][\"$1\"][\"units\"][\"$1/$2\"][\"public-address\"]" 2> /dev/null
  else
      juju status --format yaml | python -c "import yaml; import sys; print yaml.load(sys.stdin)[\"applications\"][\"$1\"][\"units\"][\"$1/$2\"][\"public-address\"]" 2> /dev/null
  fi
}

unitMachine() {
  if [[ "$jujuver" < "2" ]]; then
      juju status --format yaml | python -c "import yaml; import sys; print yaml.load(sys.stdin)[\"services\"][\"$1\"][\"units\"][\"$1/$2\"][\"machine\"]" 2> /dev/null
  else
      juju status --format yaml | python -c "import yaml; import sys; print yaml.load(sys.stdin)[\"applications\"][\"$1\"][\"units\"][\"$1/$2\"][\"machine\"]" 2> /dev/null
  fi
}
The function configOpenrc() creates the OpenStack login credentials, the function unitAddress() finds the IP address of the unit, and the function unitMachine() finds the machine info of the unit.
create_openrc() {
   keystoneIp=$(keystoneIp)
   if [[ "$jujuver" < "2" ]]; then
       adminPasswd=$(juju get keystone | grep admin-password -A 7 | grep value | awk '{print $2}' 2> /dev/null)
   else
       adminPasswd=$(juju config keystone | grep admin-password -A 7 | grep value | awk '{print $2}' 2> /dev/null)
   fi

   configOpenrc admin $adminPasswd admin http://$keystoneIp:5000/v2.0 RegionOne > ~/joid_config/admin-openrc
   chmod 0600 ~/joid_config/admin-openrc
}
This finds the IP address of the keystone unit 0, feeds in the OpenStack admin credentials to a new file name ‘admin-openrc’ in the ‘~/joid_config/’ folder and change the permission of the file. It’s important to change the credentials here if you use a different password in the deployment Juju charm bundle.yaml.
neutron net-show ext-net > /dev/null 2>&1 || neutron net-create ext-net \
                                               --router:external=True \
                                               --provider:network_type flat \
                                               --provider:physical_network physnet1
This section will create the ext-net and ext-subnet for defining the for floating ips.
openstack congress datasource create nova "nova" \
 --config username=$OS_USERNAME \
 --config tenant_name=$OS_TENANT_NAME \
 --config password=$OS_PASSWORD \
 --config auth_url=http://$keystoneIp:5000/v2.0
This section will create the congress datasource for various services. Each service datasource will have entry in the file.
folder=/srv/data/
sudo mkdir $folder || true

if grep -q 'virt-type: lxd' bundles.yaml; then
   URLS=" \
   http://download.cirros-cloud.net/0.3.4/cirros-0.3.4-x86_64-lxc.tar.gz \
   http://cloud-images.ubuntu.com/xenial/current/xenial-server-cloudimg-amd64-root.tar.gz "

else
   URLS=" \
   http://cloud-images.ubuntu.com/precise/current/precise-server-cloudimg-amd64-disk1.img \
   http://cloud-images.ubuntu.com/trusty/current/trusty-server-cloudimg-amd64-disk1.img \
   http://cloud-images.ubuntu.com/xenial/current/xenial-server-cloudimg-amd64-disk1.img \
   http://mirror.catn.com/pub/catn/images/qcow2/centos6.4-x86_64-gold-master.img \
   http://cloud.centos.org/centos/7/images/CentOS-7-x86_64-GenericCloud.qcow2 \
   http://download.cirros-cloud.net/0.3.4/cirros-0.3.4-x86_64-disk.img "
fi

for URL in $URLS
do
FILENAME=${URL##*/}
if [ -f $folder/$FILENAME ];
then
   echo "$FILENAME already downloaded."
else
   wget  -O  $folder/$FILENAME $URL
fi
done
This section of the file will download the images to jumphost if not found to be used with openstack VIM.
NOTE: The image downloading and uploading might take too long and time out. In this case, use juju ssh glance/0 to log in to the glance unit 0 and run the script again, or manually run the glance commands.
source ~/joid_config/admin-openrc
First, source the the admin-openrc file.
upload the images into glane to be used for creating the VM.
# adjust tiny image
nova flavor-delete m1.tiny
nova flavor-create m1.tiny 1 512 8 1
Adjust the tiny image profile as the default tiny instance is too small for Ubuntu.
# configure security groups
neutron security-group-rule-create --direction ingress --ethertype IPv4 --protocol icmp --remote-ip-prefix 0.0.0.0/0 default
neutron security-group-rule-create --direction ingress --ethertype IPv4 --protocol tcp --port-range-min 22 --port-range-max 22 --remote-ip-prefix 0.0.0.0/0 default
Open up the ICMP and SSH access in the default security group.
# import key pair
keystone tenant-create --name demo --description "Demo Tenant"
keystone user-create --name demo --tenant demo --pass demo --email demo@demo.demo

nova keypair-add --pub-key id_rsa.pub ubuntu-keypair
Create a project called ‘demo’ and create a user called ‘demo’ in this project. Import the key pair.
# configure external network
neutron net-create ext-net --router:external --provider:physical_network external --provider:network_type flat --shared
neutron subnet-create ext-net --name ext-subnet --allocation-pool start=10.5.8.5,end=10.5.8.254 --disable-dhcp --gateway 10.5.8.1 10.5.8.0/24
This section configures an external network ‘ext-net’ with a subnet called ‘ext-subnet’. In this subnet, the IP pool starts at 10.5.8.5 and ends at 10.5.8.254. DHCP is disabled. The gateway is at 10.5.8.1, and the subnet mask is 10.5.8.0/24. These are the public IPs that will be requested and associated to the instance. Please change the network configuration according to your environment.
# create vm network
neutron net-create demo-net
neutron subnet-create --name demo-subnet --gateway 10.20.5.1 demo-net 10.20.5.0/24
This section creates a private network for the instances. Please change accordingly.
neutron router-create demo-router
neutron router-interface-add demo-router demo-subnet
neutron router-gateway-set demo-router ext-net
This section creates a router and connects this router to the two networks we just created.
# create pool of floating ips
i=0
while [ $i -ne 10 ]; do
  neutron floatingip-create ext-net
  i=$((i + 1))
done
Finally, the script will request 10 floating IPs.
This script can be used to do juju bootstrap on openstack so that Juju can be used as model tool to deploy the services and VNF on top of openstack using the JOID.
By default, running the script ./03-maasdeploy.sh will automatically create the KVM VMs on a single machine and configure everything for you.
if [ ! -e ./labconfig.yaml ]; then
    virtinstall=1
    labname="default"
    cp ../labconfig/default/labconfig.yaml ./
    cp ../labconfig/default/deployconfig.yaml ./
Please change joid/ci/labconfig/default/labconfig.yaml accordingly. The MAAS deployment script will do the following: 1. Create bootstrap VM. 2. Install MAAS on the jumphost. 3. Configure MAAS to enlist and commission VM for Juju bootstrap node.
Later, the 03-massdeploy.sh script will create three additional VMs and register them into the MAAS Server:
if [ "$virtinstall" -eq 1 ]; then
          sudo virt-install --connect qemu:///system --name $NODE_NAME --ram 8192 --cpu host --vcpus 4 \
                   --disk size=120,format=qcow2,bus=virtio,io=native,pool=default \
                   $netw $netw --boot network,hd,menu=off --noautoconsole --vnc --print-xml | tee $NODE_NAME

          nodemac=`grep  "mac address" $NODE_NAME | head -1 | cut -d '"' -f 2`
          sudo virsh -c qemu:///system define --file $NODE_NAME
          rm -f $NODE_NAME
          maas $PROFILE machines create autodetect_nodegroup='yes' name=$NODE_NAME \
              tags='control compute' hostname=$NODE_NAME power_type='virsh' mac_addresses=$nodemac \
              power_parameters_power_address='qemu+ssh://'$USER'@'$MAAS_IP'/system' \
              architecture='amd64/generic' power_parameters_power_id=$NODE_NAME
          nodeid=$(maas $PROFILE machines read | jq -r '.[] | select(.hostname == '\"$NODE_NAME\"').system_id')
          maas $PROFILE tag update-nodes control add=$nodeid || true
          maas $PROFILE tag update-nodes compute add=$nodeid || true

fi
If your bare metal servers support IPMI, they can be discovered and enlisted automatically by the MAAS server. You need to configure bare metal servers to PXE boot on the network interface where they can reach the MAAS server. With nodes set to boot from a PXE image, they will start, look for a DHCP server, receive the PXE boot details, boot the image, contact the MAAS server and shut down.
During this process, the MAAS server will be passed information about the node, including the architecture, MAC address and other details which will be stored in the database of nodes. You can accept and commission the nodes via the web interface. When the nodes have been accepted the selected series of Ubuntu will be installed.
Juju and MAAS together allow you to assign different roles to servers, so that hardware and software can be configured according to their roles. We have briefly mentioned and used this feature in our example. Please visit Juju Machine Constraints https://jujucharms.com/docs/stable/charms-constraints and MAAS tags https://maas.ubuntu.com/docs/tags.html for more information.
When you have limited access policy in your environment, for example, when only the Jump Host has Internet access, but not the rest of the servers, we provide tools in JOID to support the offline installation.
The following package set is provided to those wishing to experiment with a ‘disconnected from the internet’ setup when deploying JOID utilizing MAAS. These instructions provide basic guidance as to how to accomplish the task, but it should be noted that due to the current reliance of MAAS and DNS, that behavior and success of deployment may vary depending on infrastructure setup. An official guided setup is in the roadmap for the next release:
NOTE: The mirror is quite large 700GB in size, and does not mirror SDN repo/ppa.
Since OPNFV board expanded its scope to include NFV MANO last year, several upstream open source projects have been created to develop MANO solutions. Each solution has demonstrated its unique value in specific area. Open-Orchestrator (OPEN-O) project is one of such communities. Opera seeks to develop requirements for OPEN-O MANO support in the OPNFV reference platform, with the plan to eventually integrate OPEN-O in OPNFV as a non-exclusive upstream MANO. The project will definitely benefit not only OPNFV and Open-O, but can be referenced by other MANO integration as well. In particular, this project is basically use case driven. Based on that, it will focus on the requirement of interfaces/data models for integration among various components and OPNFV platform. The requirement is designed to support integration among Open-O as NFVO with Juju as VNFM and OpenStack as VIM.
Currently OPNFV has already included upstream OpenStack as VIM, and Juju and Tacker have been being considered as gVNFM by different OPNFV projects. OPEN-O as NFVO part of MANO will interact with OpenStack and Juju. The key items required for the integration can be described as follows.
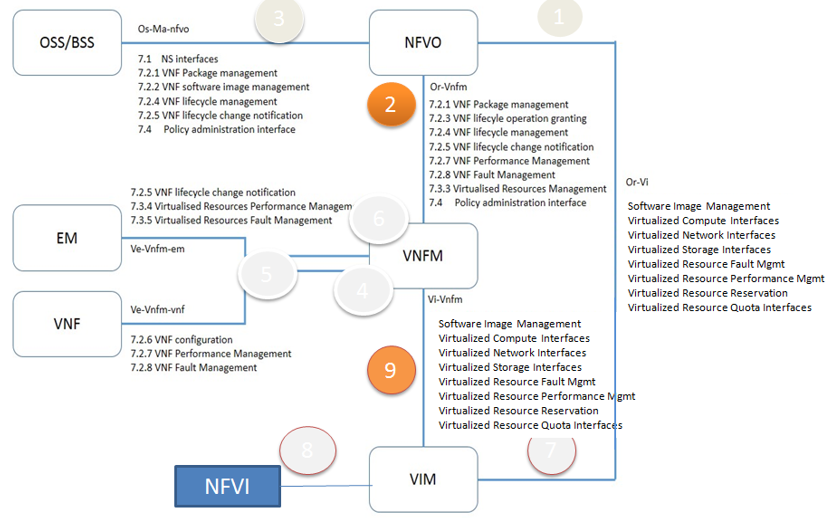
Fig 1. Key Item for Integration
OPEN-O includes various components for OPNFV MANO integration. The initial release of integration will be focusing on NFV-O, Common service and Common TOSCA. Other components of Open-O will be gradually integrated to OPNFV reference platform in later release.
Fig 2. Deploy Overview
based on which test cases will be created and aligned with Open-O first release for OPNFV D release.
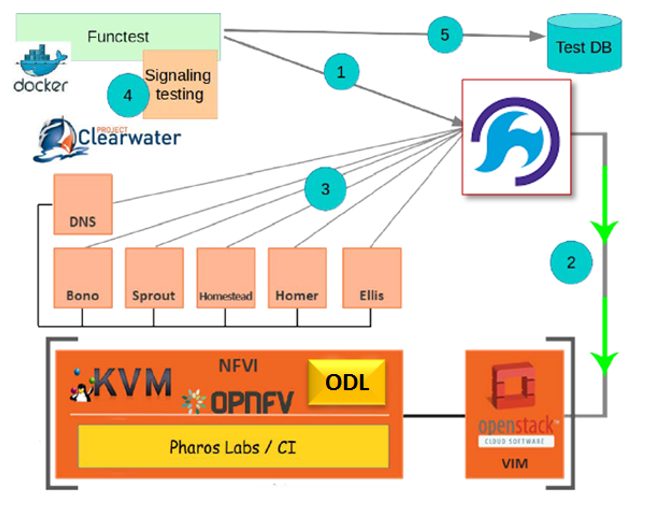
Fig 3. vIMS Deploy
This document describes how to install Open-O in an OpenStack deployed environment using Opera project.
| Date | Ver. | Author | Comment |
| 2017-02-16 | 0.0.1 | Harry Huang (HUAWEI) | First draft |
This document providing guidelines on how to deploy a working Open-O environment using opera project.
The audience of this document is assumed to have good knowledge in OpenStack and Linux.
There are some preconditions before starting the Opera deployment
OpenStack should be deployed before opera deploy.
Retrieve the repository of Opera using the following command:
After opera deployment, Open-O dockers will be launched on local server as orchestrator and juju vm will be launched on OpenStack as VNFM.
Add the admin openrc file of your local openstack into opera/conf directory with the name of admin-openrc.sh.
Set openo_version to specify Open-O version.
Set openo_ip to specify an external ip to access Open-O services. (leave the value unset will use local server’s external ip)
Set ports in openo_docker_net to specify Open-O’s exposed service ports.
Set enable_sdno to specify if use Open-O ‘s sdno services. (set this value false will not launch Open-O sdno dockers and reduce deploy duration)
Set vnf_type to specify the vnf type need to be deployed. (currently only support clearwater deployment, leave this unset will not deploy any vnf)
./opera_launch.sh
Add the admin openrc file of your local openstack into opera/conf directory with the name of admin-openrc.sh.
Set openo_version to specify Open-O version.
Set openo_ip to specify an external ip to access Open-O services. (leave the value unset will use local server’s external ip)
Set ports in openo_docker_net to specify Open-O’s exposed service ports.
Set enable_sdno to specify if use Open-O ‘s sdno services. (set this value false will not launch Open-O sdno dockers and reduce deploy duration)
Set vnf_type to specify the vnf type need to be deployed. (currently only support clearwater deployment, leave this unset will not deploy any vnf)
Define Scenario OS-NOSDN-OPENO-HA and Integrate OPEN-O M Release with OPNFV D Release (with OpenStack Newton)
Integrate vIMS test scripts to FuncTest
Scenario name: os-nosdn-openo-ha
Deployment: OpenStack + Open-O + JuJu
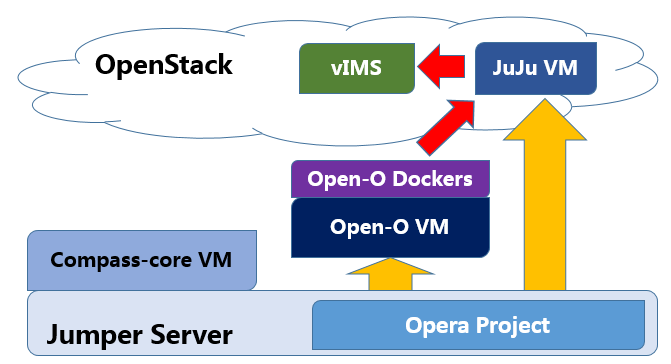
Fig 1. Deploy Overview
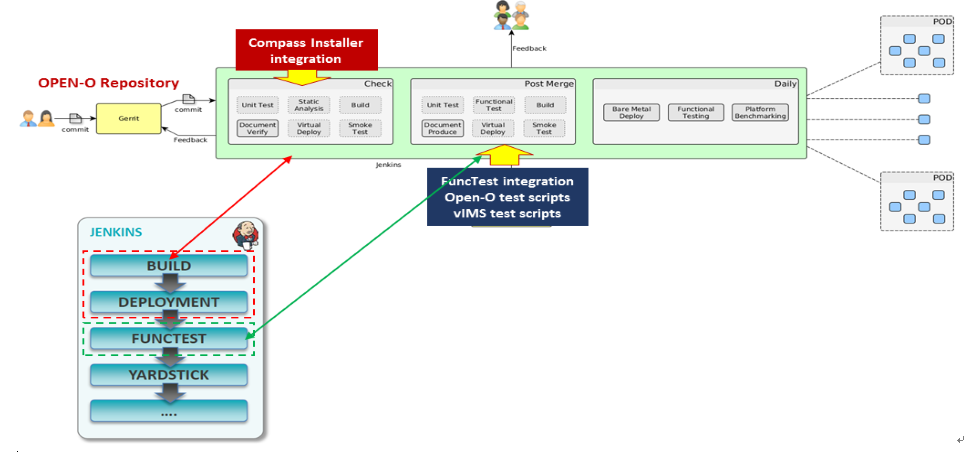
Fig 2. Opera Ci
based on which test cases will be created and aligned with Open-O first release for OPNFV D release.

Fig 3. vIMS Deploy
Compass to deploy scenario of os-nosdn-openo-noha
Automate OPEN-O installation (deployment) process
Automate JuJu installation process
Create vIMS TOSCA blueprint (for vIMS deployment)
Integrate scripts of step 2,3,4,5 with OPNFV CD Jenkins Job
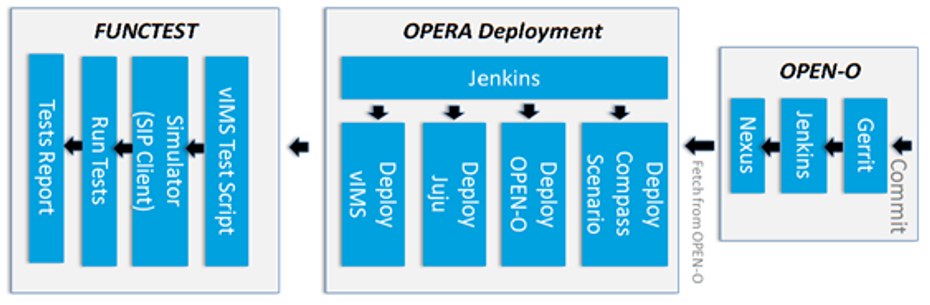
Fig 4. Functest
OPNFV develops, operates, and maintains infrastructure which is used by the OPNFV Community for development, integration, and testing purposes. OPNFV Infrastructure Working Group (Infra WG) oversees the OPNFV Infrastructure, ensures it is kept in a state which serves the community in best possible way and always up to date.
Infra WG is working towards a model whereby we have a seamless pipeline for handing resource requests from the OPNFV community for both development and Continuous Integration perspectives. Automation of requests and integration to existing automation tools is a primary driver in reaching this model. In the Infra WG, we imagine a model where the Infrastructure Requirements that are specified by a Feature, Installer or otherrelevant projects within OPNFV are requested, provisioned, used, reported on and subsequently torn down with no (or minimal) user intervention at the physical/infrastructure level.
Objectives of the Infra WG are
The details of what is provided as part of the infrastructure can be seen in following chapters.
TBD
Please see the details of CI from the chapters below.
Please see the details of XCI from the chapters below.
Found a typo or any other feedback? Send an email to users@opnfv.org or talk to us on IRC.