2. Scenario 1 - Native OpenStack Environment
Scenario 1 is the native OpenStack environment. Although the instructions are based on Liberty, they can be applied to Kilo in the same way. Because the anti-spoofing rules of Security Group feature in OpenStack prevents a VM from forwarding packets, we need to disable Security Group feature in the native OpenStack environment.
For exemplary purpose, we assume:
- A two-node setup of OpenStack environment is used as shown in Fig. 2.1
- The hostname of OpenStack Controller+Network+Compute Node is
opnfv-os-controller, and the host IP address is192.168.0.10 - The hostname of OpenStack Compute Node is
opnfv-os-compute, and the host IP address is192.168.0.20 - Ubuntu 14.04 or Fedora 21 is installed
- We use
opnfvas username to login. - We use
devstackto install OpenStack Liberty. Please note that OpenStack Kilo can be used as well.
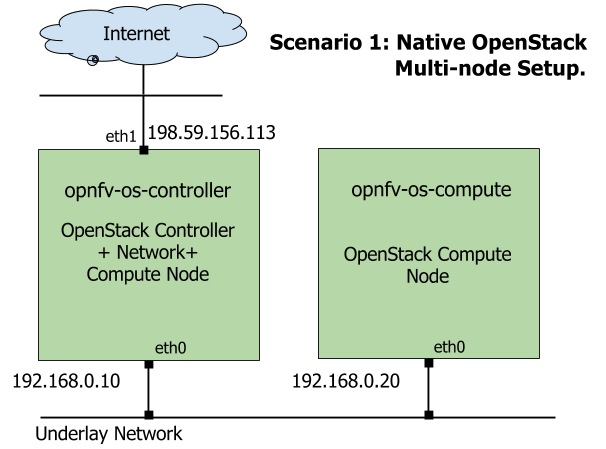
Fig. 2.1 Underlay Network Topology - Scenario 1
Please note that the IP address shown in Fig. 2.1 are for exemplary purpose. You need to configure your public IP address connecting to Internet according to your actual network infrastructure. And you need to make sure the private IP address are not conflicting with other subnets.
2.1. Prerequisite
OS-NATIVE-0: Clone the following GitHub repository to get the configuration and metadata files
git clone https://github.com/sridhargaddam/opnfv_os_ipv6_poc.git /opt/stack/opnfv_os_ipv6_poc
2.2. Set up OpenStack Controller Node
We assume the hostname is opnfv-os-controller, and the host IP address is 192.168.0.10.
OS-NATIVE-N-1: Clone stable/liberty devstack code base.
git clone https://github.com/openstack-dev/devstack.git -b stable/liberty
OS-NATIVE-N-2: Copy local.conf.controller to devstack as local.conf
cp /opt/stack/opnfv_os_ipv6_poc/local.conf.controller ~/devstack/local.conf
OS-NATIVE-N-3: If you want to modify any devstack configuration, update local.conf now.
OS-NATIVE-N-4: Start the devstack installation.
cd ~/devstack
./stack.sh
OS-NATIVE-N-5: If all goes well, you should see the following output.
This is your host IP address: 192.168.0.10
This is your host IPv6 address: ::1
Horizon is now available at http://192.168.0.10/
Keystone is serving at http://192.168.0.10:5000/
The default users are: admin and demo
The password: password
2.3. Set up OpenStack Compute Node
We assume the hostname is opnfv-os-compute, and the host IP address is 192.168.0.20.
OS-NATIVE-M-1: Clone stable/liberty devstack code base.
git clone https://github.com/openstack-dev/devstack.git -b stable/liberty
OS-NATIVE-M-2: Copy local.conf.compute to devstack as local.conf
cp /opt/stack/opnfv_os_ipv6_poc/local.conf.compute ~/devstack/local.conf
Please note that you need to change the IP address of SERVICE_HOST to point to your actual IP
address of OpenStack Controller
OS-NATIVE-M-3: If you want to modify any devstack configuration, update local.conf now.
OS-NATIVE-M-4: Start the devstack installation.
cd ~/devstack
./stack.sh
OS-NATIVE-M-5: If all goes well, you should see the following output.
This is your host IP address: 192.168.0.20
This is your host IPv6 address: ::1
OS-NATIVE-M-6 (OPTIONAL): You can verify that OpenStack is set up correctly by showing hypervisor list
~/devstack$ nova hypervisor-list
+----+------------------------------------+---------+------------+
| ID  | Hypervisor hostname      | State  | Status  |
+----+------------------------------------+---------+------------+
| 1   | opnfv-os-controller      | up     | enabled |
| 2   | opnfv-os-compute         | up     | enabled |
+----+------------------------------------+---------+------------+
2.4. Note: Disable Security Groups in OpenStack ML2 Setup
Please note that Security Groups feature has been disabled automatically through local.conf configuration file
during the setup procedure of OpenStack in both Controller Node and Compute Node.
If you are an experienced user and installing OpenStack using a different installer (i.e. not with devstack),
please make sure that Security Groups are disabled in the setup. You can verify that your setup has the following
configuration parameters.
OS-NATIVE-SEC-1: Change the settings in /etc/neutron/plugins/ml2/ml2_conf.ini as follows
# /etc/neutron/plugins/ml2/ml2_conf.ini
[securitygroup]
enable_security_group = False
firewall_driver = neutron.agent.firewall.NoopFirewallDriver
OS-NATIVE-SEC-2: Change the settings in /etc/nova/nova.conf as follows
# /etc/nova/nova.conf
[DEFAULT]
security_group_api = nova
firewall_driver = nova.virt.firewall.NoopFirewallDriver
2.5. Set Up Service VM as IPv6 vRouter
OS-NATIVE-SETUP-1: Now we assume that OpenStack multi-node setup is up and running. The following commands should be executed:
cd ~/devstack
source openrc admin demo
OS-NATIVE-SETUP-2: Download fedora22 image which would be used for vRouter
wget https://download.fedoraproject.org/pub/fedora/linux/releases/22/Cloud/x86_64/Images/Fedora-Cloud-Base-22-20150521.x86_64.qcow2
OS-NATIVE-SETUP-3: Import Fedora22 image to glance
glance image-create --name 'Fedora22' --disk-format qcow2 --container-format bare --file ./Fedora-Cloud-Base-22-20150521.x86_64.qcow2
OS-NATIVE-SETUP-4: Create Neutron routers ipv4-router and ipv6-router which need to provide external
connectivity.
neutron router-create ipv4-router
neutron router-create ipv6-router
OS-NATIVE-SETUP-5: Create an external network/subnet ext-net using the appropriate values based on the
data-center physical network setup.
neutron net-create --router:external ext-net
OS-NATIVE-SETUP-6: If your opnfv-os-controller node has two interfaces eth0 and eth1,
and eth1 is used for external connectivity, move the IP address of eth1 to br-ex.
Please note that the IP address 198.59.156.113 and related subnet and gateway addressed in the command
below are for exemplary purpose. Please replace them with the IP addresses of your actual network.
sudo ip addr del 198.59.156.113/24 dev eth1
sudo ovs-vsctl add-port br-ex eth1
sudo ifconfig eth1 up
sudo ip addr add 198.59.156.113/24 dev br-ex
sudo ifconfig br-ex up
sudo ip route add default via 198.59.156.1 dev br-ex
neutron subnet-create --disable-dhcp --allocation-pool start=198.59.156.251,end=198.59.156.254 --gateway 198.59.156.1 ext-net 198.59.156.0/24
OS-NATIVE-SETUP-7: Verify that br-ex now has the original external IP address, and that the default route is on
br-ex
opnfv@opnfv-os-controller:~/devstack$ ip a s br-ex
38: br-ex: <BROADCAST,UP,LOWER_UP> mtu 1430 qdisc noqueue state UNKNOWN group default
    link/ether 00:50:56:82:42:d1 brd ff:ff:ff:ff:ff:ff
    inet 198.59.156.113/24 brd 198.59.156.255 scope global br-ex
       valid_lft forever preferred_lft forever
    inet6 fe80::543e:28ff:fe70:4426/64 scope link
       valid_lft forever preferred_lft forever
opnfv@opnfv-os-controller:~/devstack$
opnfv@opnfv-os-controller:~/devstack$ ip route
default via 198.59.156.1 dev br-ex
192.168.0.0/24 dev eth0  proto kernel  scope link  src 192.168.0.10
192.168.122.0/24 dev virbr0  proto kernel  scope link  src 192.168.122.1
198.59.156.0/24 dev br-ex  proto kernel  scope link  src 198.59.156.113
Please note that the IP addresses above are exemplary purpose.
OS-NATIVE-SETUP-8: Create Neutron networks ipv4-int-network1 and ipv6-int-network2
with port_security disabled
neutron net-create --port_security_enabled=False ipv4-int-network1
neutron net-create --port_security_enabled=False ipv6-int-network2
OS-NATIVE-SETUP-9: Create IPv4 subnet ipv4-int-subnet1 in the internal network ipv4-int-network1,
and associate it to ipv4-router.
neutron subnet-create --name ipv4-int-subnet1 --dns-nameserver 8.8.8.8 ipv4-int-network1 20.0.0.0/24
neutron router-interface-add ipv4-router ipv4-int-subnet1
OS-NATIVE-SETUP-10: Associate the ext-net to the Neutron routers ipv4-router and ipv6-router.
neutron router-gateway-set ipv4-router ext-net
neutron router-gateway-set ipv6-router ext-net
OS-NATIVE-SETUP-11: Create two subnets, one IPv4 subnet ipv4-int-subnet2 and one IPv6 subnet
ipv6-int-subnet2 in ipv6-int-network2, and associate both subnets to ipv6-router
neutron subnet-create --name ipv4-int-subnet2 --dns-nameserver 8.8.8.8 ipv6-int-network2 10.0.0.0/24
neutron subnet-create --name ipv6-int-subnet2 --ip-version 6 --ipv6-ra-mode slaac --ipv6-address-mode slaac ipv6-int-network2 2001:db8:0:1::/64
neutron router-interface-add ipv6-router ipv4-int-subnet2
neutron router-interface-add ipv6-router ipv6-int-subnet2
OS-NATIVE-SETUP-12: Create a keypair
nova keypair-add vRouterKey > ~/vRouterKey
OS-NATIVE-SETUP-13: Create ports for vRouter (with some specific MAC address - basically for automation - to know the IPv6 addresses that would be assigned to the port).
neutron port-create --name eth0-vRouter --mac-address fa:16:3e:11:11:11 ipv6-int-network2
neutron port-create --name eth1-vRouter --mac-address fa:16:3e:22:22:22 ipv4-int-network1
OS-NATIVE-SETUP-14: Create ports for VM1 and VM2.
neutron port-create --name eth0-VM1 --mac-address fa:16:3e:33:33:33 ipv4-int-network1
neutron port-create --name eth0-VM2 --mac-address fa:16:3e:44:44:44 ipv4-int-network1
OS-NATIVE-SETUP-15: Update ipv6-router with routing information to subnet 2001:db8:0:2::/64
neutron router-update ipv6-router --routes type=dict list=true destination=2001:db8:0:2::/64,nexthop=2001:db8:0:1:f816:3eff:fe11:1111
OS-NATIVE-SETUP-16: Boot Service VM (vRouter), VM1 and VM2
nova boot --image Fedora22 --flavor m1.small --user-data /opt/stack/opnfv_os_ipv6_poc/metadata.txt --availability-zone nova:opnfv-os-compute --nic port-id=$(neutron port-list | grep -w eth0-vRouter | awk '{print $2}') --nic port-id=$(neutron port-list | grep -w eth1-vRouter | awk '{print $2}') --key-name vRouterKey vRouter
nova list
nova console-log vRouter #Please wait for some 10 to 15 minutes so that necessary packages (like radvd) are installed and vRouter is up.
nova boot --image cirros-0.3.4-x86_64-uec --flavor m1.tiny --nic port-id=$(neutron port-list | grep -w eth0-VM1 | awk '{print $2}') --availability-zone nova:opnfv-os-controller --key-name vRouterKey --user-data /opt/stack/opnfv_os_ipv6_poc/set_mtu.sh VM1
nova boot --image cirros-0.3.4-x86_64-uec --flavor m1.tiny --nic port-id=$(neutron port-list | grep -w eth0-VM2 | awk '{print $2}') --availability-zone nova:opnfv-os-compute --key-name vRouterKey --user-data /opt/stack/opnfv_os_ipv6_poc/set_mtu.sh VM2
nova list # Verify that all the VMs are in ACTIVE state.
OS-NATIVE-SETUP-17: If all goes well, the IPv6 addresses assigned to the VMs would be as shown as follows:
vRouter eth0 interface would have the following IPv6 address: 2001:db8:0:1:f816:3eff:fe11:1111/64
vRouter eth1 interface would have the following IPv6 address: 2001:db8:0:2::1/64
VM1 would have the following IPv6 address: 2001:db8:0:2:f816:3eff:fe33:3333/64
VM2 would have the following IPv6 address: 2001:db8:0:2:f816:3eff:fe44:4444/64
OS-NATIVE-SETUP-18: To SSH to vRouter, you can execute the following command.
sudo ip netns exec qrouter-$(neutron router-list | grep -w ipv6-router | awk '{print $2}') ssh -i ~/vRouterKey fedora@2001:db8:0:1:f816:3eff:fe11:1111
Revision: 0d45e89e70abf93440415d4d4faaa996f05b96ad
Build date: January 05, 2016