Compliance Verification Program Testing User Guide
Conducting CVP Testing with Dovetail
Overview
The Dovetail testing framework for CVP consists of two major parts: the testing client that executes all test cases in a lab (vendor self-testing or a third party lab), and the server system that is hosted by the CVP administrator to store and view test results based on a web API. The following diagram illustrates this overall framework.
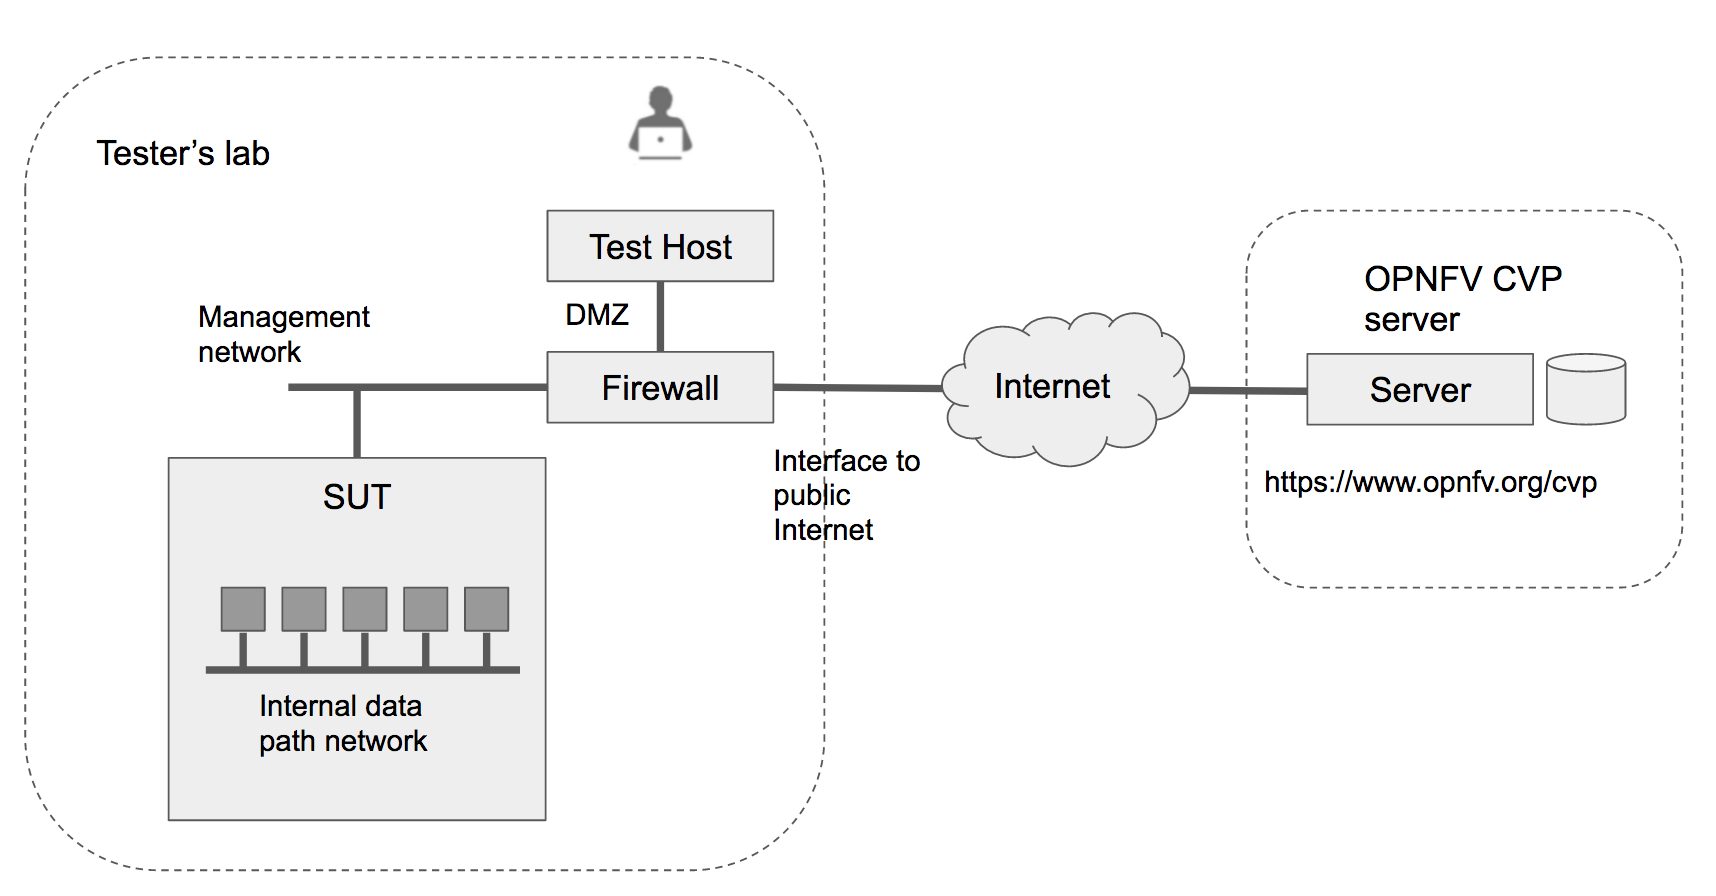
Within the tester’s lab, the Test Host is the machine where Dovetail executes all automated test cases. As it hosts the test harness, the Test Host must not be part of the System Under Test (SUT) itself. The above diagram assumes that the tester’s Test Host is situated in a DMZ which has internal network access to the SUT and external access to the OPNFV server via the public Internet. This arrangement may not be supported in some labs. Dovetail also supports an offline mode of testing that is illustrated in the next diagram.
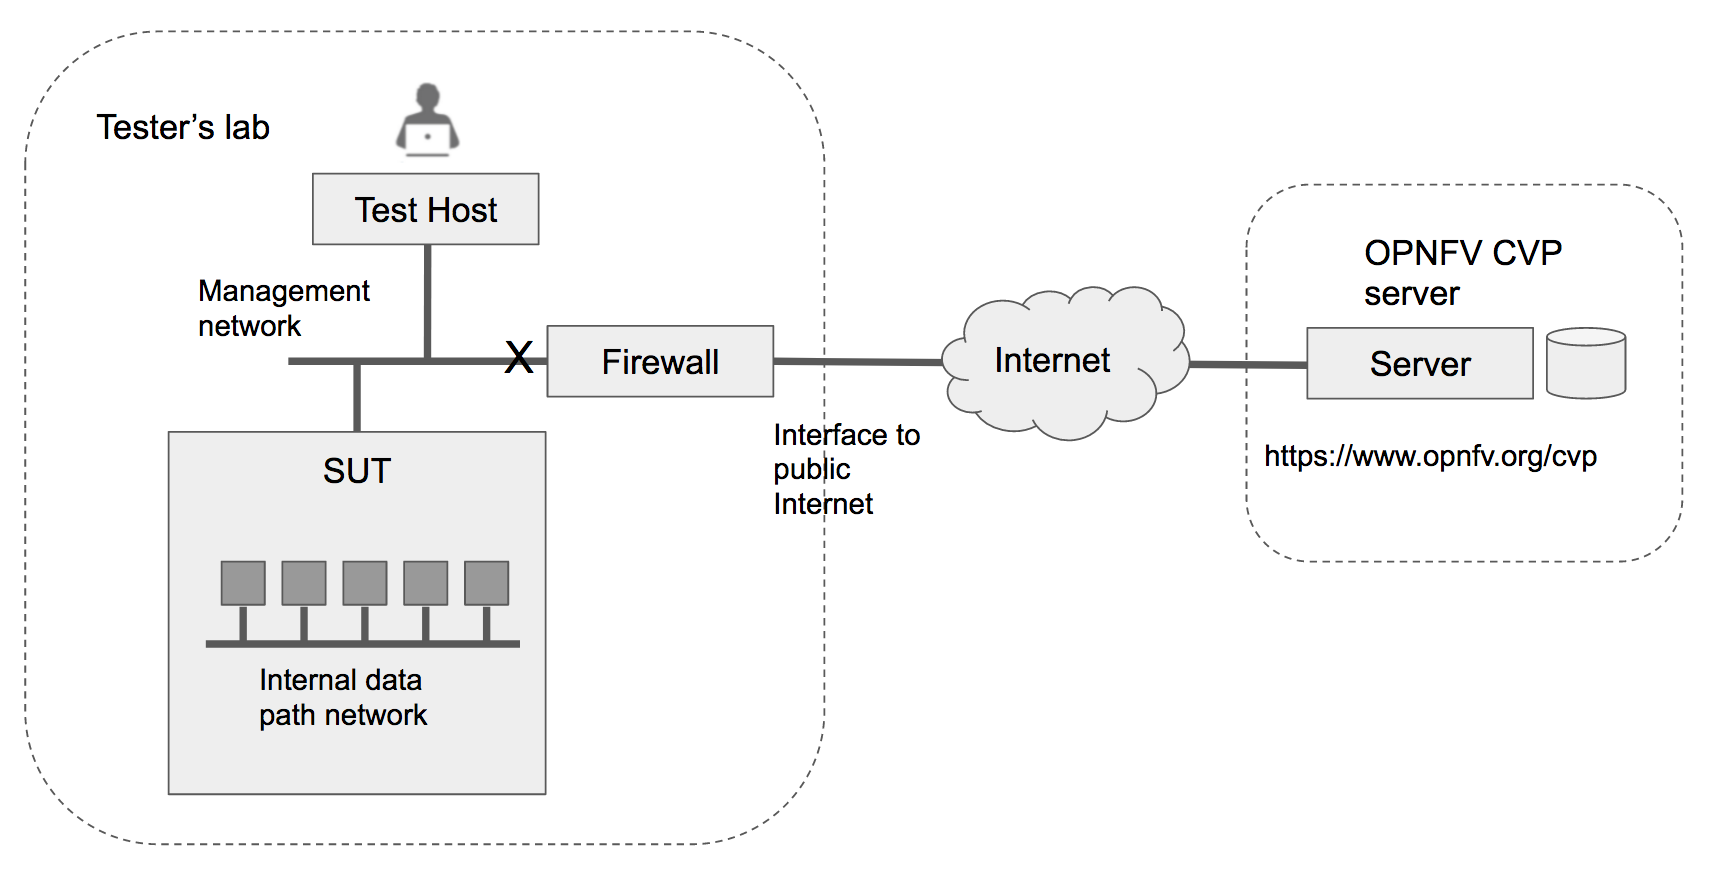
In the offline mode, the Test Host only needs to have access to the SUT via the internal network, but does not need to connect to the public Internet. This user guide will highlight differences between the online and offline modes of the Test Host. While it is possible to run the Test Host as a virtual machine, this user guide assumes it is a physical machine for simplicity.
The rest of this guide will describe how to install the Dovetail tool as a Docker container image, go over the steps of running the CVP test suite, and then discuss how to view test results and make sense of them.
Readers interested in using Dovetail for its functionalities beyond CVP testing, e.g. for in-house or extended testing, should consult the Dovetail developer’s guide for additional information.
Installing Dovetail
In this section, we describe the procedure to install Dovetail client tool on the Test Host. The Test Host must have network access to the management network with access rights to the Virtual Infrastructure Manager’s API.
Checking the Test Host Readiness
The Test Host must have network access to the Virtual Infrastructure Manager’s API
hosted in the SUT so that the Dovetail tool can exercise the API from the Test Host.
It must also have ssh access to the Linux operating system
of the compute nodes in the SUT. The ssh mechanism is used by some test cases
to generate test events in the compute nodes. You can find out which test cases
use this mechanism in the test specification document.
We have tested the Dovetail tool on the following host operating systems. Other versions or distribution of Linux may also work, but community support may be more available on these versions.
- Ubuntu 16.04.2 LTS (Xenial) or 14.04 LTS (Trusty)
- CentOS-7-1611
- Red Hat Enterprise Linux 7.3
- Fedora 24 or 25 Server
Non-Linux operating systems, such as Windows, Mac OS, have not been tested and are not supported.
If online mode is used, the tester should also validate that the Test Host can reach the public Internet. For example,
$ ping www.opnfv.org
PING www.opnfv.org (50.56.49.117): 56 data bytes
64 bytes from 50.56.49.117: icmp_seq=0 ttl=48 time=52.952 ms
64 bytes from 50.56.49.117: icmp_seq=1 ttl=48 time=53.805 ms
64 bytes from 50.56.49.117: icmp_seq=2 ttl=48 time=53.349 ms
...
Or, if the lab environment does not allow ping, try validating it using HTTPS instead.
$ curl https://www.opnfv.org
<!doctype html>


<html lang="en-US" class="no-js">
<head>
...
Configuring the Test Host Environment
The Test Host needs a few environment variables set correctly in order to access the Openstack API required to drive the Dovetail tests. For convenience and as a convention, we will also create a home directory for storing all Dovetail related config files and results files:
$ mkdir -p /home/dovetail
$ export DOVETAIL_HOME=/home/dovetail
Here we set dovetail home directory to be /home/dovetail for an example.
Then create a directory named pre_config in this directory to store all
Dovetail related config files:
$ mkdir -p ${DOVETAIL_HOME}/pre_config
At this point, you will need to consult your SUT (Openstack) administrator to correctly set
the configurations in a file named env_config.sh.
The Openstack settings need to be configured such that the Dovetail client has all the necessary
credentials and privileges to execute all test operations. If the SUT uses terms
somewhat differently from the standard Openstack naming, you will need to adjust
this file accordingly.
Create and edit the file ${DOVETAIL_HOME}/pre_config/env_config.sh so that
all parameters are set correctly to match your SUT. Here is an example of what
this file should contain.
$ cat ${DOVETAIL_HOME}/pre_config/env_config.sh

# Project-level authentication scope (name or ID), recommend admin project.
export OS_PROJECT_NAME=admin

# For identity v2, it uses OS_TENANT_NAME rather than OS_PROJECT_NAME.
export OS_TENANT_NAME=admin

# Authentication username, belongs to the project above, recommend admin user.
export OS_USERNAME=admin

# Authentication password. Use your own password
export OS_PASSWORD=xxxxxxxx

# Authentication URL, one of the endpoints of keystone service. If this is v3 version,
# there need some extra variables as follows.
export OS_AUTH_URL='http://xxx.xxx.xxx.xxx:5000/v3'

# Default is 2.0. If use keystone v3 API, this should be set as 3.
export OS_IDENTITY_API_VERSION=3

# Domain name or ID containing the user above.
# Command to check the domain: openstack user show <OS_USERNAME>
export OS_USER_DOMAIN_NAME=default

# Domain name or ID containing the project above.
# Command to check the domain: openstack project show <OS_PROJECT_NAME>
export OS_PROJECT_DOMAIN_NAME=default

# Home directory for dovetail that you have created before.
export DOVETAIL_HOME=/home/dovetail

# Special environment parameters for https.
# If using https + cacert, the path of cacert file should be provided.
# The cacert file should be put at $DOVETAIL_HOME/pre_config.
export OS_CACERT=$DOVETAIL_HOME/pre_config/cacert.pem

# If using https + no cacert, should add OS_INSECURE environment parameter.
export OS_INSECURE=True
Export all these variables into environment by,
$ source ${DOVETAIL_HOME}/pre_config/env_config.sh
If OpenStack client is installed, you can validate that the OpenStack environmental settings are correct by,
$ openstack service list
If the SUT uses https but have no cacert, you can validate the OpenStack environmental settings by,
$ openstack --insecure service list
If your SUT uses hosts file to translate hostnames into the IP
of OS_AUTH_URL, then you need to provide these hosts info in file
$DOVETAIL_HOME/pre_config/hosts.yaml.
Create and edit file $DOVETAIL_HOME/pre_config/hosts.yaml. Here is an example of
what this file should contain.
$ cat ${DOVETAIL_HOME}/pre_config/hosts.yaml

---
hosts_info:
  - image.xx.xx.xx.com:172.xxx.xxx.xxx
  - compute.xx.xx.xx.com:172.xxx.xxx.xxx
  - <Hostname>:<IPaddress>
Installing Prerequisite on the Test Host
The main prerequisite software for Dovetail are Python and Docker.
In the CVP test suite for the Danube release, Dovetail requires Python 2.7. Python 3.x is not supported at this time.
Use the following steps to check if the right version of python is already installed, and if not, install it.
$ python --version
Python 2.7.6
If your Test Host does not have Python installed, or the version is not 2.7, you should consult Python installation guides corresponding to the operating system in your Test Host on how to install Python 2.7.
Dovetail does not work with Docker versions prior to 1.12.3. We have validated Dovetail with Docker 17.03 CE. Other versions of Docker later than 1.12.3 may also work, but community support may be more available on Docker 17.03 CE.
$ sudo docker version
Client:
Version:      17.03.1-ce
API version:  1.27
Go version:   go1.7.5
Git commit:   c6d412e
Built:        Mon Mar 27 17:10:36 2017
OS/Arch:      linux/amd64

Server:
Version:      17.03.1-ce
API version:  1.27 (minimum version 1.12)
Go version:   go1.7.5
Git commit:   c6d412e
Built:        Mon Mar 27 17:10:36 2017
OS/Arch:      linux/amd64
Experimental: false
If your Test Host does not have Docker installed, or Docker is older than 1.12.3, or you have Docker version other than 17.03 CE and wish to change, you will need to install, upgrade, or re-install in order to run Dovetail. The Docker installation process can be more complex, you should refer to the official Docker installation guide that is relevant to your Test Host’s operating system.
The above installation steps assume that the Test Host is in the online mode. For offline testing, use the following offline installation steps instead.
In order to install or upgrade Python offline, you may download packaged Python 2.7 for your Test Host’s operating system on a connected host, copy the packge to the Test Host, then install from that local copy.
In order to install Docker offline, download Docker static binaries and copy the tar file to the Test Host, such as for Ubuntu14.04, you may follow the following link to install,
https://github.com/meetyg/docker-offline-install
Installing Dovetail on the Test Host
The Dovetail project maintains a Docker image that has Dovetail test tools preinstalled. This Docker image is tagged with versions. Before pulling the Dovetail image, check the OPNFV’s CVP web page first to determine the right tag for CVP testing.
If the Test Host is online, you can directly pull Dovetail Docker image and download ubuntu and cirros images.
$ sudo wget -nc http://artifacts.opnfv.org/sdnvpn/ubuntu-16.04-server-cloudimg-amd64-disk1.img -P ${DOVETAIL_HOME}/pre_config
$ sudo wget -nc http://download.cirros-cloud.net/0.3.5/cirros-0.3.5-x86_64-disk.img -P ${DOVETAIL_HOME}/pre_config

$ sudo docker pull opnfv/dovetail:cvp.0.6.0
cvp.0.6.0: Pulling from opnfv/dovetail
30d541b48fc0: Pull complete
8ecd7f80d390: Pull complete
46ec9927bb81: Pull complete
2e67a4d67b44: Pull complete
7d9dd9155488: Pull complete
cc79be29f08e: Pull complete
e102eed9bf6a: Pull complete
952b8a9d2150: Pull complete
bfbb639d1f38: Pull complete
bf7c644692de: Pull complete
cdc345e3f363: Pull complete
Digest: sha256:d571b1073b2fdada79562e8cc67f63018e8d89268ff7faabee3380202c05edee
Status: Downloaded newer image for opnfv/dovetail:cvp.0.6.0
An example of the <tag> is cvp.0.6.0.
If the Test Host is offline, you will need to first pull the Dovetail Docker image, and all the dependent images that Dovetail uses, to a host that is online. The reason that you need to pull all dependent images is because Dovetail normally does dependency checking at run-time and automatically pull images as needed, if the Test Host is online. If the Test Host is offline, then all these dependencies will also need to be manually copied.
$ sudo docker pull opnfv/dovetail:cvp.0.6.0
$ sudo docker pull opnfv/functest:cvp.0.5.0
$ sudo docker pull opnfv/yardstick:danube.3.2
$ sudo docker pull opnfv/bottlenecks:cvp.0.4.0
$ sudo wget -nc http://artifacts.opnfv.org/sdnvpn/ubuntu-16.04-server-cloudimg-amd64-disk1.img -P {ANY_DIR}
$ sudo wget -nc http://download.cirros-cloud.net/0.3.5/cirros-0.3.5-x86_64-disk.img -P {ANY_DIR}
Once all these images are pulled, save the images, copy to the Test Host, and then load the Dovetail and all dependent images at the Test Host.
At the online host, save images.
$ sudo docker save -o dovetail.tar opnfv/dovetail:cvp.0.6.0 opnfv/functest:cvp.0.5.0 \
  opnfv/yardstick:danube.3.2 opnfv/bottlenecks:cvp.0.4.0
Copy dovetail.tar file to the Test Host, and then load the images on the Test Host.
$ sudo docker load --input dovetail.tar
Copy sdnvpn test area image ubuntu-16.04-server-cloudimg-amd64-disk1.img to ${DOVETAIL_HOME}/pre_config/.
Copy cirros image cirros-0.3.5-x86_64-disk.img to ${DOVETAIL_HOME}/pre_config/.
Now check to see that all Docker images have been pulled or loaded properly.
$ sudo docker images
REPOSITORY          TAG                 IMAGE ID            CREATED             SIZE
opnfv/functest      cvp.0.5.0           9eaeaea5f203        8 days ago          1.53GB
opnfv/dovetail      cvp.0.6.0           5d25b289451c        8 days ago          516MB
opnfv/yardstick     danube.3.2          574596b6ea12        8 days ago          1.2GB
opnfv/bottlenecks   cvp.0.4.0           00450688bcae        3 hours ago         622 MB
Regardless of whether you pulled down the Dovetail image directly online, or loaded from a static image tar file, you are ready to run Dovetail.
$ sudo docker run --privileged=true -it \
          -e DOVETAIL_HOME=$DOVETAIL_HOME \
          -v $DOVETAIL_HOME:$DOVETAIL_HOME \
          -v /var/run/docker.sock:/var/run/docker.sock \
          opnfv/dovetail:<tag> /bin/bash
The -e options set the env variables in the container and the -v options map files
in the host to files in the container.
Running the CVP Test Suite
Now you should be in the Dovetail container’s prompt and ready to execute test suites.
The Dovetail client CLI allows the tester to specify which test suite to run.
By default the results are stored in a local file $DOVETAIL_HOME/results.
$ dovetail run --testsuite <test-suite-name>
If you want to see more DEBUG logs, --debug should be added.
$ dovetail run --testsuite <test-suite-name> --debug
If the Test Host is offline, --offline should be added to support running with
local resources.
$ dovetail run --testsuite <test-suite-name> --offline
Multiple test suites may be available. For the purpose of running
CVP test suite, the test suite name follows the following format,
CVP_<major>_<minor>_<patch>
For example, CVP_1_0_0.
$ dovetail run --testsuite CVP_1_0_0
If you are not running the entire test suite, you can choose to run an individual test area instead.
$ dovetail run --testsuite CVP_1_0_0 --testarea ipv6
Until the official test suite is approved and released, you can use the proposed_tests for your trial runs, like this.
$ dovetail run --testsuite proposed_tests --testarea ipv6
2017-05-23 05:01:49,488 - run - INFO - ================================================
2017-05-23 05:01:49,488 - run - INFO - Dovetail compliance: proposed_tests!
2017-05-23 05:01:49,488 - run - INFO - ================================================
2017-05-23 05:01:49,488 - run - INFO - Build tag: daily-master-4bdde6b8-afa6-40bb-8fc9-5d568d74c8d7
2017-05-23 05:01:49,536 - run - INFO -
2017-05-23 05:01:49,710 - run - INFO - >>[testcase]: dovetail.ipv6.tc001
2017-05-23 05:08:22,532 - run - INFO - Results have been stored with file /home/dovetail/results/functest_results.txt.
2017-05-23 05:08:22,538 - run - INFO - >>[testcase]: dovetail.ipv6.tc002
...
Special Configuration for Running HA Test Cases
HA test cases need to know the info of a controller node of the OpenStack.
It should include the node’s name, role, ip, as well as the user and key_filename
or password to login the node. Users should create file
${DOVETAIL_HOME}/pre_config/pod.yaml to store the info.
There is a sample file for users.
nodes:
-
    # This can not be changed and must be node1.
    name: node1

    # This must be controller.
    role: Controller

    # This is the install IP of a controller node.
    ip: xx.xx.xx.xx

    # User name of this node. This user must have sudo privileges.
    user: root

    # Password of the user.
    password: root
Besides the ‘password’, user could also provide ‘key_filename’ to login the node.
Users need to create file $DOVETAIL_HOME/pre_config/id_rsa to store the private key.
nodes:
-
    name: node1
    role: Controller
    ip: 10.1.0.50
    user: root

    # Private key of this node. It must be /root/.ssh/id_rsa
    # Dovetail will move the key file from $DOVETAIL_HOME/pre_config/id_rsa
    # to /root/.ssh/id_rsa of Yardstick container
    key_filename: /root/.ssh/id_rsa
Special Configuration for Running defcore, IPv6 and tempest Test Cases
All test cases in test area defcore, ipv6 and tempest are picked up from Tempest.
For all these test cases, they need some configurations. Most of them
are done by Dovetail. However, there are still some configurations needed to be
given by users who know the SUT better. All these additional configurations should
be in file $DOVETAIL_HOME/pre_config/tempest_conf.yaml. If this file is not given,
some test cases will be skipped or failed.
Create and edit file $DOVETAIL_HOME/pre_config/tempest_conf.yaml.
Here is an example of what this file should contain.
compute:
  # The minimum number of compute nodes expected.
  # This should be no less than 2 and no larger than the compute nodes the SUT actually has.
  min_compute_nodes: 2

  # Expected device name when a volume is attached to an instance.
  volume_device_name: vdb

  # Lower version of the test target microversion range.
  min_microversion: 2.2

  # Upper version of the test target microversion range.
  max_microversion: latest
Making Sense of CVP Test Results
When a tester is performing trial runs, Dovetail stores results in a local file by default.
cd $DOVETAIL_HOME/results
- Local file
- Log file: dovetail.log
- Review the dovetail.log to see if all important information has been captured - in default mode without DEBUG.
- The end of the log file has a summary of all test case test results.
- Additional log files may be of interests: refstack.log, dovetail_ha_tcXXX.out ...
- Example: defcore test case example
- Can see the log details in
defcore_logs/dovetail.defcore.tc001.log, which has the passed, skipped and failed test cases results. - The skipped test cases have the reason for the users to see why these test cases skipped.
- The failed test cases have rich debug information for the users to see why these test cases fail.
- Can see the log details in
- Example: vping test case example
- Its log is stored in dovetail.log.
- Its result is stored in functest_results.txt.
- Example: ha test case example
- Its log is stored in dovetail.log.
- Its result is stored in dovetail_ha_tcXXX.out.
- Example: ipv6, sdnvpn and tempest test cases examples
- Can see the log details in
ipv6_logs/dovetail.ipv6.tcXXX.log,sdnvpn_logs/dovetail.sdnvpn.tcXXX.logandtempest_logs/dovetail.tempest.tcXXX.log, respectively. They all have the passed, skipped and failed test cases results.
- Can see the log details in
- Log file: dovetail.log
- OPNFV web interface
CVP will host a web site to collect test results. Users can upload their results to this web site, so they can review these results in the future.
- web site url
- Wait for the complement of LF, test community, etc.
- Sign in / Sign up
- You need to sign in you account, then you can upload results, and check your private results. CVP is now using openstack id as account provider, but will soon support Linux Foundation ID as well.
- If you already have a openstack id, you can sign in directly with your id.
- If you do not have a openstack id, you can sign up a new one on the sign up page.
- If you do not sign in, you can only check the community results.
- My results
- This page lists all results uploaded by you after you signed in,
- You can also upload your results on this page.
- There is a choose file button, once you click it, you can choose your reuslt file in your harddisk then click the upload button, and you will see a results id once your uploading succeed.
- Check the review box to submit your result to the OPNFV. Uncheck the box to withdraw your result.
- profile
- This page shows your account info after you signed in.
Updating Dovetail or a Test Suite
Follow the instructions in section Installing Dovetail on the Test Host and Running the CVP Test Suite by replacing the docker images with new_tags,
sudo docker pull opnfv/dovetail:<dovetail_new_tag>
sudo docker pull opnfv/functest:<functest_new_tag>
sudo docker pull opnfv/yardstick:<yardstick_new_tag>
This step is necessary if dovetail software or the CVP test suite have updates.