Compass4nfv Installation Instructions
1. Abstract
This document describes how to install the Euphrates release of OPNFV when using Compass4nfv as a deployment tool covering it’s limitations, dependencies and required system resources.
2. Features
2.1. Supported Openstack Version and OS
| OS only | OpenStack Liberty | OpenStack Mitaka | OpenStack Newton | OpenStack Ocata | |
| CentOS 7 | yes | yes | yes | yes | no |
| Ubuntu trusty | yes | yes | yes | no | no |
| Ubuntu xenial | yes | no | yes | yes | yes |
2.2. Supported Openstack Flavor and Features
| OpenStack Liberty | OpenStack Mitaka | OpenStack Newton | OpenStack Ocata | |
| Virtual Deployment | Yes | Yes | Yes | Yes |
| Baremetal Deployment | Yes | Yes | Yes | Yes |
| HA | Yes | Yes | Yes | Yes |
| Ceph | Yes | Yes | Yes | Yes |
| SDN ODL/ONOS | Yes | Yes | Yes | Yes* |
| Compute Node Expansion | Yes | Yes | Yes | No |
| Multi-Nic Support | Yes | Yes | Yes | Yes |
| Boot Recovery | Yes | Yes | Yes | Yes |
| SFC | No | No | Yes | Yes |
- ONOS will not be supported in this release.
3. Compass4nfv configuration
This document describes providing guidelines on how to install and configure the Danube release of OPNFV when using Compass as a deployment tool including required software and hardware configurations.
Installation and configuration of host OS, OpenStack, OpenDaylight, ONOS, Ceph etc. can be supported by Compass on Virtual nodes or Bare Metal nodes.
The audience of this document is assumed to have good knowledge in networking and Unix/Linux administration.
3.1. Preconditions
Before starting the installation of the Euphrates release of OPNFV, some planning must be done.
3.1.1. Retrieving the installation tarball
First of all, The installation tarball is needed for deploying your OPNFV environment, it included packages of Compass, OpenStack, OpenDaylight, ONOS and so on.
The stable release tarball can be retrieved via OPNFV software download page
The daily build tarball can be retrieved via OPNFV artifacts repository:
http://artifacts.opnfv.org/compass4nfv.html
NOTE: Search the keyword “compass4nfv/Euphrates” to locate the tarball.
E.g. compass4nfv/euphrates/opnfv-2017-03-29_08-55-09.tar.gz
The name of tarball includes the time of tarball building, you can get the daily tarball according the building time. The git url and sha1 of Compass4nfv are recorded in properties files, According these, the corresponding deployment scripts can be retrieved.
3.1.2. Getting the deployment scripts
To retrieve the repository of Compass4nfv on Jumphost use the following command:
NOTE: PLEASE DO NOT GIT CLONE COMPASS4NFV IN ROOT DIRECTORY(INCLUDE SUBFOLDERS).
To get stable/euphrates release, you can use the following command:
- git checkout Euphrates.1.0
3.2. Setup Requirements
If you have only 1 Bare Metal server, Virtual deployment is recommended. if more than or equal 3 servers, the Bare Metal deployment is recommended. The minimum number of servers for Bare metal deployment is 3, 1 for JumpServer(Jumphost), 1 for controller, 1 for compute.
3.2.1. Jumphost Requirements
The Jumphost requirements are outlined below:
- Ubuntu 14.04 (Pre-installed).
- Root access.
- libvirt virtualization support.
- Minimum 2 NICs.
- PXE installation Network (Receiving PXE request from nodes and providing OS provisioning)
- IPMI Network (Nodes power control and set boot PXE first via IPMI interface)
- External Network (Optional: Internet access)
- 16 GB of RAM for a Bare Metal deployment, 64 GB of RAM for a Virtual deployment.
- CPU cores: 32, Memory: 64 GB, Hard Disk: 500 GB, (Virtual Deployment needs 1 TB Hard Disk)
3.3. Bare Metal Node Requirements
Bare Metal nodes require:
- IPMI enabled on OOB interface for power control.
- BIOS boot priority should be PXE first then local hard disk.
- Minimum 3 NICs.
- PXE installation Network (Broadcasting PXE request)
- IPMI Network (Receiving IPMI command from Jumphost)
- External Network (OpenStack mgmt/external/storage/tenant network)
3.4. Network Requirements
Network requirements include:
- No DHCP or TFTP server running on networks used by OPNFV.
- 2-6 separate networks with connectivity between Jumphost and nodes.
- PXE installation Network
- IPMI Network
- Openstack mgmt Network*
- Openstack external Network*
- Openstack tenant Network*
- Openstack storage Network*
- Lights out OOB network access from Jumphost with IPMI node enabled (Bare Metal deployment only).
- External network has Internet access, meaning a gateway and DNS availability.
The networks with(*) can be share one NIC(Default configuration) or use an exclusive NIC(Reconfigurated in network.yml).
3.5. Execution Requirements (Bare Metal Only)
In order to execute a deployment, one must gather the following information:
- IPMI IP addresses of the nodes.
- IPMI login information for the nodes (user/pass).
- MAC address of Control Plane / Provisioning interfaces of the Bare Metal nodes.
3.6. Configurations
There are three configuration files a user needs to modify for a cluster deployment.
network_cfg.yaml for openstack networks on hosts.
dha file for host role, IPMI credential and host nic idenfitication (MAC address).
deploy.sh for os and openstack version.
4. Configure network
network_cfg.yaml file describes networks configuration for openstack on hosts. It
specifies host network mapping and ip assignment of networks to be installed on hosts.
Compass4nfv includes a sample network_cfg.yaml under
compass4nfv/deploy/conf/network_cfg.yaml
There are three openstack networks to be installed: external, mgmt and storage. These three networks can be shared on one physical nic or on separate nics (multi-nic). The sample included in compass4nfv uses one nic. For multi-nic configuration, see multi-nic configuration.
4.1. Configure openstack network
**! All interface name in network_cfg.yaml must be identified in dha file by mac address !**
Compass4nfv will install networks on host as described in this configuration. It will look for physical nic on host by mac address from dha file and rename nic to the name with that mac address. Therefore, any network interface name that is not identified by mac address in dha file will not be installed correctly as compass4nfv cannot find the nic.
Configure provider network
provider_net_mappings:
  - name: br-prv
    network: physnet
    interface: eth1
    type: ovs
    role:
      - controller
      - compute
The external nic in dha file must be named eth1 with mac address. If user uses a
different interface name in dha file, change eth1 to that name here.
Note: User cannot use eth0 for external interface name as install/pxe network is named as
such.
Configure openstack mgmt&storage network:
sys_intf_mappings:
  - name: mgmt
    interface: eth1
    vlan_tag: 101
    type: vlan
    role:
      - controller
      - compute
- name: storage
    interface: eth1
    vlan_tag: 102
    type: vlan
    role:
      - controller
      - compute
Change vlan_tag of mgmt and storage to corresponding vlan tag configured on
switch.
Note: for virtual deployment, there is no need to modify mgmt&storage network.
If using multi-nic feature, i.e, separate nic for mgmt or storage network, user needs to
change name to desired nic name (need to match dha file). Please see multi-nic
configuration.
4.2. Assign IP address to networks
ip_settings section specifics ip assignment for openstack networks.
User can use default ip range for mgmt&storage network.
for external networks:
- name: external
   ip_ranges:
   - - "192.168.50.210"
     - "192.168.50.220"
   cidr: "192.168.50.0/24"
   gw: "192.168.50.1"
   role:
     - controller
     - compute
Provide at least number of hosts available ip for external IP range(these ips will be
assigned to each host). Provide actual cidr and gateway in cidr and gw fields.
configure public IP for horizon dashboard
public_vip:
 ip: 192.168.50.240
 netmask: "24"
 interface: external
Provide an external ip in ip field. This ip cannot be within the ip range assigned to
external network configured in pervious section. It will be used for horizon address.
See section 6.2 (Vitual) and 7.2 (BareMetal) for graphs illustrating network topology.
5. Installation on Bare Metal
5.1. Nodes Configuration (Bare Metal Deployment)
The below file is the inventory template of deployment nodes:
“compass4nfv/deploy/conf/hardware_environment/huawei-pod1/dha.yml”
The “dha.yml” is a collectively name for “os-nosdn-nofeature-ha.yml os-ocl-nofeature-ha.yml os-odl_l2-moon-ha.yml etc”.
You can write your own IPMI IP/User/Password/Mac address/roles reference to it.
- name – Host name for deployment node after installation.
- ipmiVer – IPMI interface version for deployment node support. IPMI 1.0 or IPMI 2.0 is available.
- ipmiIP – IPMI IP address for deployment node. Make sure it can access from Jumphost.
- ipmiUser – IPMI Username for deployment node.
- ipmiPass – IPMI Password for deployment node.
- mac – MAC Address of deployment node PXE NIC.
- interfaces – Host NIC renamed according to NIC MAC addresses when OS provisioning.
- roles – Components deployed.
Set TYPE/FLAVOR and POWER TOOL
E.g. .. code-block:: yaml
TYPE: baremetal FLAVOR: cluster POWER_TOOL: ipmitool
Set ipmiUser/ipmiPass and ipmiVer
E.g.
ipmiUser: USER
ipmiPass: PASSWORD
ipmiVer: '2.0'
Assignment of different roles to servers
E.g. Openstack only deployment roles setting
hosts:
  - name: host1
    mac: 'F8:4A:BF:55:A2:8D'
    interfaces:
       - eth1: 'F8:4A:BF:55:A2:8E'
    ipmiIp: 172.16.130.26
    roles:
      - controller
      - ha

  - name: host2
    mac: 'D8:49:0B:DA:5A:B7'
    interfaces:
      - eth1: 'D8:49:0B:DA:5A:B8'
    ipmiIp: 172.16.130.27
    roles:
      - compute
NOTE: THE ‘ha’ role MUST BE SELECTED WITH CONTROLLERS, EVEN THERE IS ONLY ONE CONTROLLER NODE.
E.g. Openstack and ceph deployment roles setting
hosts:
  - name: host1
    mac: 'F8:4A:BF:55:A2:8D'
    interfaces:
       - eth1: 'F8:4A:BF:55:A2:8E'
    ipmiIp: 172.16.130.26
    roles:
      - controller
      - ha
      - ceph-adm
      - ceph-mon

  - name: host2
    mac: 'D8:49:0B:DA:5A:B7'
    interfaces:
      - eth1: 'D8:49:0B:DA:5A:B8'
    ipmiIp: 172.16.130.27
    roles:
      - compute
      - ceph-osd
E.g. Openstack and ODL deployment roles setting
hosts:
  - name: host1
    mac: 'F8:4A:BF:55:A2:8D'
    interfaces:
       - eth1: 'F8:4A:BF:55:A2:8E'
    ipmiIp: 172.16.130.26
    roles:
      - controller
      - ha
      - odl

  - name: host2
    mac: 'D8:49:0B:DA:5A:B7'
    interfaces:
      - eth1: 'D8:49:0B:DA:5A:B8'
    ipmiIp: 172.16.130.27
    roles:
      - compute
E.g. Openstack and ONOS deployment roles setting
hosts:
  - name: host1
    mac: 'F8:4A:BF:55:A2:8D'
    interfaces:
       - eth1: 'F8:4A:BF:55:A2:8E'
    ipmiIp: 172.16.130.26
    roles:
      - controller
      - ha
      - onos

  - name: host2
    mac: 'D8:49:0B:DA:5A:B7'
    interfaces:
      - eth1: 'D8:49:0B:DA:5A:B8'
    ipmiIp: 172.16.130.27
    roles:
      - compute
5.2. Network Configuration (Bare Metal Deployment)
Before deployment, there are some network configuration to be checked based on your network topology.Compass4nfv network default configuration file is “compass4nfv/deploy/conf/hardware_environment/huawei-pod1/network.yml”. This file is an example, you can customize by yourself according to specific network environment.
In this network.yml, there are several config sections listed following(corresponed to the ordre of the config file):
5.2.1. Provider Mapping
- name – provider network name.
- network – default as physnet, do not change it.
- interfaces – the NIC or Bridge attached by the Network.
- type – the type of the NIC or Bridge(vlan for NIC and ovs for Bridge, either).
- roles – all the possible roles of the host machines which connected by this network(mostly put both controller and compute).
5.2.2. System Interface
- name – Network name.
- interfaces – the NIC or Bridge attached by the Network.
- vlan_tag – if type is vlan, add this tag before ‘type’ tag.
- type – the type of the NIC or Bridge(vlan for NIC and ovs for Bridge, either).
- roles – all the possible roles of the host machines which connected by this network(mostly put both controller and compute).
5.2.3. IP Settings
- name – network name corresponding the the network name in System Interface section one by one.
- ip_ranges – ip addresses range provided for this network.
- cidr – the IPv4 address and its associated routing prefix and subnet mask?
- gw – need to add this line only if network is external.
- roles – all the possible roles of the host machines which connected by this network(mostly put both controller and compute).
5.2.4. Internal VIP(virtual or proxy IP)
- ip – virtual or proxy ip address, must be in the same subnet with mgmt network but must not be in the range of mgmt network.
- netmask – the length of netmask
- interface – mostly mgmt.
5.2.5. Public VIP
- ip – virtual or proxy ip address, must be in the same subnet with external network but must not be in the range of external network.
- netmask – the length of netmask
- interface – mostly external.
5.2.6. Public Network
- enable – must be True(if False, you need to set up provider network manually).
- network – leave it ext-net.
- type – the type of the ext-net above, such as flat or vlan.
- segment_id – when the type is vlan, this should be id of vlan.
- subnet – leave it ext-subnet.
- provider_network – leave it physnet.
- router – leave it router-ext.
- enable_dhcp – must be False.
- no_gateway – must be False.
- external_gw – same as gw in ip_settings.
- floating_ip_cidr – cidr for floating ip, see explanation in ip_settings.
- floating_ip_start – define range of floating ip with floating_ip_end(this defined range must not be included in ip range of external configured in ip_settings section).
- floating_ip_end – define range of floating ip with floating_ip_start.
The following figure shows the default network configuration.
+--+                          +--+     +--+
|  |                          |  |     |  |
|  |      +------------+      |  |     |  |
|  +------+  Jumphost  +------+  |     |  |
|  |      +------+-----+      |  |     |  |
|  |             |            |  |     |  |
|  |             +------------+  +-----+  |
|  |                          |  |     |  |
|  |      +------------+      |  |     |  |
|  +------+    host1   +------+  |     |  |
|  |      +------+-----+      |  |     |  |
|  |             |            |  |     |  |
|  |             +------------+  +-----+  |
|  |                          |  |     |  |
|  |      +------------+      |  |     |  |
|  +------+    host2   +------+  |     |  |
|  |      +------+-----+      |  |     |  |
|  |             |            |  |     |  |
|  |             +------------+  +-----+  |
|  |                          |  |     |  |
|  |      +------------+      |  |     |  |
|  +------+    host3   +------+  |     |  |
|  |      +------+-----+      |  |     |  |
|  |             |            |  |     |  |
|  |             +------------+  +-----+  |
|  |                          |  |     |  |
|  |                          |  |     |  |
+-++                          ++-+     +-++
  ^                            ^         ^
  |                            |         |
  |                            |         |
+-+-------------------------+  |         |
|      External Network     |  |         |
+---------------------------+  |         |
       +-----------------------+---+     |
       |       IPMI Network        |     |
       +---------------------------+     |
               +-------------------------+-+
               | PXE(Installation) Network |
               +---------------------------+
The following figure shows the interfaces and nics of JumpHost and deployment nodes in huawei-pod1 network configuration(default one nic for openstack networks).
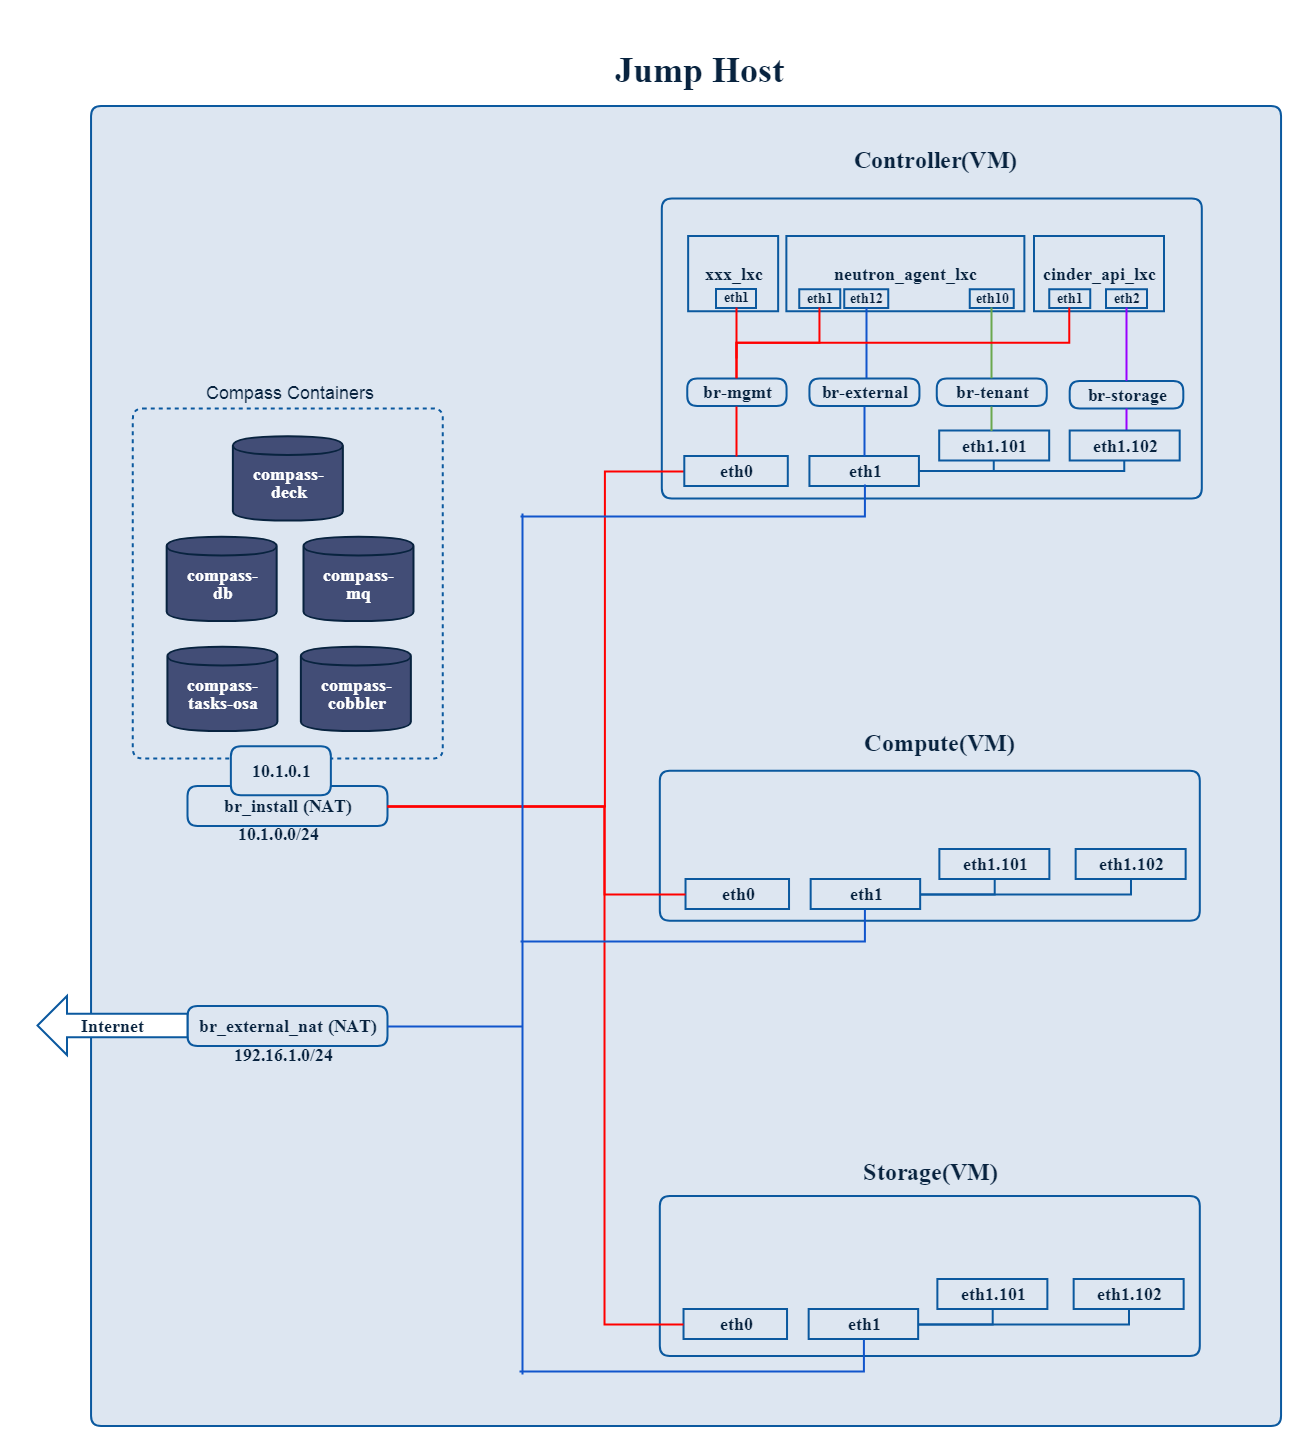
Fig 1. Single nic scenario
The following figure shows the interfaces and nics of JumpHost and deployment nodes in intel-pod8 network configuration(openstack networks are seperated by multiple NICs).
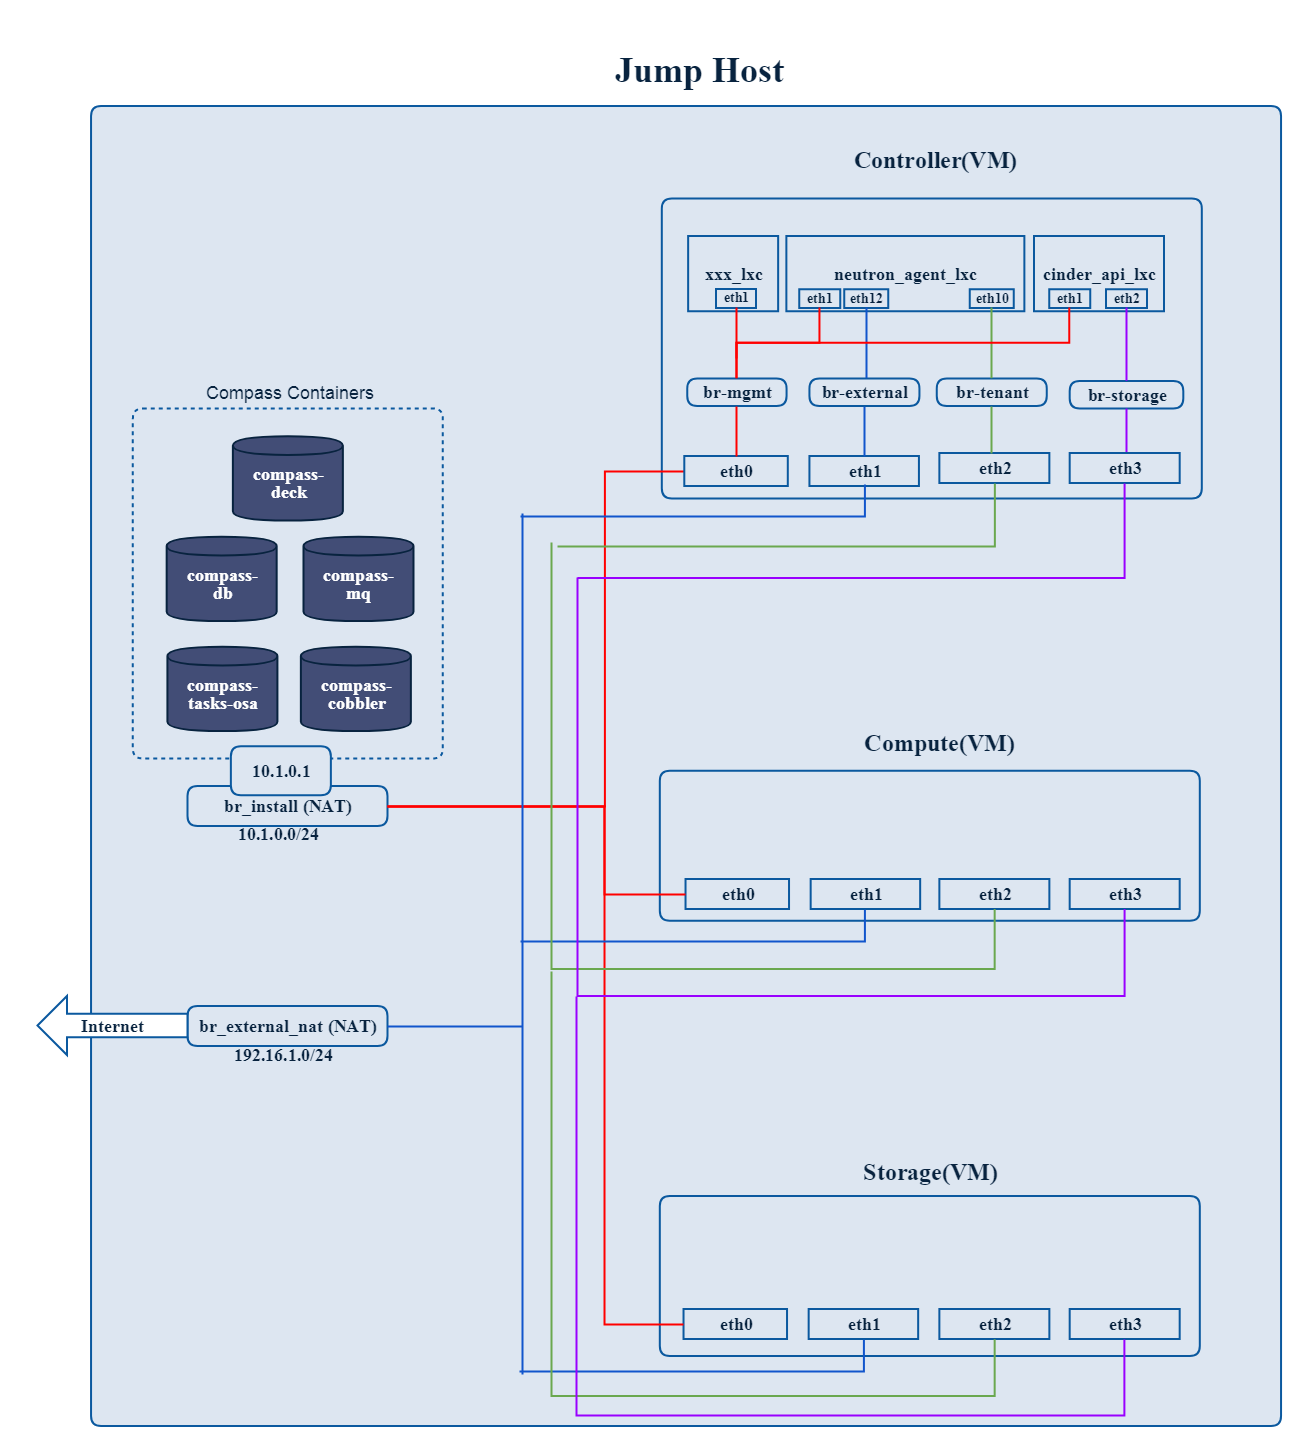
Fig 2. Multiple nics scenario
5.3. Start Deployment (Bare Metal Deployment)
- Edit deploy.sh
- 1.1. Set OS version for deployment nodes.
- Compass4nfv supports ubuntu and centos based openstack newton.
E.g.
# Set OS version for target hosts
# Ubuntu16.04 or CentOS7
export OS_VERSION=xenial
or
export OS_VERSION=centos7
1.2. Set tarball corresponding to your code
E.g.
# Set ISO image corresponding to your code
export ISO_URL=file:///home/compass/compass4nfv.tar.gz
- 1.3. Set hardware deploy jumpserver PXE NIC. (set eth1 E.g.)
- You do not need to set it when virtual deploy.
E.g.
# Set hardware deploy jumpserver PXE NIC
# you need to comment out it when virtual deploy
export INSTALL_NIC=eth1
1.4. Set scenario that you want to deploy
E.g.
nosdn-nofeature scenario deploy sample
# DHA is your dha.yml's path
export DHA=./deploy/conf/hardware_environment/huawei-pod1/os-nosdn-nofeature-ha.yml

# NETWORK is your network.yml's path
export NETWORK=./deploy/conf/hardware_environment/huawei-pod1/network.yml
odl_l2-moon scenario deploy sample
# DHA is your dha.yml's path
export DHA=./deploy/conf/hardware_environment/huawei-pod1/os-odl_l2-moon-ha.yml

# NETWORK is your network.yml's path
export NETWORK=./deploy/conf/hardware_environment/huawei-pod1/network.yml
odl_l2-nofeature scenario deploy sample
# DHA is your dha.yml's path
export DHA=./deploy/conf/hardware_environment/huawei-pod1/os-odl_l2-nofeature-ha.yml

# NETWORK is your network.yml's path
export NETWORK=./deploy/conf/hardware_environment/huawei-pod1/network.yml
odl_l3-nofeature scenario deploy sample
# DHA is your dha.yml's path
export DHA=./deploy/conf/hardware_environment/huawei-pod1/os-odl_l3-nofeature-ha.yml

# NETWORK is your network.yml's path
export NETWORK=./deploy/conf/hardware_environment/huawei-pod1/network.yml
odl-sfc deploy scenario sample
# DHA is your dha.yml's path
export DHA=./deploy/conf/hardware_environment/huawei-pod1/os-odl-sfc-ha.yml

# NETWORK is your network.yml's path
export NETWORK=./deploy/conf/hardware_environment/huawei-pod1/network.yml
- Run
deploy.sh
./deploy.sh
6. Installation on virtual machines
6.1. Quick Start
Only 1 command to try virtual deployment, if you have Internet access. Just Paste it and Run.
curl https://raw.githubusercontent.com/opnfv/compass4nfv/euphrates/quickstart.sh | bash
If you want to deploy noha with1 controller and 1 compute, run the following command
6.2. Nodes Configuration (Virtual Deployment)
6.2.1. virtual machine setting
- VIRT_NUMBER – the number of nodes for virtual deployment.
- VIRT_CPUS – the number of CPUs allocated per virtual machine.
- VIRT_MEM – the memory size(MB) allocated per virtual machine.
- VIRT_DISK – the disk size allocated per virtual machine.
export VIRT_NUMBER=${VIRT_NUMBER:-5}
export VIRT_CPUS=${VIRT_CPU:-4}
export VIRT_MEM=${VIRT_MEM:-16384}
export VIRT_DISK=${VIRT_DISK:-200G}
6.2.2. roles setting
The below file is the inventory template of deployment nodes:
”./deploy/conf/vm_environment/huawei-virtual1/dha.yml”
The “dha.yml” is a collectively name for “os-nosdn-nofeature-ha.yml os-ocl-nofeature-ha.yml os-odl_l2-moon-ha.yml etc”.
You can write your own address/roles reference to it.
- name – Host name for deployment node after installation.
- roles – Components deployed.
Set TYPE and FLAVOR
E.g.
TYPE: virtual
FLAVOR: cluster
Assignment of different roles to servers
E.g. Openstack only deployment roles setting
hosts:
  - name: host1
    roles:
      - controller
      - ha

  - name: host2
    roles:
      - compute
NOTE: IF YOU SELECT MUTIPLE NODES AS CONTROLLER, THE ‘ha’ role MUST BE SELECT, TOO.
E.g. Openstack and ceph deployment roles setting
hosts:
  - name: host1
    roles:
      - controller
      - ha
      - ceph-adm
      - ceph-mon

  - name: host2
    roles:
      - compute
      - ceph-osd
E.g. Openstack and ODL deployment roles setting
hosts:
  - name: host1
    roles:
      - controller
      - ha
      - odl

  - name: host2
    roles:
      - compute
E.g. Openstack and ONOS deployment roles setting
hosts:
  - name: host1
    roles:
      - controller
      - ha
      - onos

  - name: host2
    roles:
      - compute
6.3. Network Configuration (Virtual Deployment)
The same with Baremetal Deployment.
6.4. Start Deployment (Virtual Deployment)
- Edit deploy.sh
- 1.1. Set OS version for deployment nodes.
- Compass4nfv supports ubuntu and centos based openstack ocata.
E.g.
# Set OS version for target hosts
# Ubuntu16.04 or CentOS7
export OS_VERSION=xenial
or
export OS_VERSION=centos7
1.2. Set ISO image corresponding to your code
E.g.
# Set ISO image corresponding to your code
export ISO_URL=file:///home/compass/compass4nfv.tar.gz
1.3. Set scenario that you want to deploy
E.g.
nosdn-nofeature scenario deploy sample
# DHA is your dha.yml's path
export DHA=./deploy/conf/vm_environment/os-nosdn-nofeature-ha.yml

# NETWORK is your network.yml's path
export NETWORK=./deploy/conf/vm_environment/huawei-virtual1/network.yml
odl_l2-moon scenario deploy sample
# DHA is your dha.yml's path
export DHA=./deploy/conf/vm_environment/os-odl_l2-moon-ha.yml

# NETWORK is your network.yml's path
export NETWORK=./deploy/conf/vm_environment/huawei-virtual1/network.yml
odl_l2-nofeature scenario deploy sample
# DHA is your dha.yml's path
export DHA=./deploy/conf/vm_environment/os-odl_l2-nofeature-ha.yml

# NETWORK is your network.yml's path
export NETWORK=./deploy/conf/vm_environment/huawei-virtual1/network.yml
odl_l3-nofeature scenario deploy sample
# DHA is your dha.yml's path
export DHA=./deploy/conf/vm_environment/os-odl_l3-nofeature-ha.yml

# NETWORK is your network.yml's path
export NETWORK=./deploy/conf/vm_environment/huawei-virtual1/network.yml
odl-sfc deploy scenario sample
# DHA is your dha.yml's path
export DHA=./deploy/conf/vm_environment/os-odl-sfc-ha.yml

# NETWORK is your network.yml's path
export NETWORK=./deploy/conf/vm_environment/huawei-virtual1/network.yml
- Run
deploy.sh
./deploy.sh
7. K8s introduction
7.1. Kubernetes Architecture
Currently Compass can deploy kubernetes as NFVI in 3+2 mode by default.
The following figure shows a typical architecture of Kubernetes.
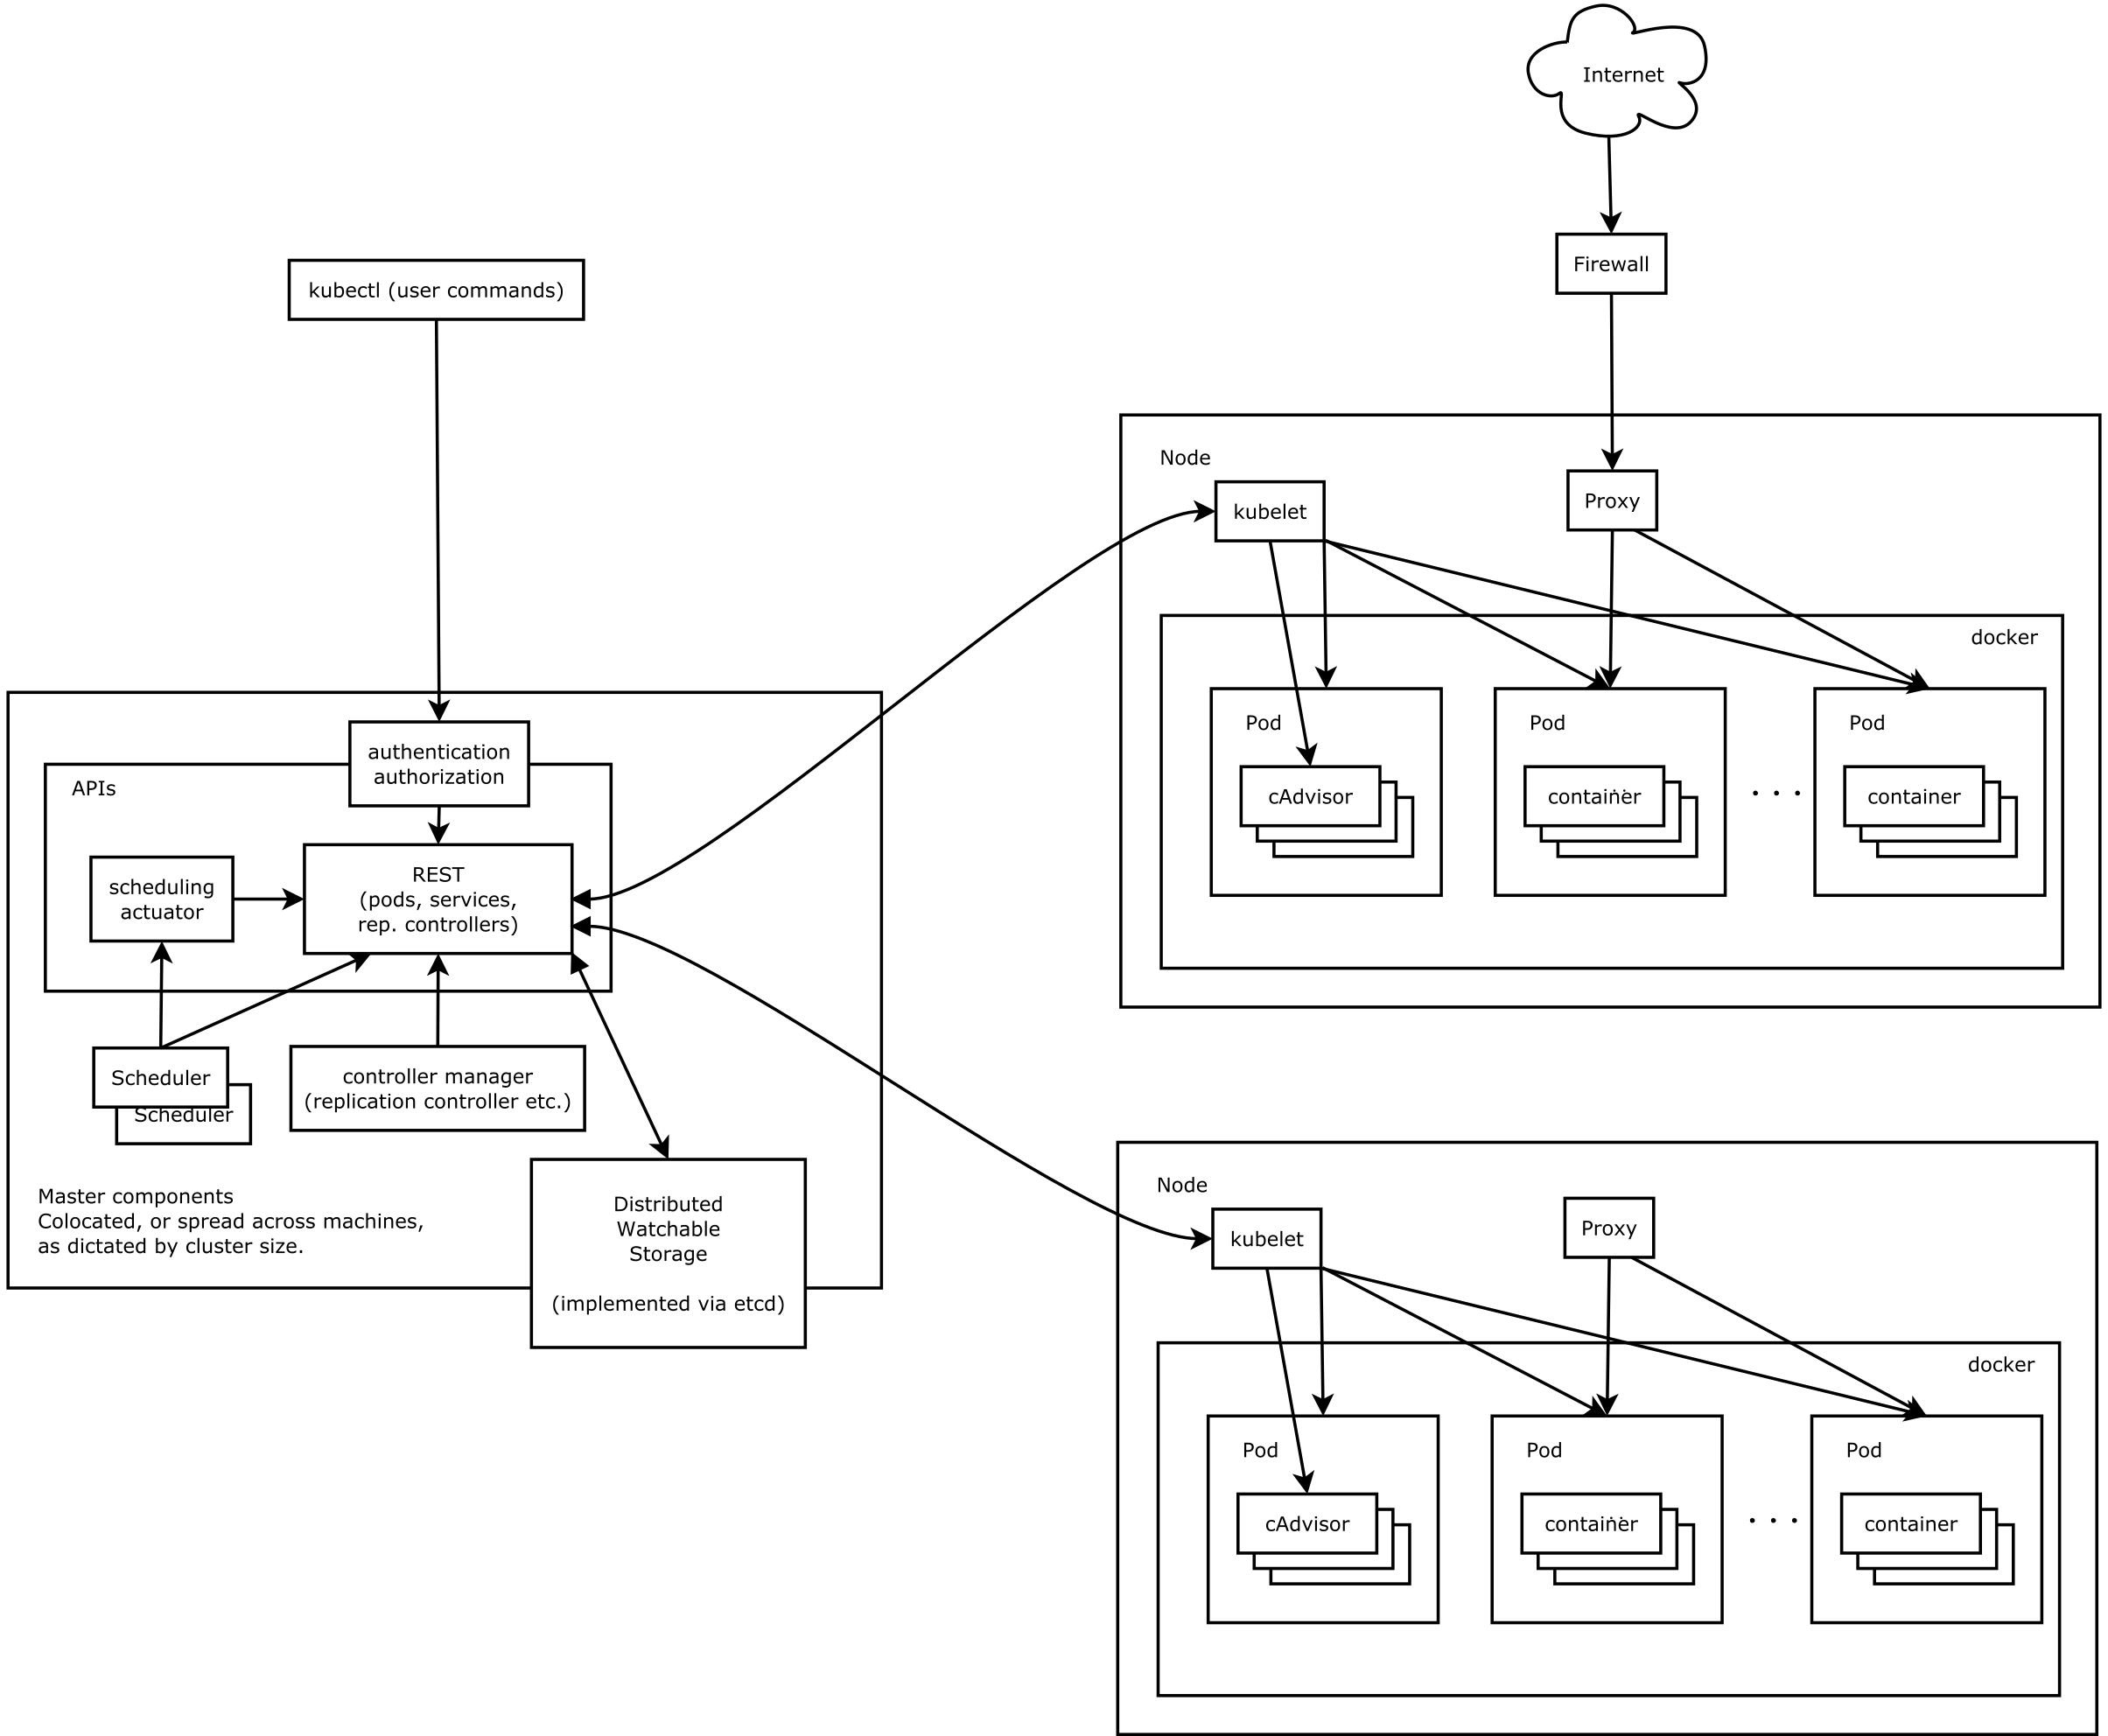
Fig 3. K8s architecture
7.1.1. Kube-apiserver
Kube-apiserver exposes the Kubernetes API. It is the front-end for the Kubernetes control plane. It is designed to scale horizontally, that is, it scales by deploying more instances.
7.1.2. Etcd
Etcd is used as Kubernetes’ backing store. All cluster data is stored here. Always have a backup plan for etcd’s data for your Kubernetes cluster.
7.1.3. Kube-controller-manager
Kube-controller-manager runs controllers, which are the background threads that handle routine tasks in the cluster. Logically, each controller is a separate process, but to reduce complexity, they are all compiled into a single binary and run in a single process.
These controllers include:
- Node Controller: Responsible for noticing and responding when nodes go down.
- Replication Controller: Responsible for maintaining the correct number of pods for every replication controller object in the system.
- Endpoints Controller: Populates the Endpoints object (that is, joins Services & Pods).
- Service Account & Token Controllers: Create default accounts and API access tokens for new namespaces.
7.1.4. kube-scheduler
Kube-scheduler watches newly created pods that have no node assigned, and selects a node for them to run on.
7.1.5. Kubelet
Kubelet is the primary node agent. It watches for pods that have been assigned to its node (either by apiserver or via local configuration file) and:
- Mounts the pod’s required volumes.
- Downloads the pod’s secrets.
- Runs the pod’s containers via docker (or, experimentally, rkt).
- Periodically executes any requested container liveness probes.
- Reports the status of the pod back to the rest of the system, by creating a mirror pod if necessary.
- Reports the status of the node back to the rest of the system.
7.1.6. Kube-proxy
Kube-proxy enables the Kubernetes service abstraction by maintaining network rules on the host and performing connection forwarding.
7.1.7. Docker
Docker is used for running containers.
7.1.8. POD
A pod is a collection of containers and its storage inside a node of a Kubernetes cluster. It is possible to create a pod with multiple containers inside it. For example, keeping a database container and data container in the same pod.
7.2. Understand Kubernetes Networking in Compass configuration
The following figure shows the Kubernetes Networking in Compass configuration.
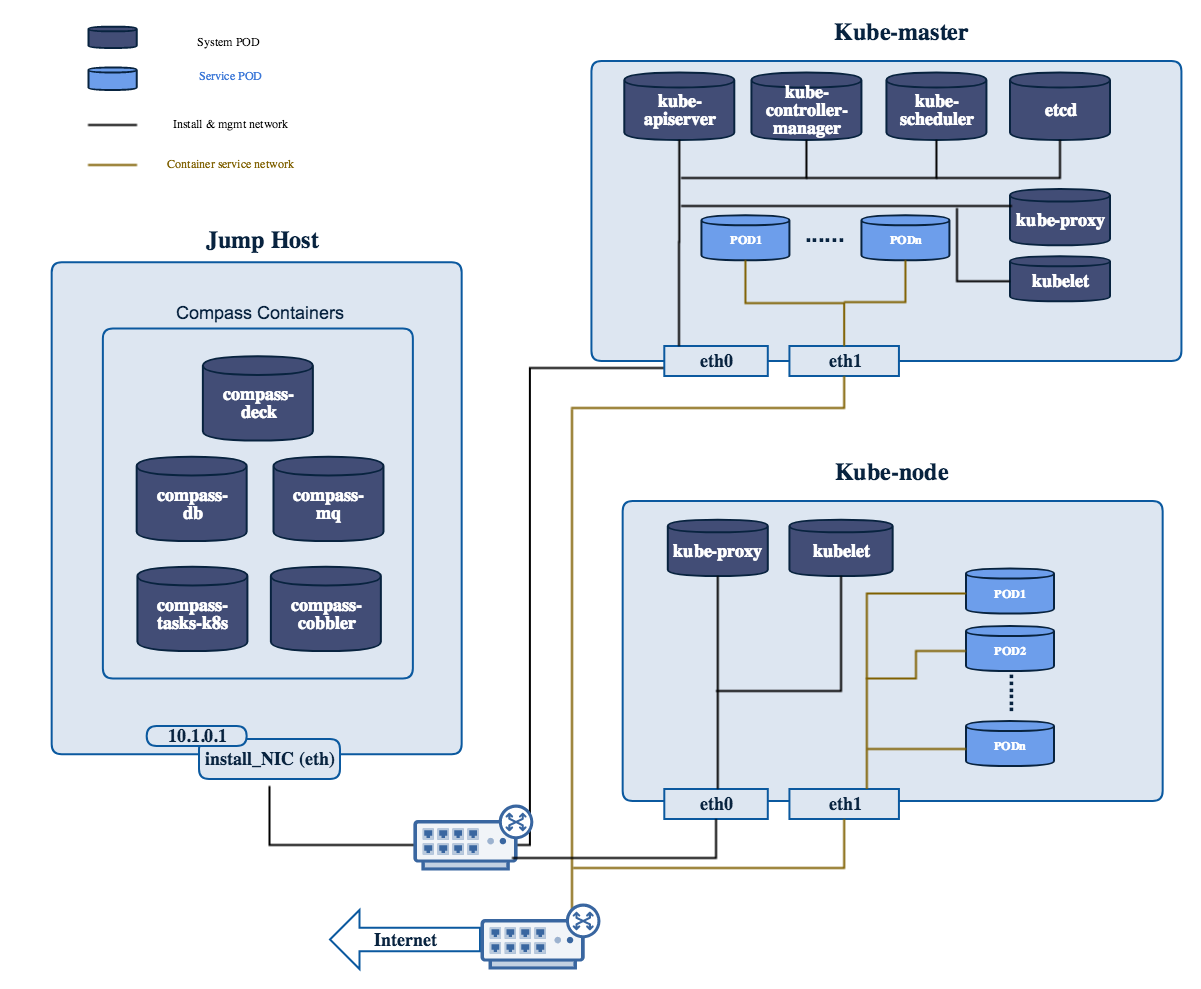
Fig 4. Kubernetes Networking in Compass
8. Installation of K8s on virtual machines
8.1. Quick Start
Only 1 command to try virtual deployment, if you have Internet access. Just Paste it and Run.
curl https://raw.githubusercontent.com/opnfv/compass4nfv/master/quickstart_k8s.sh | bash
If you want to deploy noha with1 controller and 1 compute, run the following command
export SCENARIO=k8-nosdn-nofeature-noha.yml
export VIRT_NUMBER=2
curl https://raw.githubusercontent.com/opnfv/compass4nfv/euphrates/quickstart_k8s.sh | bash
9. Installation of K8s on Bare Metal
9.1. Nodes Configuration (Bare Metal Deployment)
The below file is the inventory template of deployment nodes:
“compass4nfv/deploy/conf/hardware_environment/huawei-pod1/k8-nosdn-nofeature-ha.yml”
You can write your own IPMI IP/User/Password/Mac address/roles reference to it.
- name – Host name for deployment node after installation.
- ipmiVer – IPMI interface version for deployment node support. IPMI 1.0 or IPMI 2.0 is available.
- ipmiIP – IPMI IP address for deployment node. Make sure it can access from Jumphost.
- ipmiUser – IPMI Username for deployment node.
- ipmiPass – IPMI Password for deployment node.
- mac – MAC Address of deployment node PXE NIC.
- interfaces – Host NIC renamed according to NIC MAC addresses when OS provisioning.
- roles – Components deployed.
Set TYPE/FLAVOR and POWER TOOL
E.g. .. code-block:: yaml
TYPE: baremetal FLAVOR: cluster POWER_TOOL: ipmitool
Set ipmiUser/ipmiPass and ipmiVer
E.g.
ipmiUser: USER
ipmiPass: PASSWORD
ipmiVer: '2.0'
Assignment of different roles to servers
E.g. K8s only deployment roles setting
hosts:
  - name: host1
    mac: 'F8:4A:BF:55:A2:8D'
    interfaces:
       - eth1: 'F8:4A:BF:55:A2:8E'
    ipmiIp: 172.16.130.26
    roles:
      - kube_master
      - etcd

  - name: host2
    mac: 'D8:49:0B:DA:5A:B7'
    interfaces:
      - eth1: 'D8:49:0B:DA:5A:B8'
    ipmiIp: 172.16.130.27
    roles:
      - kube_node
9.2. Network Configuration (Bare Metal Deployment)
Before deployment, there are some network configuration to be checked based on your network topology.Compass4nfv network default configuration file is “compass4nfv/deploy/conf/hardware_environment/huawei-pod1/network.yml”. This file is an example, you can customize by yourself according to specific network environment.
In this network.yml, there are several config sections listed following(corresponed to the ordre of the config file):
9.2.1. Provider Mapping
- name – provider network name.
- network – default as physnet, do not change it.
- interfaces – the NIC or Bridge attached by the Network.
- type – the type of the NIC or Bridge(vlan for NIC and ovs for Bridge, either).
- roles – all the possible roles of the host machines which connected by this network(mostly put both controller and compute).
9.2.2. System Interface
- name – Network name.
- interfaces – the NIC or Bridge attached by the Network.
- vlan_tag – if type is vlan, add this tag before ‘type’ tag.
- type – the type of the NIC or Bridge(vlan for NIC and ovs for Bridge, either).
- roles – all the possible roles of the host machines which connected by this network(mostly put both controller and compute).
9.2.3. IP Settings
- name – network name corresponding the the network name in System Interface section one by one.
- ip_ranges – ip addresses range provided for this network.
- cidr – the IPv4 address and its associated routing prefix and subnet mask?
- gw – need to add this line only if network is external.
- roles – all the possible roles of the host machines which connected by this network(mostly put both controller and compute).
9.2.4. Internal VIP(virtual or proxy IP)
- ip – virtual or proxy ip address, must be in the same subnet with mgmt network but must not be in the range of mgmt network.
- netmask – the length of netmask
- interface – mostly mgmt.
9.2.5. Public VIP
- ip – virtual or proxy ip address, must be in the same subnet with external network but must not be in the range of external network.
- netmask – the length of netmask
- interface – mostly external.
9.2.6. Public Network
- enable – must be True(if False, you need to set up provider network manually).
- network – leave it ext-net.
- type – the type of the ext-net above, such as flat or vlan.
- segment_id – when the type is vlan, this should be id of vlan.
- subnet – leave it ext-subnet.
- provider_network – leave it physnet.
- router – leave it router-ext.
- enable_dhcp – must be False.
- no_gateway – must be False.
- external_gw – same as gw in ip_settings.
- floating_ip_cidr – cidr for floating ip, see explanation in ip_settings.
- floating_ip_start – define range of floating ip with floating_ip_end(this defined range must not be included in ip range of external configured in ip_settings section).
- floating_ip_end – define range of floating ip with floating_ip_start.
The following figure shows the default network configuration.
Fig 5. Kubernetes network configuration
9.3. Start Deployment (Bare Metal Deployment)
- Edit deploy.sh
- 1.1. Set OS version for deployment nodes.
- Compass4nfv supports ubuntu and centos based openstack newton.
E.g.
# Set OS version for target hosts
# Only CentOS7 supported now
export OS_VERSION=centos7
1.2. Set tarball corresponding to your code
E.g.
# Set ISO image corresponding to your code
export ISO_URL=file:///home/compass/compass4nfv.tar.gz
- 1.3. Set hardware deploy jumpserver PXE NIC. (set eth1 E.g.)
- You do not need to set it when virtual deploy.
E.g.
# Set hardware deploy jumpserver PXE NIC
# you need to comment out it when virtual deploy
export INSTALL_NIC=eth1
1.4. K8s scenario that you want to deploy
E.g.
nosdn-nofeature scenario deploy sample
# DHA is your dha.yml's path
export DHA=./deploy/conf/hardware_environment/huawei-pod1/k8-nosdn-nofeature-ha.yml

# NETWORK is your network.yml's path
export NETWORK=./deploy/conf/hardware_environment/huawei-pod1/network.yml
- Run
deploy.sh
./deploy.sh
10. Offline Deploy
Compass4nfv uses a repo docker container as distro and pip package source to deploy cluster and support complete offline deployment on a jumphost without access internet. Here is the offline deployment instruction:
10.1. Preparation for offline deploy
- Download compass.tar.gz from OPNFV artifacts repository (Search compass4nfv in http://artifacts.opnfv.org/ and download an appropriate tarball. Tarball can also be generated by script build.sh in compass4nfv root directory.)
- Download the Jumphost preparation package from our httpserver. (Download the jumphost environment package from here. It should be awared that currently we only support ubuntu trusty as offline jumphost OS.)
- Clone the compass4nfv code repository.
10.2. Steps of offline deploy
- Copy the compass.tar.gz, jh_env_package.tar.gz and the compass4nfv code repository to your jumphost.
- Export the local path of the compass.tar.gz and jh_env_package.tar.gz on jumphost. Then you can perform deployment on a offline jumphost.
E.g.
Export the compass4nfv.iso and jh_env_package.tar.gz path
# ISO_URL and JHPKG_URL should be absolute path
export ISO_URL=file:///home/compass/compass4nfv.iso
export JHPKG_URL=file:///home/compass/jh_env_package.tar.gz
- Open the OSA offline deployment switch on jumphost.
export OFFLINE_DEPLOY=Enable
- Run deploy.sh
./deploy.sh
11. Expansion Guide
11.1. Edit NETWORK File
The below file is the inventory template of deployment nodes:
”./deploy/conf/hardware_environment/huawei-pod1/network.yml”
You need to edit the network.yml which you had edited the first deployment.
NOTE: External subnet’s ip_range should exclude the IPs those have already been used.
11.2. Edit DHA File
The below file is the inventory template of deployment nodes:
”./deploy/conf/hardware_environment/expansion-sample/hardware_cluster_expansion.yml”
You can write your own IPMI IP/User/Password/Mac address/roles reference to it.
- name – Host name for deployment node after installation.
- ipmiIP – IPMI IP address for deployment node. Make sure it can access from Jumphost.
- ipmiUser – IPMI Username for deployment node.
- ipmiPass – IPMI Password for deployment node.
- mac – MAC Address of deployment node PXE NIC .
Set TYPE/FLAVOR and POWER TOOL
E.g.
TYPE: baremetal
FLAVOR: cluster
POWER_TOOL: ipmitool
Set ipmiUser/ipmiPass and ipmiVer
E.g.
ipmiUser: USER
ipmiPass: PASSWORD
ipmiVer: '2.0'
Assignment of roles to servers
E.g. Only increase one compute node
hosts:
   - name: host6
     mac: 'E8:4D:D0:BA:60:45'
     interfaces:
        - eth1: '08:4D:D0:BA:60:44'
     ipmiIp: 172.16.131.23
     roles:
       - compute
E.g. Increase two compute nodes
hosts:
   - name: host6
     mac: 'E8:4D:D0:BA:60:45'
     interfaces:
        - eth1: '08:4D:D0:BA:60:44'
     ipmiIp: 172.16.131.23
     roles:
       - compute

   - name: host6
     mac: 'E8:4D:D0:BA:60:78'
     interfaces:
        - eth1: '08:4D:56:BA:60:83'
     ipmiIp: 172.16.131.23
     roles:
       - compute
11.2.1. Start Expansion
Edit network.yml and dha.yml file
You need to Edit network.yml and virtual_cluster_expansion.yml or hardware_cluster_expansion.yml. Edit the DHA and NETWORK envionment variables. External subnet’s ip_range and management ip should be changed as the first 6 IPs are already taken by the first deployment.
E.g.
--- network.yml     2017-02-16 20:07:10.097878150 +0800
+++ network-expansion.yml   2017-05-03 10:01:34.537379013 +0800
@@ -38,7 +38,7 @@
 ip_settings:
   - name: mgmt
     ip_ranges:
-      - - "172.16.1.1"
+      - - "172.16.1.6"
         - "172.16.1.254"
     cidr: "172.16.1.0/24"
     role:
@@ -47,7 +47,7 @@

   - name: storage
     ip_ranges:
-      - - "172.16.2.1"
+      - - "172.16.2.6"
         - "172.16.2.254"
     cidr: "172.16.2.0/24"
     role:
@@ -56,7 +56,7 @@

   - name: external
     ip_ranges:
-      - - "192.168.116.201"
+      - - "192.168.116.206"
         - "192.168.116.221"
     cidr: "192.168.116.0/24"
     gw: "192.168.116.1"
- Edit deploy.sh
- 2.1. Set EXPANSION and VIRT_NUMBER.
- VIRT_NUMBER decide how many virtual machines needs to expand when virtual expansion
E.g.
export EXPANSION="true"
export MANAGEMENT_IP_START="10.1.0.55"
export VIRT_NUMBER=1
export DEPLOY_FIRST_TIME="false"
2.2. Set scenario that you need to expansion
E.g.
# DHA is your dha.yml's path
export DHA=./deploy/conf/hardware_environment/expansion-sample/hardware_cluster_expansion.yml

# NETWORK is your network.yml's path
export NETWORK=./deploy/conf/hardware_environment/huawei-pod1/network.yml
- Note: Other environment variable shoud be same as your first deployment.
- Please check the environment variable before you run deploy.sh.
- Run
deploy.sh
./deploy.sh