Cross Community Continuous Integration
Contents:
1. Cross Community Continuous Integration
This document will contain the overview, the pipelines, and stuff.
1.1. Introduction
OPNFV has an advanced Continuous Integration (CI) machinery that provides support to OPNFV community to develop, integrate, test and release the integrated reference platform for NFV.
During the past releases, OPNFV integrated, deployed and tested different flavors (scenarios) of the platform in an entirely automated fashion, resulting in feedback to OPNFV itself and the communities OPNFV works with. This enabled communities to implement new features directly in the upstream, identify bugs and issue fixes for them.
The development and release model employed by OPNFV uses stable versions of upstream components. This helps developers and users who are after the stability however it slows down the speed of development, testing, resulting in slower pace in innovation.
In order to provide means for developers to work with OpenStack master branch, cutting the time it takes to develop new features significantly and testing them on OPNFV Infrastructure
enable OPNFV developers to identify bugs earlier, issue fixes faster, and
- get feedback on a daily basis
- establish mechanisms to run additional testing on OPNFV Infrastructure to
- provide feedback to OpenStack community
- make the solutions we put in place available to other LF Networking Projects
- OPNFV works with closely
- embrace the change and apply Continuous Delivery and DevOps principles and
practices to OPNFV
2. Sandbox and User Guide
2.1. The Sandbox
Users and developers need to have an easy way to bring up an environment that fits to their purpose in a simple way in order to spend time on features they are developing, bugs they are fixing, trying things out, for learning purposes or just for fun rather than dealing with the tools and mechanisms used for creating and provisioning nodes, installing different components they do not intend to touch, and so on.
We also have reality. For example, not all users and developers have full Pharos baremetal PODs or powerful machines waiting for them to use while doing their work or want to use different Linux distributions due to different reasons. It is important to take these into account and provide different configuration options for the sandbox based on the requirements the people have on the environment they will be using.
Based on the observations we made and the feedback we received from the OPNFV users and the developers, XCI Team has created a sandbox that is highly configurable, simple and at the same time capable to provide a realistic environment for the people to do their work. The sandbox makes it possible to bring up the complete environment with a single command and offers variety of options to change how the stack should be deployed. The configuration of the sandbox is as easy as setting few environment variables.
The sandbox provides
- automated way to bring up and tear down complete stack
- various flavors to pick and use
- support for different Linux distributions
- multiple OPNFV scenarios to install
- ability to select different versions of upstream components to base the work on
- ability to enable additional OpenStack services or disable others
One last point to highlight here is that the XCI itself uses the sandbox for development and test purposes so it is continuously tested to ensure it works for XCI and for the users and the developers who are using it for different purposes.
2.2. Components of the Sandbox
The sandbox uses OpenStack projects for VM node creation, provisioning and OpenStack installation. XCI Team provides playbooks, roles, and scripts to ensure the components utilized by the sandbox work in a way that serves the users in best possible way.
- openstack/bifrost: Bifrost (pronounced bye-frost) is a set of Ansible playbooks that automates the task of deploying a base image onto a set of known hardware using ironic. It provides modular utility for one-off operating system deployment with as few operational requirements as reasonably possible. Bifrost supports different operating systems such as Ubuntu, CentOS, and openSUSE. More information about this project can be seen on Bifrost documentation.
- openstack/openstack-ansible: OpenStack-Ansible is an official OpenStack project which aims to deploy production environments from source in a way that makes it scalable while also being simple to operate, upgrade, and grow. More information about this project can be seen on OpenStack Ansible documentation.
- opnfv/releng-xci: OPNFV Releng Project provides additional scripts, Ansible playbooks and configuration options in order for developers to have easy way of using openstack/bifrost and openstack/openstack-ansible by just setting couple of environment variables and executing a single script. More infromation about this project can be seen on OPNFV Releng documentation.
2.3. Sandbox Flavors
XCI Developer Sandbox provides 4 different configurations (flavors) that can be deployed using VM nodes.
Available flavors are listed on the table below.
| Flavor | Number of VM Nodes | VM Specs Per Node | Time Estimates |
|---|---|---|---|
| All in One (aio) | 1 VM Node
controller & compute
on single/same node
1 compute node
|
vCPUs: 8
RAM: 12GB
Disk: 80GB
NICs: 1
|
Provisioning: 10 mins
Deployment: 90 mins
Total: 100 mins
|
| Mini | 3 VM Nodes
1 deployment node
1 controller node
1 compute node
|
vCPUs: 6
RAM: 12GB
Disk: 80GB
NICs: 1
|
Provisioning: 12 mins
Deployment: 65 mins
Total: 77 mins
|
| No HA | 4 VM Nodes
1 deployment node
1 controller node
2 compute nodes
|
vCPUs: 6
RAM: 12GB
Disk: 80GB
NICs: 1
|
Provisioning: 12 mins
Deployment: 70 mins
Total: 82 mins
|
| HA | 6 VM Nodes
1 deployment node
3 controller nodes
2 compute nodes
|
vCPUs: 6
RAM: 12GB
Disk: 80GB
NICs: 1
|
Provisioning: 15 mins
Deployment: 105 mins
Total: 120 mins
|
The specs for VMs are configurable and the more vCPU/RAM the better.
Estimated times listed above are provided as guidance and they might vary depending on
- the physical (or virtual) host where the sandbox is run
- the specs of the VM nodes
- the Linux distribution
- whether the boot images are recreated or not
- installed/activated OpenStack services
- internet connection bandwidth
2.3.1. Flavor Layouts
All flavors are created and deployed based on the upstream OpenStack Ansible (OSA) guidelines.
Network configuration on the nodes are same no matter which flavor is used. The VMs are attached to default libvirt network and has single NIC where VLANs are created on. Different Linux bridges for management, storage and tunnel networks are created on these VLANs.
Use of more production-like network setup with multiple interfaces is in the backlog.
For storage, Cinder with NFS backend is used. Work to enable CEPH is currently ongoing.
The differences between the flavors are documented below.
All in One
As shown on the table in previous section, this flavor consists of single node. All the OpenStack services, including compute run on the same node.
The flavor All in One (aio) is deployed based on the process described on upstream documentation. Please check OpenStack Ansible Developer Quick Start for details.
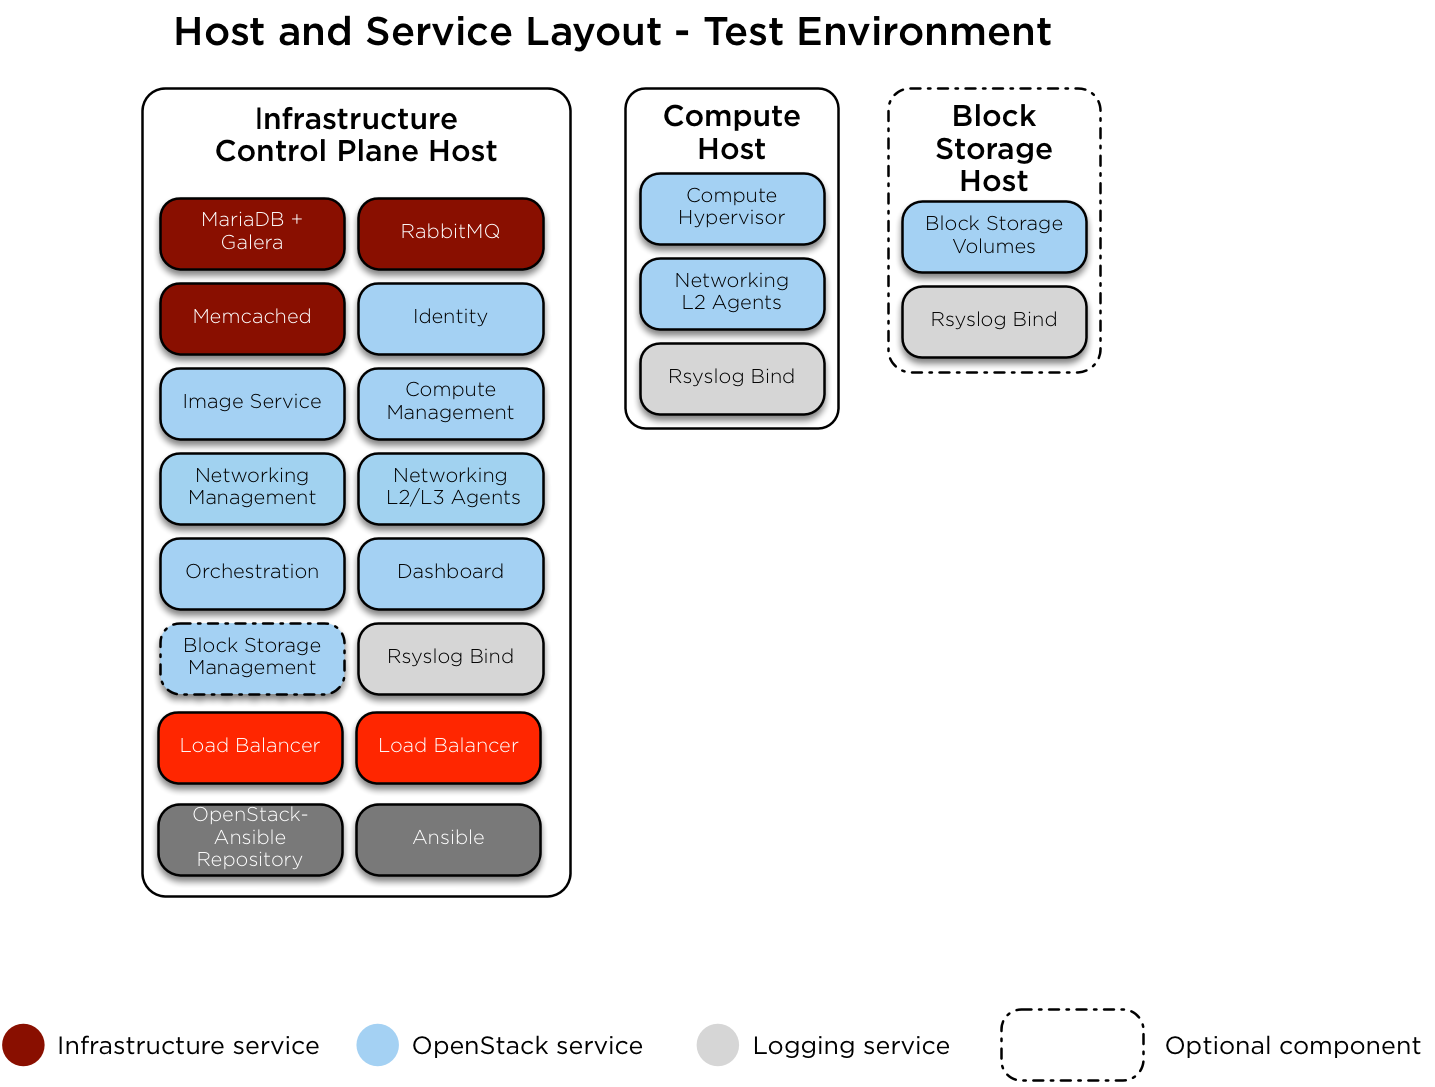
Mini/No HA/HA
These flavors consist of multiple nodes.
- opnfv: This node is used for driving the installation towards target nodes in order to ensure the deployment process is isolated from the physical host and always done on clean machine.
- controller: OpenStack control plane runs on this node.
- compute: OpenStack compute service runs on this node.
Please see the diagram below for the host and service layout for these flavors.
2.4. User Guide
2.4.1. Prerequisites
- A machine with sufficient CPU/RAM/Disk based on the chosen flavor
- Ubuntu 16.04, OpenSUSE Leap 42.3, or CentOS 7
- CPU/motherboard that supports hardware-assisted virtualization
- Passwordless sudo
- An SSH key generated for your user (ie ~/.ssh/id_rsa)
- Packages to install
- git
- python 2.7
- pip
- libvirt
2.4.2. How to Use
Basic Usage
If you don’t have one already, generate an SSH key in $HOME/.ssh
ssh-keygen -t rsaClone OPNFV releng-xci repository
git clone https://gerrit.opnfv.org/gerrit/releng-xci.gitChange into directory where the sandbox script is located
cd releng-xci/xciExecute the sandbox script
./xci-deploy.sh
Issuing above command will start the sandbox deployment using the default
flavor aio and the verified versions of upstream components.
(pinned-versions).
The sandbox should be ready between 1,5 and 2 hours depending on the host
machine.
After the script finishes execution, you can login to opnfv host and start
using your new deployment.
The openrc file will be available on opnfv host in $HOME.
Advanced Usage
The flavor to deploy and the versions of upstream components to use can be configured by the users by setting certain environment variables. Below example deploys noha flavor using the latest of openstack-ansible master branch and stores logs in different location than what is set as default.
If you don’t have one already, generate an SSH key in $HOME/.ssh
ssh-keygen -t rsaClone OPNFV releng-xci repository
git clone https://gerrit.opnfv.org/gerrit/releng-xci.gitChange into directory where the sandbox script is located
cd releng-xci/xciSet the sandbox flavor
export XCI_FLAVOR=nohaSet the version to use for openstack-ansible
export OPENSTACK_OSA_VERSION=masterSet where the logs should be stored
export LOG_PATH=/home/jenkins/xcilogsExecute the sandbox script
./xci-deploy.sh
Please note that changing the version to use may result in unexpected
behaviors, especially if it is changed to master. If you are not
sure about how good the version you intend to use, it is advisable to
use the pinned versions instead.
Verifying the Basic Operation
You can verify the basic operation using the commands below.
Login to opnfv host
ssh root@192.168.122.2Source openrc file
source openrcIssue OpenStack commands
openstack service list
You can also access to the Horizon UI by using the URL, username, and the password displayed on your console upon the completion of the deployment.
Debugging Tips
If xci-deploy.sh fails midway through and you happen to fix whatever
problem it was that caused the failure in the first place, please run
the script again. Do not attempt to continue the deployment using helper
scripts such as bifrost-provision.sh.
Look at various logs in $LOG_PATH directory. (default one is /tmp/.xci-deploy-env/opnfv/logs)
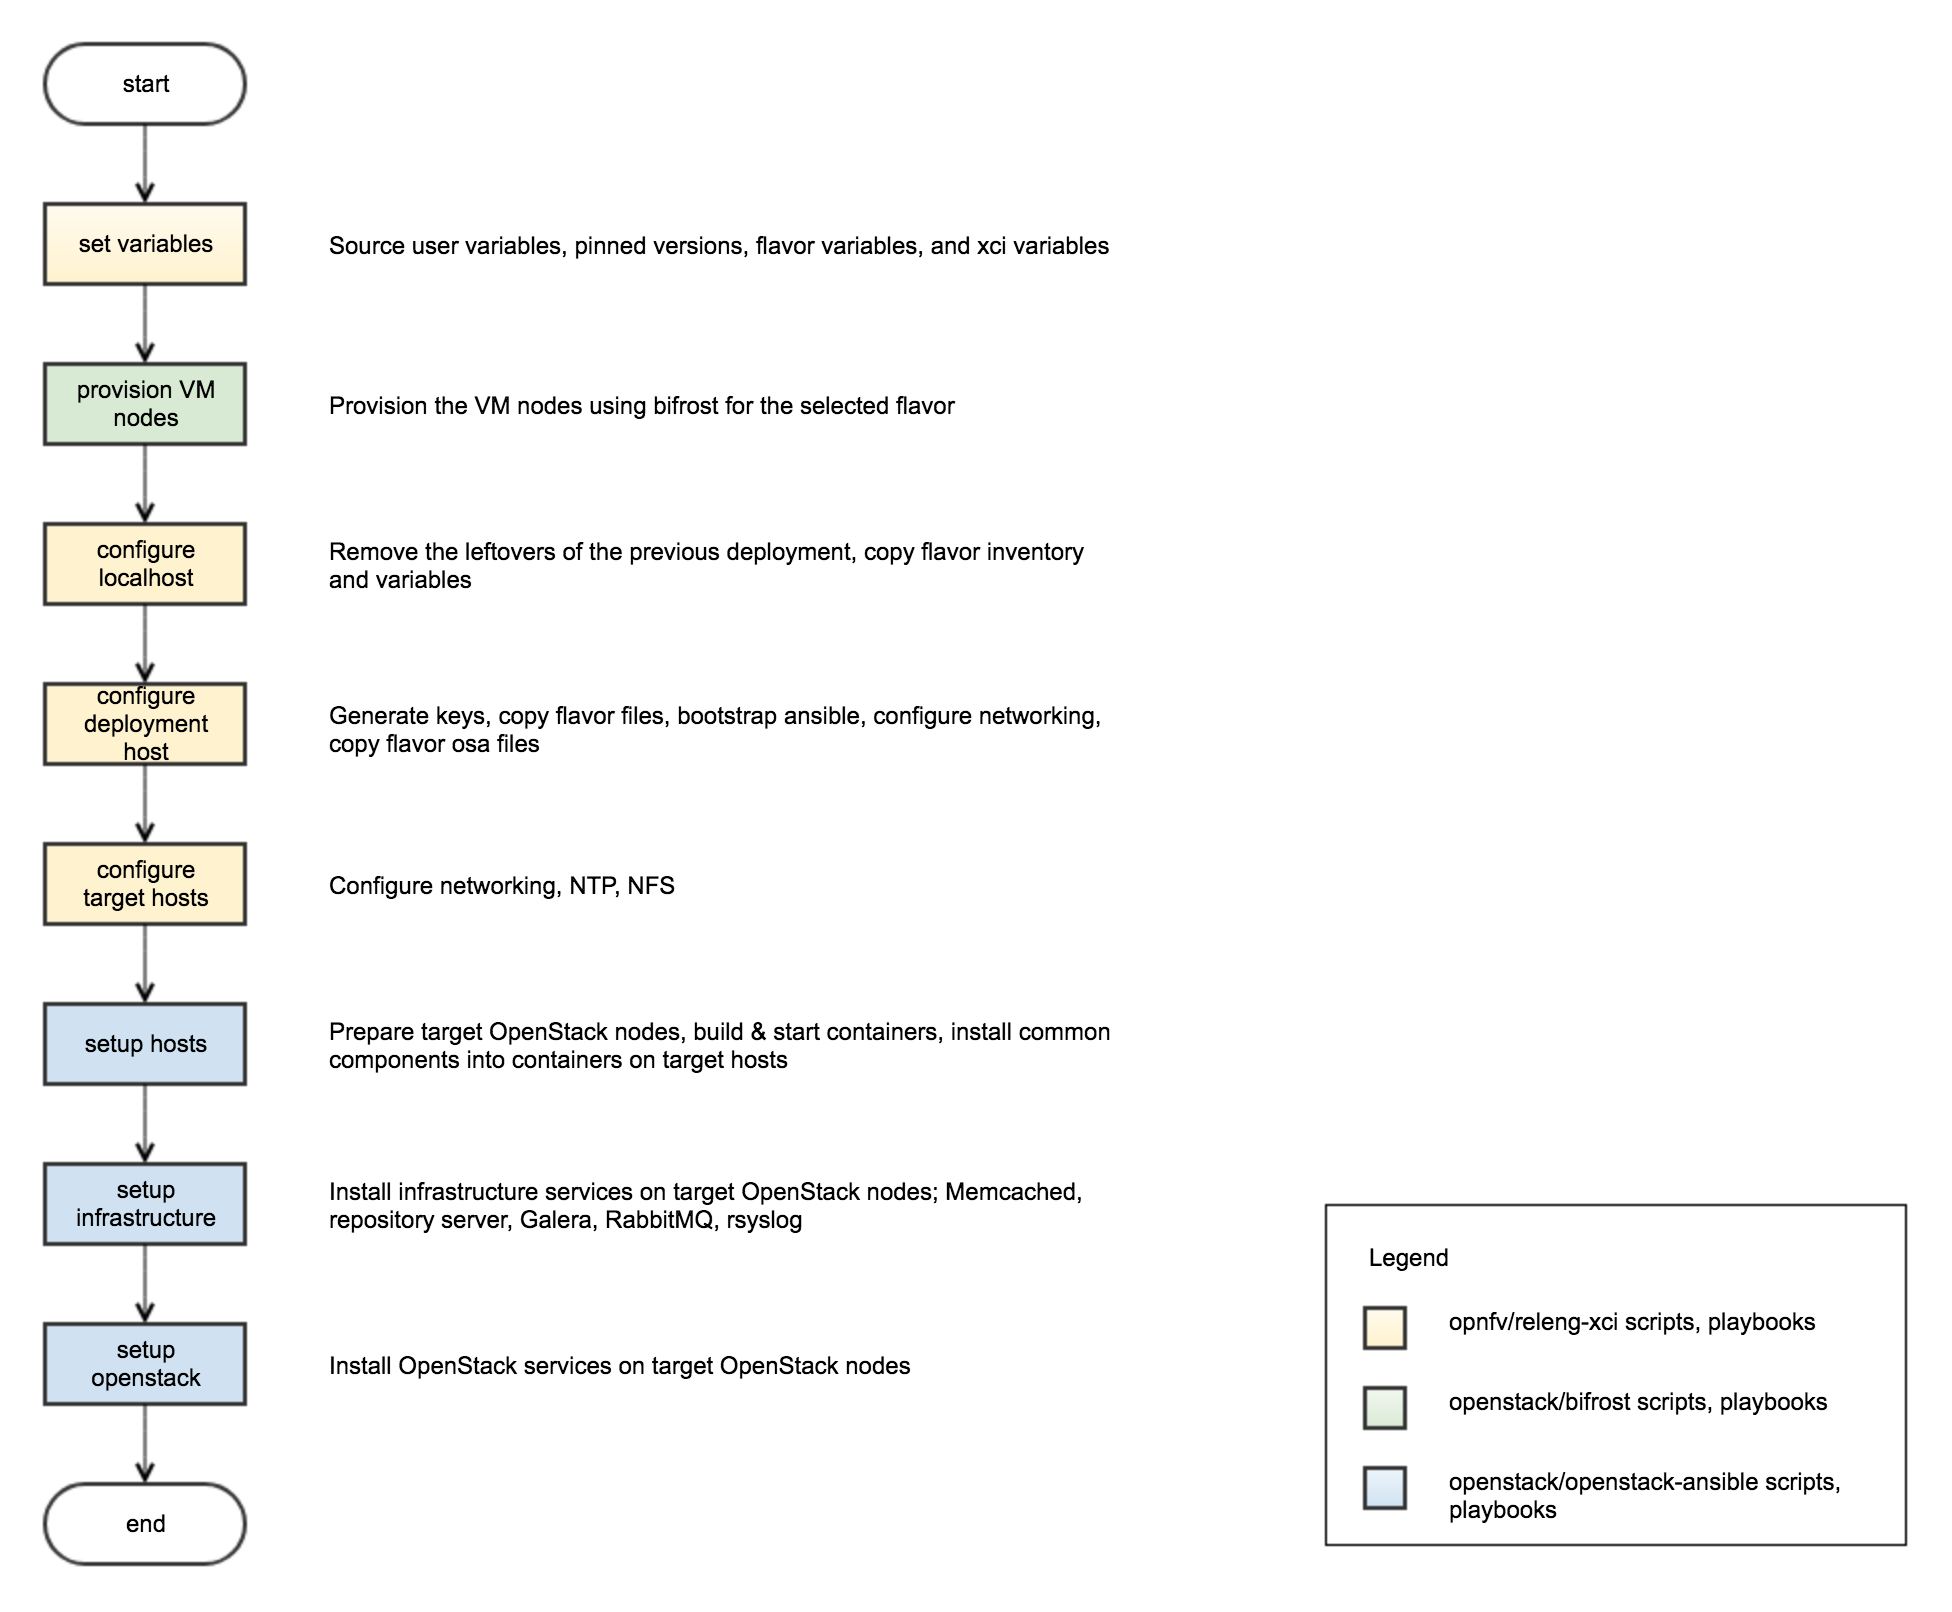
2.4.3. Behind the Scenes
Here are the steps that take place upon the execution of the sandbox script
xci-deploy.sh:
- Sources environment variables in order to set things up properly.
- Installs ansible on the host where sandbox script is executed.
- Creates and provisions VM nodes based on the flavor chosen by the user.
- Configures the host where the sandbox script is executed.
- Configures the deployment host which the OpenStack installation will be driven from.
- Configures the target hosts where OpenStack will be installed.
- Configures the target hosts as controller(s) and compute(s) nodes.
- Starts the OpenStack installation.
2.4.4. User Variables
All user variables can be set from command line by exporting them before executing the script. The current user variables can be seen from user-vars file located in releng-xci repository.
The variables can also be set directly within the file before executing
the sandbox script. If you do this, you need to set $RELENG_DEV_PATH
environment variable where the releng-xci repo is located on your host which
you modified the files in.
export RELENG_DEV_PATH=/path/to/releng-xci/2.4.5. Pinned Versions
As explained earlier, the users can pick and choose which versions to use. If you want to be on the safe side, you can use the pinned versions the sandbox provides. They can be seen from pinned-versions.
OPNFV runs periodic jobs against upstream projects openstack/bifrost and openstack/openstack-ansible using latest on master branch, continuously chasing upstream to find well working version.
Once a working version is identified, the versions of the upstream components are then bumped in releng-xci repo.
2.4.6. Further Information
If you intend to use the sandbox in more advanced ways or if you are developing XCI itself or an OPNFV scenario, please refer to XCI Developer Guide.
2.7. Testing
Sandbox is continuously tested by OPNFV XCI to ensure the changes do not impact users. In fact, OPNFV XCI itself uses the sandbox to ensure it is always in working state..
2.8. Support
OPNFV XCI issues are tracked on OPNFV JIRA Releng project. If you encounter
and issue or identify a bug, please submit an issue to JIRA using
this link. Please label the issue
you are submitting with xci label.
If you have questions or comments, you can ask them on #opnfv-pharos IRC
channel on Freenode.
3. Developer Guide
3.1. Introduction
XCI offers variety of options to ease the effort to do the development such as
- sandbox which is capable of bringing up entire stack with a single command
- high customization by setting few environment variables
- easy to follow steps while creation and provisioning of the nodes and installation of OpenStack
- ability to pick and choose the services that are needed for the development
- ability to override/change versions of almost anything
Following chapters explain how a developer can set up the best development and test environment for the work he or she is doing. The steps are accompanied by real examples.
3.2. XCI in Depth
Whether if you are working on developing XCI itself or integrating a
scenario in upstream and aiming to get it verified via XCI, there are
few things to note in order for you to know what happens in the background
when you issue the xci-deploy.sh command.
Ansible Playbooks it is important for developers to be aware of. This section will summarize those playbooks and explain how a developer can work with them.
3.3. Fine-tuning the Sandbox for Development Purposes
3.3.1. Configuring the Deployment
Developers can configure the deployment in different ways as listed below.
- the Linux distribution
- specs of the VM nodes
- the flavor
- versions of the components
- deployed & activated services
- versions of OpenStack components
3.3.1.1. Choosing the Linux Distribution
The sandbox currently picks the Linux distribution to use based on the host machine.
This means that if you have an OpenSUSE host where you intend to execute the
xci-deploy.sh script to get sandbox up, the Linux distributions of the created
and provisioned nodes will also have OpenSUSE.
3.3.1.2. Adjusting the Specs of the VM Nodes
The specs of VM nodes are set in files named {flavor}_vars stored in
config directory of the
releng-xci repo.
You can adjust the specs of the VMs by updating the configuration file of the flavor you intend to use.
All settings can be adjusted but it is important to highlight that changing TEST_VM_NUM_NODES, TEST_VM_NODE_NAMES, VM_DOMAIN_TYPE, and VM_DISK_CACHE settings might result in unexpected behaviors.
You can change the settings for VM_CPU, VM_MEMORY_SIZE, and VM_DISK to fit your purpose assuming the host machine is capable of running the VMs with newly configured settings.
As you notice in configuration files, the settings can be configured by setting the corresponding environment variables as shown in the example below.
export VM_CPU=16export VM_MEMORY_SIZE=32768export VM_DISK=200Sandbox will then use these specs while creating the VMs.
The changes to specs can directly be done by updating the file as well if you want changes to persist while you are doing your work and in doubt of losing the environment variables.
If you do that, please ensure that you set $RELENG_DEV_PATH environment
variable, pointing to the releng-xci repo which you updated the file so you
can deal with only one environment variable.
export RELENG_DEV_PATH=/path/to/releng-xci/3.3.1.3. Choosing the Sandbox Flavor
The sandbox offers 4 flavors; aio, mini, noha, and ha. Please check XCI User Guide - Sandbox Flavors to see the details of these flavors.
The flavor can be choosen by setting the environment variable $XCI_FLAVOR
as shown in the example below.
export XCI_FLAVOR=haThis will then be used by the sandbox to create and provision the number of VM nodes needed for the flavor using bifrost and instruct openstack-ansible regarding the fact that this is a high availability deployment meaning that there should be 3 nodes for OpenStack control plane and 2 nodes for compute.
3.3.1.4. Selecting OpenStack Services to Deploy and Activate
OSA uses single Ansible playbook to deploy and activate OpenStack services. XCI has its own playbook, setup-openstack.yml choosing the limited number of services to use within OPNFV.
If the service you need is not available in this playbook, you can get it by updating the file and adding the playbook that deploys and activates that service.
As an example, assume you want barbican to be deployed and activated. In this case, you update the OPNFV playbook setup-openstack.yml and add this line into it.
- include: os-barbican-install.ymlIn order for this to take effect, you need to set RELENG_DEV_PATH
environment variable before executing xci-deploy.sh script.
Please check upstream OSA documentation and the upstream playbook to see which services are available and the names of the playbooks of those services.
Please note that the flavor aio deploys all the services that are enabled by the upstream and it is not possible to configure services for it at this time.
3.3.1.5. Using Different Version of OpenStack
Sandbox offers possibility to deploy OSA from the tip of the master branch or from a commit.
It can be done by setting the environment variable $OPENSTACK_OSA_VERSION
pointing to the version of OpenStack Ansible (OSA).
export OPENSTACK_OSA_VERSION=masterSandbox will use the latest from master branch of OSA to deploy OpenStack.
You can configure the version by updating the
pinned-versions
file as well. As noted in previous sections, you need to ensure you set
$RELENG_DEV_PATH before executing xci-deploy.sh script for the setting
to take effect.
Please note that if you want to see what versions of the OpenStack components will get deployed, please check the versions of the file openstack_services.yml which corresponds to the OSA version you set from upstream.
3.3.1.6. Using Different Versions of OpenStack Components
If you want to choose a different version of an OpenStack component without changing the OSA version, you can do that by modifying openstack_services.yml stored in releng-xci repo.
In order for this to take effect, you need to set RELENG_DEV_PATH
environment variable before executing xci-deploy.sh script.
Changing component versions might result in different behaviors due to possibility of having conflicts between OpenStack services or towards the OSA itself.