ArmbandFuel@OPNFV
OPNFV Build instruction for the AArch64 Colorado 1.0 release of OPNFV when using Fuel as a deployment tool
License
This work is licensed under a Creative Commons Attribution 4.0 International License. .. http://creativecommons.org/licenses/by/4.0 .. (c) Jonas Bjurel (Ericsson AB) and others
Abstract
This document describes how to build the Fuel deployment tool for the AArch64 Colorado release of OPNFV build system, dependencies and required system resources.
Introduction
This document describes the build system used to build the Fuel deployment tool for the AArch64 Colorado release of OPNFV, required dependencies and minimum requirements on the host to be used for the build system.
The Fuel build system is designed around Docker containers such that dependencies outside of the build system can be kept to a minimum. It also shields the host from any potential dangerous operations performed by the build system.
The audience of this document is assumed to have good knowledge in network and Unix/Linux administration.
Due to early docker and nodejs support on AArch64, we will still use an x86_64 Fuel Master to build and deploy an AArch64 target pool, as well as an x86_64 build machine for building the OPNFV ISO.
Requirements
Minimum Hardware Requirements
- ~50 GB available disc
- 4 GB RAM
Minimum Software Requirements
The build host should run Ubuntu 14.04 (x86_64) operating system.
On the host, the following packages must be installed:
- An x86_64 host (Bare-metal or VM) with Ubuntu 14.04 LTS installed
- Note: Builds on Wily (Ubuntu 15.x) are currently not supported
- A kernel equal- or later than 3.19 (Vivid), simply available through:
$ sudo apt-get install linux-generic-lts-vivid
- docker - see https://docs.docker.com/engine/installation/ubuntulinux/ for installation notes for Ubuntu 14.04. Tested against version 1.9.x and greater
- git
- make
- curl
- fuseiso
Apart from docker, all other package requirements listed above are simply available through:
$ sudo apt-get install git make curl fuseiso
Preparations
Setting up the Docker build container
After having installed Docker, add yourself to the docker group:
$ sudo usermod -a -G docker [userid]
Also make sure to define relevant DNS servers part of the global DNS chain in your </etc/default/docker> configuration file. Uncomment, and modify the values appropriately.
For example:
DOCKER_OPTS=" --dns=8.8.8.8 --dns=8.8.8.4"
Then restart docker:
$ sudo service docker restart
Setting up OPNFV Gerrit in order to being able to clone the code
- Start setting up OPNFV gerrit by creating a SSH key (unless you don’t already have one), create one with ssh-keygen
- Add your generated public key in OPNFV Gerrit (https://gerrit.opnfv.org/) (this requires a Linux foundation account, create one if you do not already have one)
- Select “SSH Public Keys” to the left and then “Add Key” and paste your public key in.
Clone the armband@OPNFV code Git repository with your SSH key
Now it is time to clone the code repository:
$ git clone ssh://<Linux foundation user>@gerrit.opnfv.org:29418/armband
Now you should have the OPNFV ARMBAND repository with its directories stored locally on your build host.
Check out the Colorado release:
$ cd armband
$ git checkout colorado.1.0
Clone the armband@OPNFV code Git repository without a SSH key
You can also opt to clone the code repository without a SSH key:
$ git clone https://gerrit.opnfv.org/gerrit/armband
Make sure to checkout the release tag as described above.
Support for building behind a http/https/rsync proxy
The build system is able to make use of a web proxy setup if the http_proxy, https_proxy, no_proxy (if needed) and RSYNC_PROXY or RSYNC_CONNECT_PROG environment variables have been set before invoking make.
The proxy setup must permit port 80 (http), 443 (https) and 873 (rsync).
Important note about the host Docker daemon settings
The Docker daemon on the host must be configured to use the http proxy for it to be able to pull the base Ubuntu 14.04 image from the Docker registry before invoking make! In Ubuntu this is done by adding a line like:
export http_proxy="http://10.0.0.1:8888/"
to </etc/default/docker> and restarting the Docker daemon.
Setting proxy environment variables prior to build
The build system will make use the following environment variables that needs to be exported to subshells by using export (bash) or setenv (csh/tcsh).
http_proxy (or HTTP_PROXY)
https_proxy (or HTTP_PROXY)
no_proxy (or NO_PROXY)
RSYNC_PROXY
RSYNC_CONNECT_PROG
As an example, these are the settings that were put in the user’s .bashrc when verifying the proxy build functionality:
export RSYNC_PROXY=10.0.0.1:8888
export http_proxy=http://10.0.0.1:8888
export https_proxy=http://10.0.0.1:8888
export no_proxy=localhost,127.0.0.1,.consultron.com,.sock
Using a ssh proxy for the rsync connection
If the proxy setup is not allowing the rsync protocol, an alternative solution is to use a SSH tunnel to a machine capable of accessing the outbound port 873. Set the RSYNC_CONNECT_PROG according to the rsync manual page (for example to “ssh <username>@<hostname> nc %H 873”) to enable this. Also note that netcat needs to be installed on the remote system!
Make sure that the ssh command also refers to the user on the remote system, as the command itself will be run from the Docker build container as the root user (but with the invoking user’s SSH keys).
Disabling the Ubuntu repo cache if rsync is not allowed
During the build phase, a local Ubuntu package repository is fetched from upstream in order to be added to the OPNFV Fuel ISO and for parts of this process rsync is used.
If neither of the two available methods for proxying rsync are available, the last resort is to turn off the caching of the Ubuntu packages in the build system. This is done by removing the “f_repobuild” from SUBDIRS in the beginning of the <armband/upstream/fuel/build/f_isoroot/Makefile>.
Note! Doing this will require the Fuel master node to have Internet access when installing the ISO artifact built as no Ubuntu package cache will be on the ISO!
Note! Armband build system uses git submodules to track fuel and other upstream repos, so in order to apply the above change, one should first initialize the submodules and apply armband patches (only needed once):
$ make submodules-init
$ make patches-import
Configure your build environment
** Configuring the build environment should not be performed if building standard Colorado release **
Select the versions of the components you want to build by editing the <armband/upstream/fuel/build/config.mk> file.
Note! The same observation as above, before altering Makefile, run:
$ make submodules-init patches-import
Non official build: Selecting which plugins to build
In order to cut the build time for unofficial builds (made by an individual developer locally), the selection if which Fuel plugins to build (if any) can be done by environment variable “BUILD_FUEL_PLUGINS” prior to building.
Only the plugin targets from <armband/upstream/fuel/build/f_isoroot/Makefile> that are specified in the environment variable will then be built. In order to completely disable the building of plugins, the environment variable is set to ” ”. When using this functionality, the resulting iso file will be prepended with the prefix “unofficial-” to clearly indicate that this is not a full build.
This method of plugin selection is not meant to be used from within Gerrit!
Note! Not all plugins are ported to AArch64. Full list of supported plugins is in release notes.
Building
There is only one preffered method available for building Fuel for AArch64:
- A low level method using Make
Low level build method using make
The low level method is based on Make:
From the <armband> directory, invoke <make [target]>
Following targets exist:
- release - this will do the same as:
- make submodules-clean clean-docker clean-build
- make submodules-init patches-import build
- none/all/build - this will:
- Initialize the docker build environment
- Build Fuel from upstream (as defined by fuel-build/config-spec)
- Build the OPNFV defined plugins/features from upstream
- Build the defined additions to fuel (as defined by the structure of this framework)
- Apply changes and patches to fuel (as defined by the structure of this framework)
- Reconstruct a fuel .iso image
- submodules-init - Initialize git submodules (fuel@OPNFV, fuel-library etc.)
- submodules-clean - cleanup git submodules (fuel@OPNFV, fuel-library etc.)
- patches-import - this will apply armband@OPNFV patches to git submodules
- patches-export - this will export git submodules changes as armband patches
- clean-build - this will remove all artifacts from earlier builds.
- clean-docker - this will remove all docker caches from earlier builds.
If the build is successful, you will find the generated ISO file in the <armband/upstream/fuel/build/release> subdirectory!
Artifacts
The artifacts produced are:
- <OPNFV_XXXX.iso> - Which represents the bootable (x86_64) Fuel for AArch64 image, XXXX is replaced with the build identity provided to the build system
- <OPNFV_XXXX.iso.txt> - Which holds version metadata.
References
- OPNFV Installation instruction for the AArch64 Colorado 1.0 release of OPNFV when using Fuel as a deployment tool
- OPNFV Build instruction for the AArch64 Colorado 1.0 release of OPNFV when using Fuel as a deployment tool
- OPNFV Release Note for the AArch64 Colorado 1.0 release of OPNFV when using Fuel as a deployment tool
OPNFV Installation instruction for the AArch64 Colorado 1.0 release of OPNFV when using Fuel as a deployment tool
License
This work is licensed under a Creative Commons Attribution 4.0 International License. .. http://creativecommons.org/licenses/by/4.0 .. (c) Jonas Bjurel (Ericsson AB) and others
Abstract
This document describes how to install the Colorado 1.0 release of OPNFV when using Fuel as a deployment tool, with an AArch64 (only) target node pool.
Introduction
This document provides guidelines on how to install and configure the Colorado 1.0 release of OPNFV when using Fuel as a deployment tool, with an AArch64 (only) target node pool, including required software and hardware configurations.
Although the available installation options give a high degree of freedom in how the system is set-up, including architecture, services and features, etc., said permutations may not provide an OPNFV compliant reference architecture. This instruction provides a step-by-step guide that results in an OPNFV Colorado compliant deployment.
The audience of this document is assumed to have good knowledge in networking and Unix/Linux administration.
Preface
Before starting the installation of the AArch64 Colorado 1.0 release of OPNFV, using Fuel as a deployment tool, some planning must be done.
Retrieving the ISO image
First of all, the Fuel deployment ISO image needs to be retrieved, the ArmbandFuel .iso image of the AArch64 Colorado release can be found at Reference: 2
Building the ISO image
Alternatively, you may build the ArmbandFuel .iso from source by cloning the opnfv/armband git repository. To retrieve the repository for the AArch64 Colorado 1.0 release use the following command:
$ git clone https://gerrit.opnfv.org/gerrit/armband
Check-out the Colorado release tag to set the HEAD to the baseline required to replicate the Colorado release:
$ git checkout colorado.1.0
Go to the armband directory and build the .iso:
$ cd armband
$ make release
For more information on how to build, please see Reference: 14
Other preparations
Next, familiarize yourself with Fuel by reading the following documents:
- Fuel planning guide, please see Reference: 8
- Fuel user guide, please see Reference: 9
- Fuel operations guide, please see Reference: 10
- Fuel Plugin Developers Guide, please see Reference: 11
Prior to installation, a number of deployment specific parameters must be collected, those are:
- Provider sub-net and gateway information
- Provider VLAN information
- Provider DNS addresses
- Provider NTP addresses
- Network overlay you plan to deploy (VLAN, VXLAN, FLAT)
- How many nodes and what roles you want to deploy (Controllers, Storage, Computes)
- Monitoring options you want to deploy (Ceilometer, Syslog, erc.).
- Other options not covered in the document are available in the links above
This information will be needed for the configuration procedures provided in this document.
Hardware requirements
The following minimum hardware requirements must be met for the installation of AArch64 Colorado 1.0 using Fuel:
| HW Aspect | Requirement |
|---|---|
| AArch64 nodes | Minimum 5 (3 for non redundant deployment):
|
| CPU | Minimum 1 socket AArch64 (ARMv8) with Virtualization support |
| RAM | Minimum 16GB/server (Depending on VNF work load) |
| Disk | Minimum 256GB 10kRPM spinning disks |
| Firmware | UEFI compatible (e.g. EDK2) with PXE support |
| Networks | 4 Tagged VLANs (PUBLIC, MGMT, STORAGE, PRIVATE) 1 Un-Tagged VLAN for PXE Boot - ADMIN Network Note: These can be allocated to a single NIC - or spread out over multiple NICs as your hardware supports. |
| 1 x86_64 node |
|
Help with Hardware Requirements
Calculate hardware requirements:
When choosing the hardware on which you will deploy your OpenStack environment, you should think about:
- CPU – Consider the number of virtual machines that you plan to deploy in your cloud environment and the CPU per virtual machine.
- Memory – Depends on the amount of RAM assigned per virtual machine and the controller node.
- Storage – Depends on the local drive space per virtual machine, remote volumes that can be attached to a virtual machine, and object storage.
- Networking – Depends on the Choose Network Topology, the network bandwidth per virtual machine, and network storage.
Top of the rack (TOR) Configuration requirements
The switching infrastructure provides connectivity for the OPNFV infrastructure operations, tenant networks (East/West) and provider connectivity (North/South); it also provides needed connectivity for the Storage Area Network (SAN). To avoid traffic congestion, it is strongly suggested that three physically separated networks are used, that is: 1 physical network for administration and control, one physical network for tenant private and public networks, and one physical network for SAN. The switching connectivity can (but does not need to) be fully redundant, in such case it comprises a redundant 10GE switch pair for each of the three physically separated networks.
The physical TOR switches are not automatically configured from the Fuel OPNFV reference platform. All the networks involved in the OPNFV infrastructure as well as the provider networks and the private tenant VLANs needs to be manually configured.
Manual configuration of the Colorado hardware platform should be carried out according to the OPNFV Pharos specification: <https://wiki.opnfv.org/display/pharos/Pharos+Specification>
OPNFV Software installation and deployment
This section describes the installation of the OPNFV installation server (Fuel master) as well as the deployment of the full OPNFV reference platform stack across a server cluster.
Install Fuel master
Mount the Colorado Fuel ISO file/media as a boot device to the jump host server.
Reboot the jump host to establish the Fuel server.
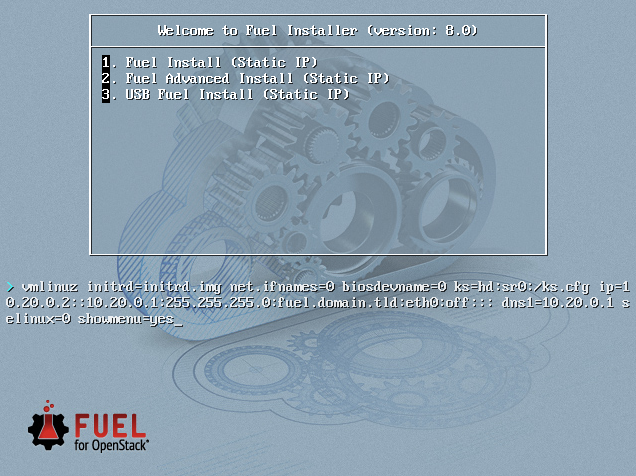
- The system now boots from the ISO image.
- Select “Fuel Install (Static IP)” (See figure below)
- Press [Enter].
Wait until screen Fuel setup is shown (Note: This can take up to 30 minutes).
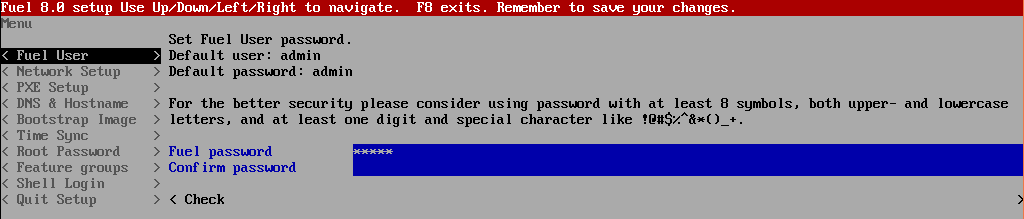
In the “Fuel User” section - Confirm/change the default password (See figure below)
- Enter “admin” in the Fuel password input
- Enter “admin” in the Confirm password input
- Select “Check” and press [Enter]
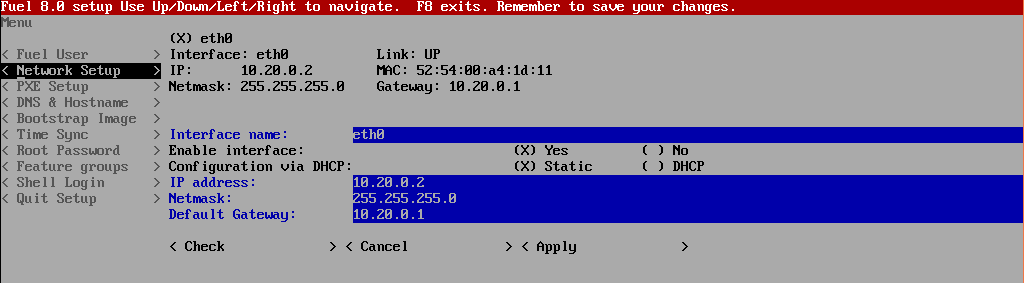
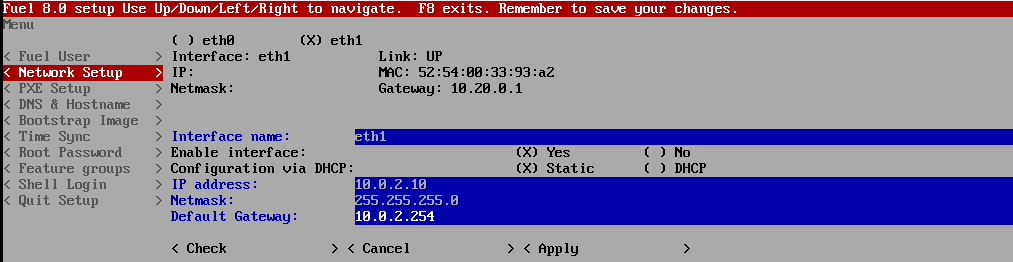
In the “Network Setup” section - Configure DHCP/Static IP information for your FUEL node - For example, ETH0 is 10.20.0.2/24 for FUEL booting and ETH1 is DHCP/Static in your corporate/lab network (see figure below).
- NOTE: ArmbandFuel@OPNFV requires internet connectivity during bootstrap image building, due to missing arm64 (AArch64) packages in the partial local Ubuntu mirror (consequence of ports.ubuntu.com mirror architecture).
- Configuration of ETH1 interface for connectivity into your corporate/lab network is mandatory, as internet connection is required during deployment.
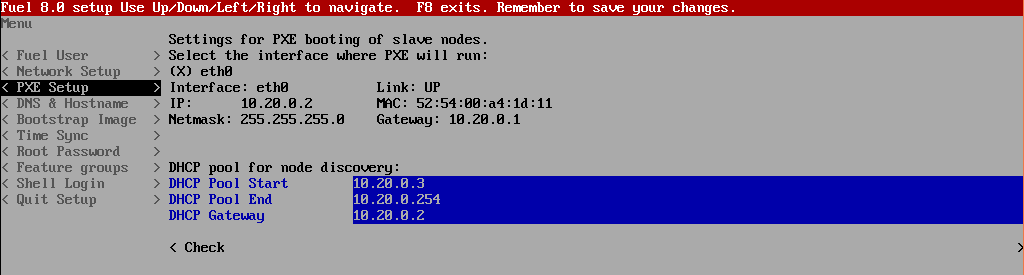
In the “PXE Setup” section (see figure below) - Change the following fields to appropriate values (example below):
- DHCP Pool Start 10.20.0.3
- DHCP Pool End 10.20.0.254
- DHCP Pool Gateway 10.20.0.2 (IP address of Fuel node)
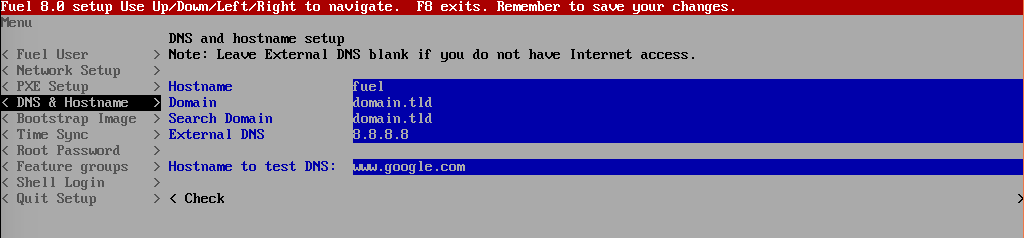
In the “DNS & Hostname” section (see figure below) - Change the following fields to appropriate values:
- Hostname
- Domain
- Search Domain
- External DNS
- Hostname to test DNS
- Select <Check> and press [Enter]
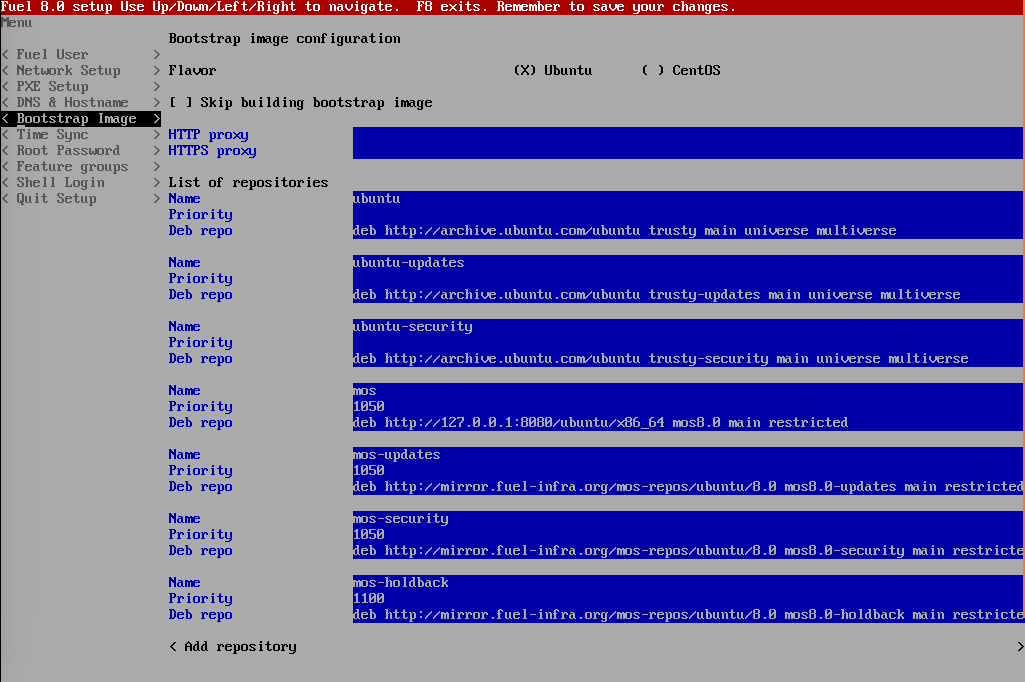
DO NOT CHANGE anything in “Bootstrap Image” section (see figure below).
In ArmbandFuel@OPNFV, this data is NOT actually used for bootstrap image building. Any change here will replace the configuration from the OPNFV bootstrap build scripts and will lead to a failed bootstrap image build.
NOTE: Cannot be used in tandem with local repository support.
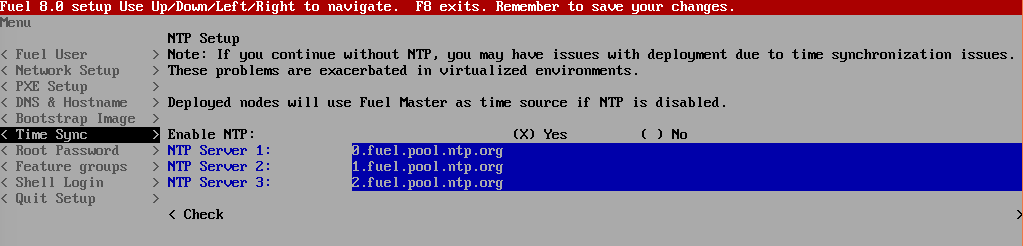
In the “Time Sync” section (see figure below) - Change the following fields to appropriate values:
- NTP Server 1 <Customer NTP server 1>
- NTP Server 2 <Customer NTP server 2>
- NTP Server 3 <Customer NTP server 3>
Start the installation.
- Press <F8> or select Quit Setup and press Save and Quit.
- Installation starts, wait until the login screen is shown.
Boot the Node Servers
After the Fuel Master node has rebooted from the above steps and is at the login prompt, you should boot the Node Servers (Your Compute/Control/Storage blades (nested or real) with a PXE booting scheme so that the FUEL Master can pick them up for control.
NOTE: AArch64 target nodes are expected to support PXE booting an EFI binary, i.e. an EFI-stubbed GRUB2 bootloader.
NOTE: UEFI (EDK2) firmware is highly recommended, becoming the de facto standard for ARMv8 nodes.
Enable PXE booting
- For every controller and compute server: enable PXE Booting as the first boot device in the UEFI (EDK2) boot order menu and hard disk as the second boot device in the same menu.
Reboot all the control and compute blades.
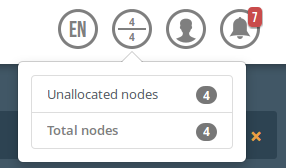
Wait for the availability of nodes showing up in the Fuel GUI.
- Connect to the FUEL UI via the URL provided in the Console (default: https://10.20.0.2:8443)
- Wait until all nodes are displayed in top right corner of the Fuel GUI: Total nodes and Unallocated nodes (see figure below).
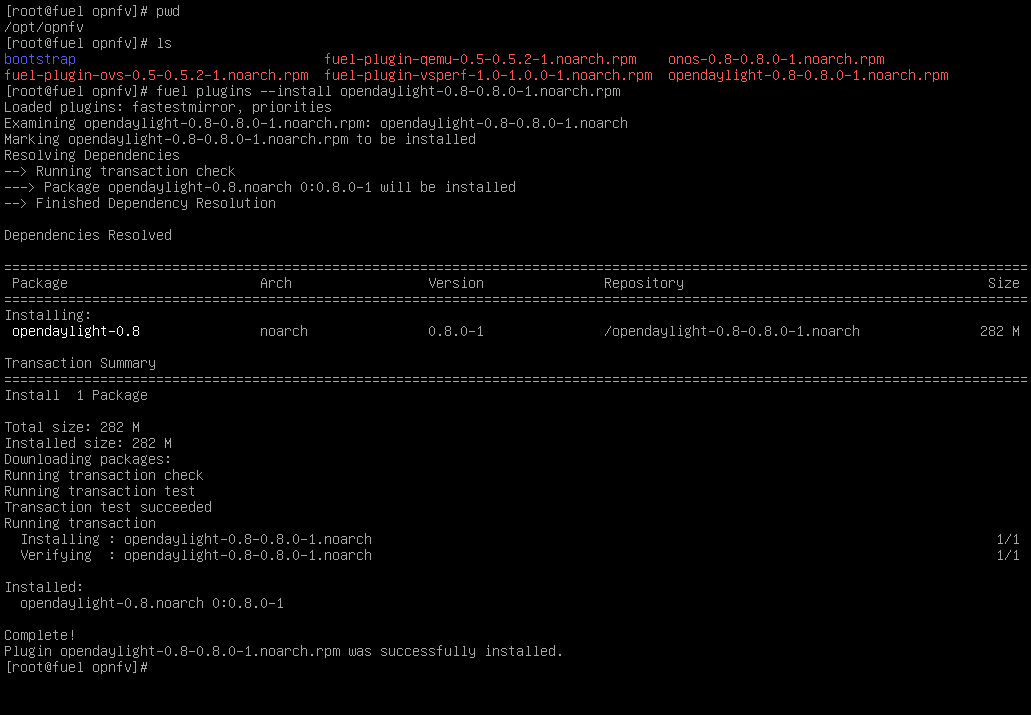
Install additional Plugins/Features on the FUEL node
SSH to your FUEL node (e.g. root@10.20.0.2 pwd: r00tme)
Select wanted plugins/features from the /opt/opnfv/ directory.
Install the wanted plugin with the command:
$ fuel plugins --install /opt/opnfv/<plugin-name>-<version>.<arch>.rpm
Expected output (see figure below):
Plugin ....... was successfully installed.
NOTE: Not all plugins are ported to AArch64 Colorado 1.0 see Reference 15.
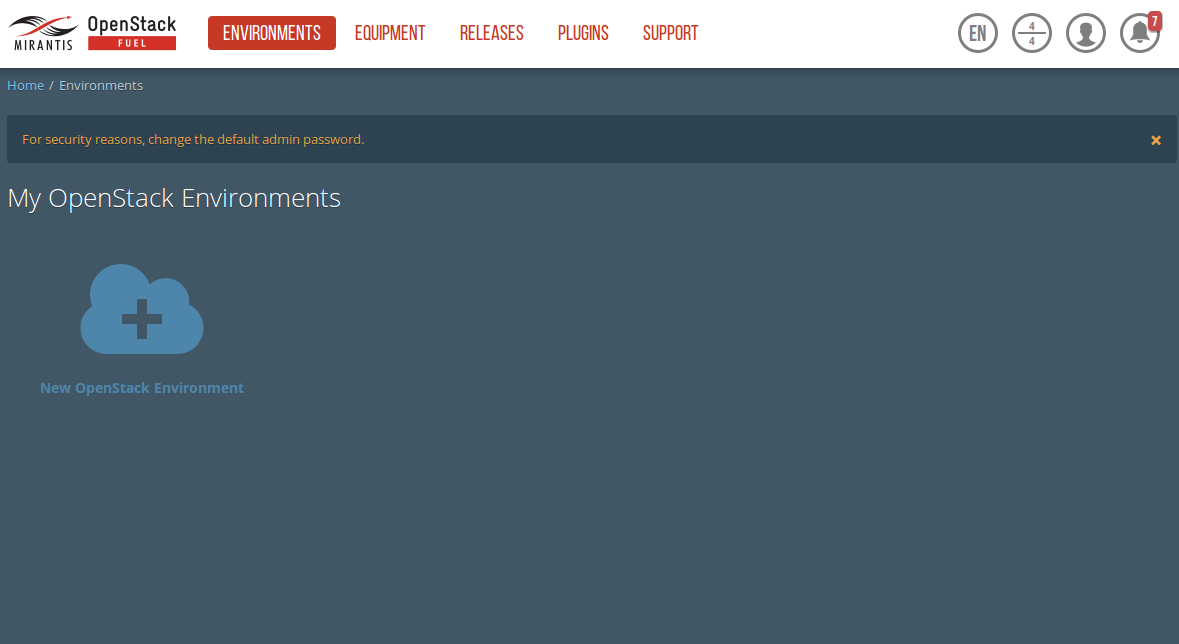
Create an OpenStack Environment
Connect to Fuel WEB UI with a browser (default: https://10.20.0.2:8443) (login admin/admin)
Create and name a new OpenStack environment, to be installed.
Select “<Mitaka on Ubuntu 14.04 (aarch64)>” and press <Next>
Select “compute virtulization method”.
- Select “QEMU-KVM as hypervisor” and press <Next>
Select “network mode”.
- Select “Neutron with ML2 plugin”
- Select “Neutron with tunneling segmentation” (Required when using the ODL plugin)
- Press <Next>
Select “Storage Back-ends”.
- Select “Ceph for block storage” and press <Next>
Select “additional services” you wish to install.
- Check option “Install Ceilometer (OpenStack Telemetry)” and press <Next>
Create the new environment.
- Click <Create> Button
Configure the network environment
Open the environment you previously created.
Open the networks tab and select the “default Node Networks group to” on the left pane (see figure below).
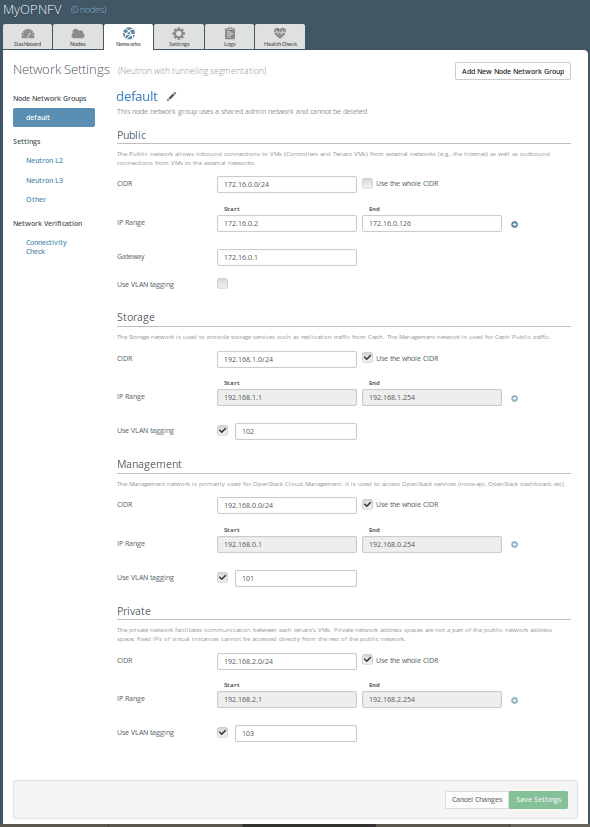
Update the Public network configuration and change the following fields to appropriate values:
- CIDR to <CIDR for Public IP Addresses>
- IP Range Start to <Public IP Address start>
- IP Range End to <Public IP Address end>
- Gateway to <Gateway for Public IP Addresses>
- Check <VLAN tagging>.
- Set appropriate VLAN id.
Update the Storage Network Configuration
- Set CIDR to appropriate value (default 192.168.1.0/24)
- Set IP Range Start to appropriate value (default 192.168.1.1)
- Set IP Range End to appropriate value (default 192.168.1.254)
- Set vlan to appropriate value (default 102)
Update the Management network configuration.
- Set CIDR to appropriate value (default 192.168.0.0/24)
- Set IP Range Start to appropriate value (default 192.168.0.1)
- Set IP Range End to appropriate value (default 192.168.0.254)
- Check <VLAN tagging>.
- Set appropriate VLAN id. (default 101)
Update the Private Network Information
- Set CIDR to appropriate value (default 192.168.2.0/24
- Set IP Range Start to appropriate value (default 192.168.2.1)
- Set IP Range End to appropriate value (default 192.168.2.254)
- Check <VLAN tagging>.
- Set appropriate VLAN tag (default 103)
Select the “Neutron L3 Node Networks group” on the left pane.
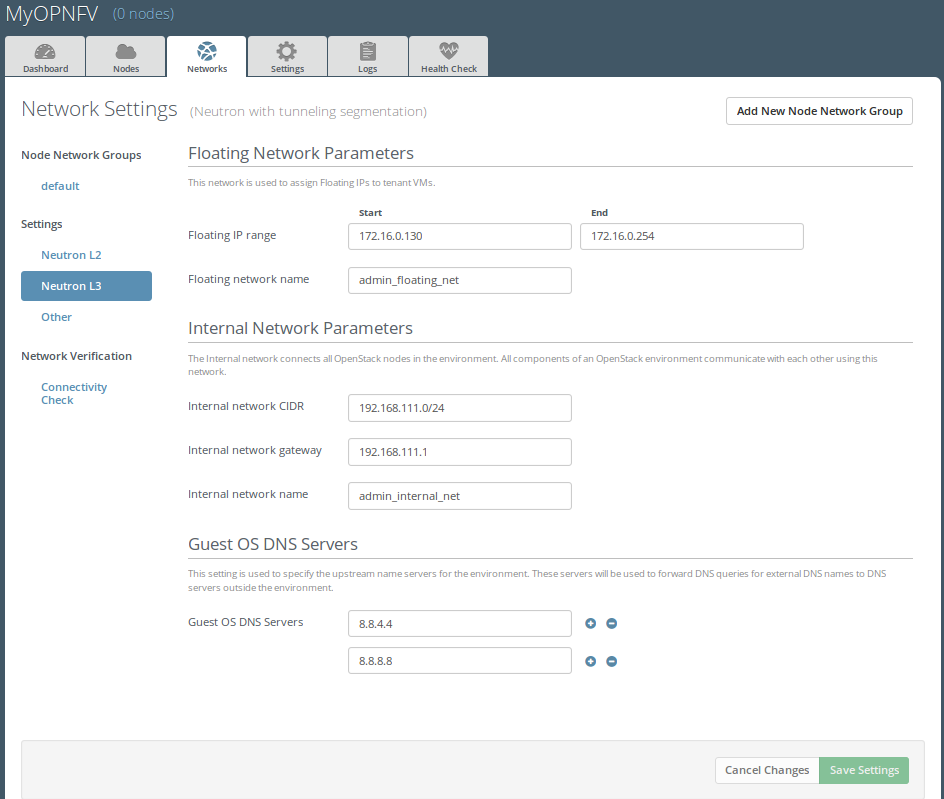
Update the Floating Network configuration.
- Set the Floating IP range start (default 172.16.0.130)
- Set the Floating IP range end (default 172.16.0.254)
- Set the Floating network name (default admin_floating_net)
Update the Internal Network configuration.
- Set Internal network CIDR to an appropriate value (default 192.168.111.0/24)
- Set Internal network gateway to an appropriate value
- Set the Internal network name (default admin_internal_net)
Update the Guest OS DNS servers.
- Set Guest OS DNS Server values appropriately
Save Settings.
Select the “Other Node Networks group” on the left pane(see figure below).
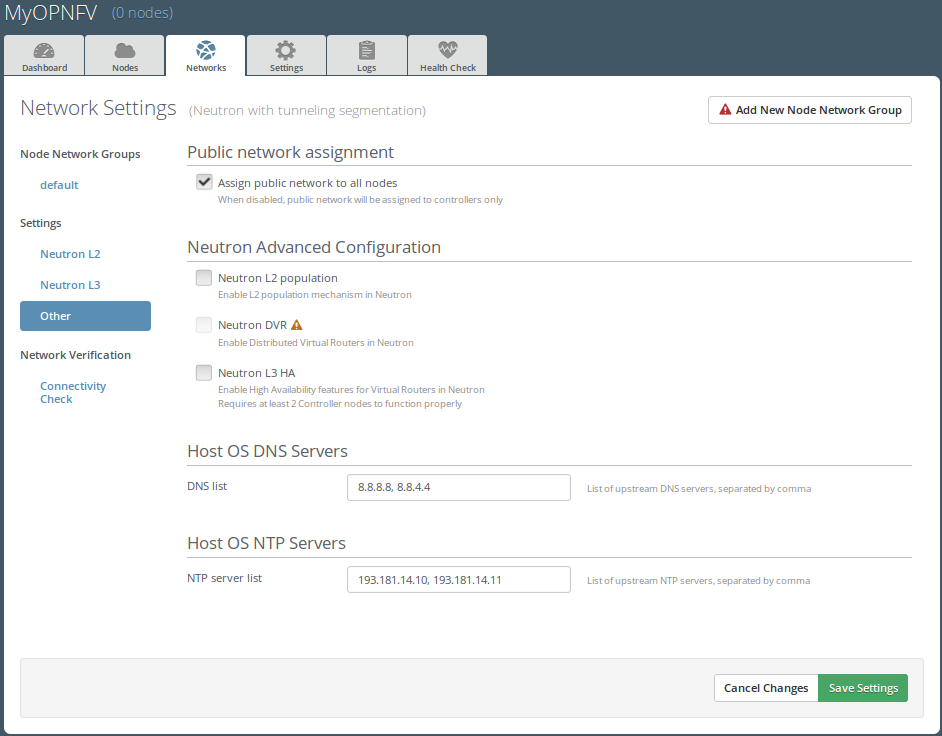
Update the Public network assignment.
- Check the box for “Assign public network to all nodes” (Required by OpenDaylight)
Update Host OS DNS Servers.
- Provide the DNS server settings
Update Host OS NTP Servers.
- Provide the NTP server settings
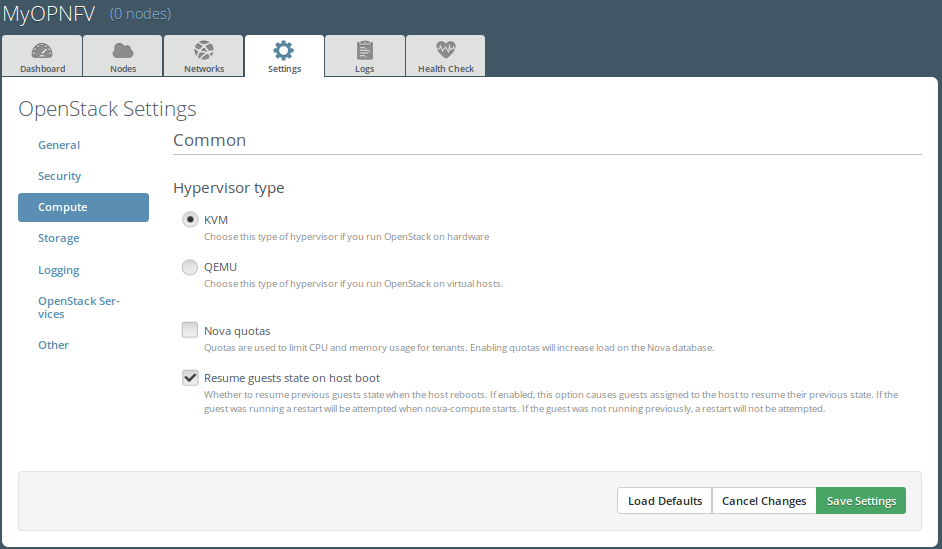
Select Hypervisor type
In the FUEL UI of your Environment, click the “Settings” Tab
Select Compute on the left side pane (see figure below)
- Check the KVM box and press “Save settings”
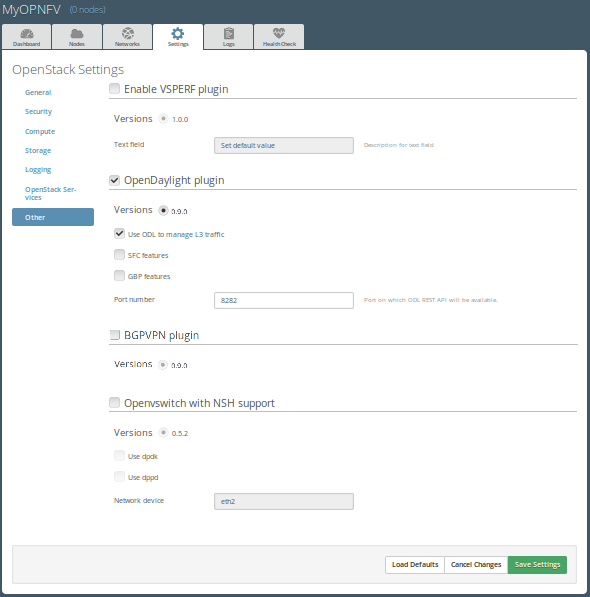
Enable Plugins
In the FUEL UI of your Environment, click the “Settings” Tab
Select Other on the left side pane (see figure below)
- Enable and configure the plugins of your choice
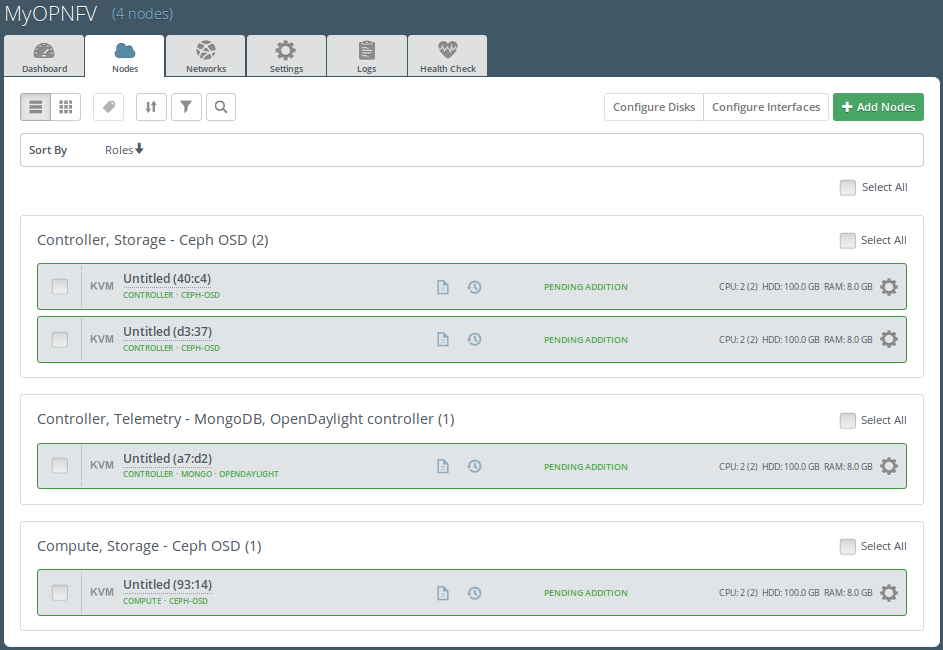
Allocate nodes to environment and assign functional roles
Click on the “Nodes” Tab in the FUEL WEB UI (see figure below).
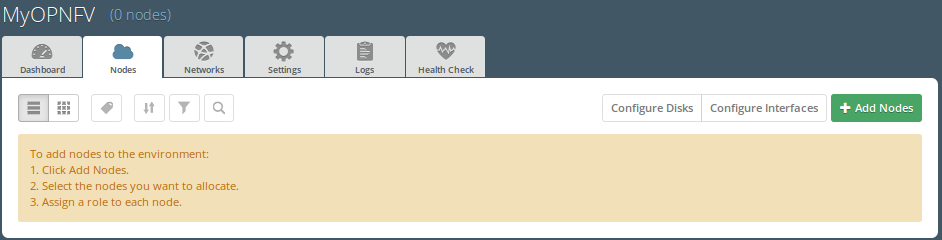
Assign roles (see figure below).
- Click on the <+Add Nodes> button
- Check <Controller>, <Telemetry - MongoDB> and optionally an SDN Controller role (OpenDaylight controller) in the Assign Roles Section.
- Check one node which you want to act as a Controller from the bottom half of the screen
- Click <Apply Changes>.
- Click on the <+Add Nodes> button
- Check the <Controller> and <Storage - Ceph OSD> roles.
- Check the two next nodes you want to act as Controllers from the bottom half of the screen
- Click <Apply Changes>
- Click on <+Add Nodes> button
- Check the <Compute> and <Storage - Ceph OSD> roles.
- Check the Nodes you want to act as Computes from the bottom half of the screen
- Click <Apply Changes>.
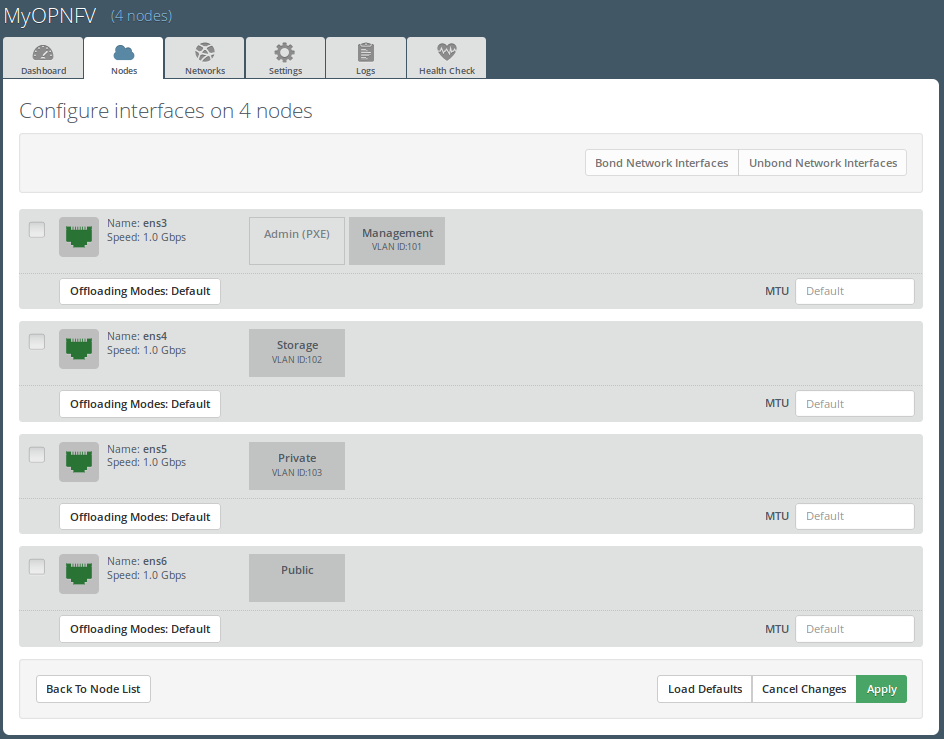
Configure interfaces (see figure below).
- Check Select <All> to select all allocated nodes
- Click <Configure Interfaces>
- Assign interfaces (bonded) for mgmt-, admin-, private-, public- and storage networks
- Click <Apply>
OPTIONAL - UNTESTED - Set Local Mirror Repos
NOTE: AArch64 Colorado 1.0 does not fully support local Ubuntu mirrors, or at least does not ship with arm64 packages in local repos by default. In order to use local (partial) Ubuntu mirrors, one should add arm64 packages by hand to the existing amd64 mirrors and re-generate repo metadata. Local MOS/Auxiliary repos contain packages for both amd64 and arm64.
NOTE: Below instruction assume you already added (by hand) arm64 Ubuntu necessary packages to the local repository!
The following steps can be executed if you are in an environment with no connection to the Internet. The Fuel server delivers a local repo that can be used for installation / deployment of openstack.
- In the Fuel UI of your Environment, click the Settings Tab and select General from the left pane.
- Replace the URI values for the “Name” values outlined below:
- “ubuntu” URI=”deb http://<ip-of-fuel-server>:8080/mirrors/ubuntu/ trusty main”
- “ubuntu-security” URI=”deb http://<ip-of-fuel-server>:8080/mirrors/ubuntu/ trusty-security main”
- “ubuntu-updates” URI=”deb http://<ip-of-fuel-server>:8080/mirrors/ubuntu/ trusty-updates main”
- “mos” URI=”deb http://<ip-of-fuel-server>::8080/mitaka-8.0/ubuntu/x86_64 mos8.0 main restricted”
- “Auxiliary” URI=”deb http://<ip-of-fuel-server>:8080/mitaka-8.0/ubuntu/auxiliary auxiliary main restricted”
- Click <Save Settings> at the bottom to Save your changes
Target specific configuration
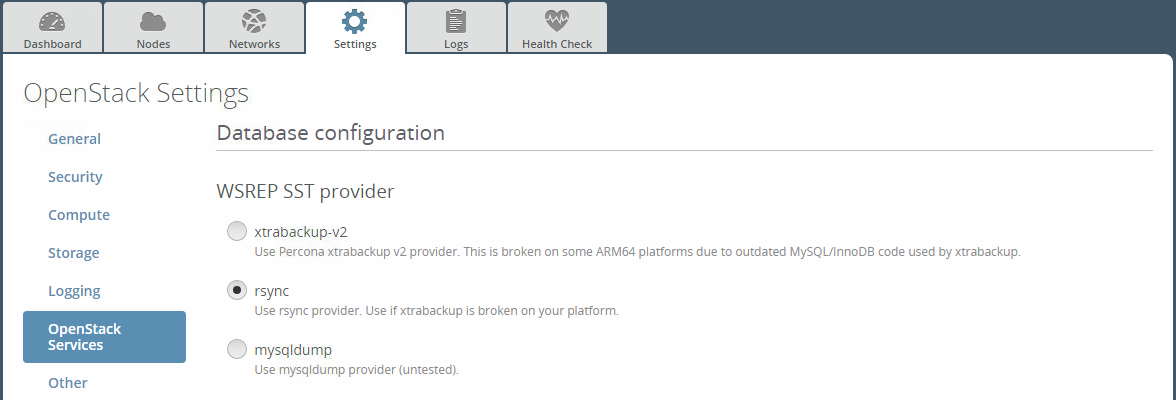
[AArch64 specific] Configure MySQL WSREP SST provider
NOTE: This option is only available for ArmbandFuel@OPNFV, since it currently only affects AArch64 targets (see Reference 15).
When using some AArch64 platforms as controller nodes, WSREP SST synchronisation using default backend provider (xtrabackup-v2) might fail, so a mechanism that allows selecting a different WSREP SST provider has been introduced.
In the FUEL UI of your Environment, click the <Settings> tab, click <OpenStack Services> on the left side pane (see figure below), then select one of the following options:
- xtrabackup-v2 (default provider, AArch64 stability issues);
- rsync (AArch64 validated, better or comparable speed to xtrabackup, takes the donor node offline during state transfer);
- mysqldump (untested);
Set up targets for provisioning with non-default “Offloading Modes”
Some target nodes may require additional configuration after they are PXE booted (bootstrapped); the most frequent changes are in defaults for ethernet devices’ “Offloading Modes” settings (e.g. some targets’ ethernet drivers may strip VLAN traffic by default).
If your target ethernet drivers have wrong “Offloading Modes” defaults, in “Configure interfaces” page (described above), expand affected interface’s “Offloading Modes” and [un]check the relevant settings (see figure below):
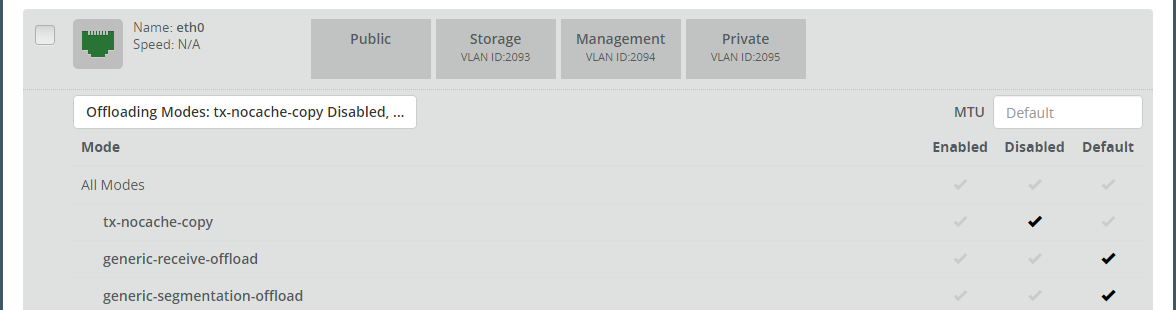
Set up targets for “Verify Networks” with non-default “Offloading Modes”
NOTE: Check Reference 15 for an updated and comprehensive list of known issues and/or limitations, including “Offloading Modes” not being applied during “Verify Networks” step.
Setting custom “Offloading Modes” in Fuel GUI will only apply those settings during provisiong and not during “Verify Networks”, so if your targets need this change, you have to apply “Offloading Modes” settings by hand to bootstrapped nodes.
E.g.: Our driver has “rx-vlan-filter” default “on” (expected “off”) on the Openstack interface(s) “eth1”, preventing VLAN traffic from passing during “Verify Networks”.
From Fuel master console identify target nodes admin IPs (see figure below):
$ fuel nodes

SSH into each of the target nodes and disable “rx-vlan-filter” on the affected physical interface(s) allocated for OpenStack traffic (eth1):
$ ssh root@10.20.0.6 ethtool -K eth1 rx-vlan-filter off
Repeat the step above for all affected nodes/interfaces in the POD.
Verify Networks
It is important that the Verify Networks action is performed as it will verify that communicate works for the networks you have setup, as well as check that packages needed for a successful deployment can be fetched.
From the FUEL UI in your Environment, Select the Networks Tab and select “Connectivity check” on the left pane (see figure below)
- Select <Verify Networks>
- Continue to fix your topology (physical switch, etc) until the “Verification Succeeded” and “Your network is configured correctly” message is shown

Deploy Your Environment
Deploy the environment.
- In the Fuel GUI, click on the “Dashboard” Tab.
- Click on <Deploy Changes> in the “Ready to Deploy?” section
- Examine any information notice that pops up and click <Deploy>
Wait for your deployment to complete, you can view the “Dashboard” Tab to see the progress and status of your deployment.
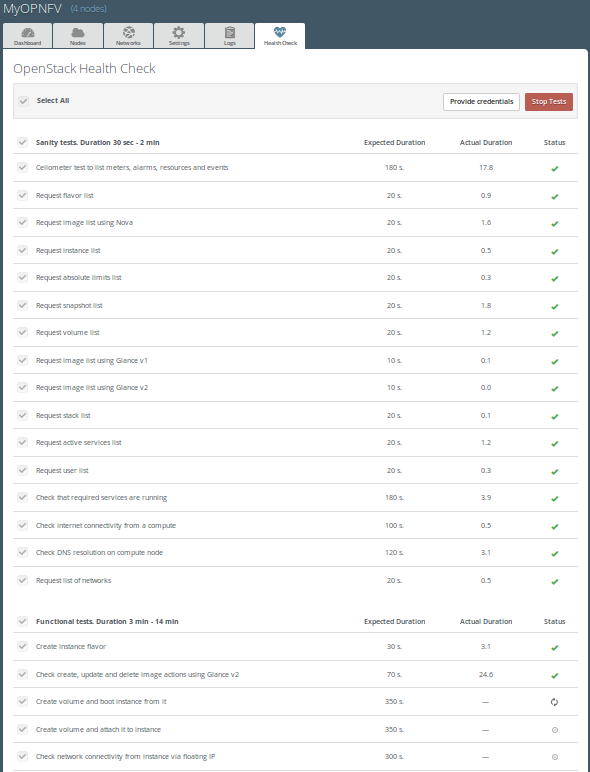
Installation health-check
Perform system health-check (see figure below)
- Click the “Health Check” tab inside your Environment in the FUEL Web UI
- Check <Select All> and Click <Run Tests>
- Allow tests to run and investigate results where appropriate
- Check Reference 15 for known issues / limitations on AArch64, like unsupported migration tests when using a GICv3 interrupt controller
References
OpenDaylight
Fuel
Fuel in OPNFV
- OPNFV Installation instruction for the AArch64 Colorado release of OPNFV when using Fuel as a deployment tool
- OPNFV Build instruction for the AArch64 Colorado release of OPNFV when using Fuel as a deployment tool
- OPNFV Release Note for the AArch64 Colorado release of OPNFV when using Fuel as a deployment tool
OPNFV Release Note for the AArch64 Colorado 1.0 release of OPNFV when using Fuel as a deployment tool
License
This work is licensed under a Creative Commons Attribution 4.0 International License. .. http://creativecommons.org/licenses/by/4.0 .. (c) Jonas Bjurel (Ericsson AB) and others
Abstract
This document compiles the release notes for the Colorado 1.0 release of OPNFV when using Fuel as a deployment tool, with an AArch64 (only) target node pool.
Important notes
These notes provide release information for the use of Fuel as deployment tool for the AArch64 Colorado 1.0 release of OPNFV.
The goal of the Colorado release and this Fuel-based deployment process is to establish a lab ready platform accelerating further development of the OPNFV infrastructure on AArch64 architecture.
Due to early docker and nodejs support on AArch64, we will still use an x86_64 Fuel Master to build and deploy an AArch64 target pool.
Although not currently supported, mixing x86_64 and AArch64 architectures inside the target pool will be possible later.
Carefully follow the installation-instructions provided in Reference 13.
Summary
For AArch64 Colorado, the typical use of Fuel as an OpenStack installer is supplemented with OPNFV unique components such as:
- OpenDaylight version “Berylium SR3”
- Open vSwitch for NFV
- VSPERF
The following OPNFV plugins are not yet ported for AArch64:
As well as OPNFV-unique configurations of the Hardware- and Software stack.
This Colorado artifact provides Fuel as the deployment stage tool in the OPNFV CI pipeline including:
- Documentation built by Jenkins
- overall OPNFV documentation
- this document (release notes)
- installation instructions
- build-instructions
- The Colorado Fuel installer image for AArch64 (.iso) built by Jenkins
- Automated deployment of Colorado with running on bare metal or a nested hypervisor environment (KVM)
- Automated validation of the Colorado deployment
Release Data
| Project | fuel |
| Repo/tag | colorado.1.0 |
| Release designation | Colorado 1.0 |
| Release date | Sep 22 2016 |
| Purpose of the delivery | Colorado alignment to Released Fuel 9.0 baseline + Bug-fixes for the following feaures/scenarios: - Added AArch64 target support - OpenDaylight SR3 |
Version change
Module version changes
This is the first AArch64 release for Colorado 1.0. It is based on following upstream versions:
- Fuel 9.0 Base release
- OpenStack Mitaka release
- OPNFV Fuel Colorado 1.0 release
- OpenDaylight Beryllium SR3 release
Document changes
This is based upon a follow-up release to Colorado 1.0. It comes with the following documentation:
- Installation instructions - Reference 13 - Changed
- Build instructions - Reference 14 - Changed
- Release notes - Reference 15 - Changed (This document)
Reason for version
Feature additions
JIRA TICKETS:
AArch64 new features ‘https://jira.opnfv.org/issues/?filter=11129‘
(Also See respective Integrated feature project’s bug tracking)
Bug corrections
JIRA TICKETS:
AArch64 Workarounds ‘https://jira.opnfv.org/issues/?filter=11126‘
(Also See respective Integrated feature project’s bug tracking)
Known Limitations, Issues and Workarounds
System Limitations
- Max number of blades: 1 Fuel master, 3 Controllers, 20 Compute blades
- Min number of blades: 1 Fuel master, 1 Controller, 1 Compute blade
- Storage: Ceph is the only supported storage configuration
- Max number of networks: 65k
- Fuel master arch: x86_64
- Target node arch: aarch64
Known issues
JIRA TICKETS:
AArch64 Known issues ‘https://jira.opnfv.org/issues/?filter=11127‘
(Also See respective Integrated feature project’s bug tracking)
Workarounds
JIRA TICKETS:
AArch64 Workarounds ‘https://jira.opnfv.org/issues/?filter=11128‘
(Also See respective Integrated feature project’s bug tracking)
Test results
The Colorado 1.0 release with the Fuel deployment tool has undergone QA test runs, see separate test results.
References
For more information on the OPNFV Colorado release, please see:
OpenDaylight
Fuel
Fuel in OPNFV
- OPNFV Installation instruction for the AArch64 Colorado release of OPNFV when using Fuel as a deployment tool
- OPNFV Build instruction for the AArch64 Colorado release of OPNFV when using Fuel as a deployment tool
- OPNFV Release Note for the AArch64 Colorado release of OPNFV when using Fuel as a deployment tool