8. Integration
8.1. Introduction
The purpose of this chapter is to establish an operational run-book containing sequences and steps explaining, with enough detail, how to install a Reference Implementation (RI).
The term Run-Book is synonymous with “Cookbook”, and either term will be used interchangeably to indicate that if a user follows the steps or procedures in the “book”, the expected result will be an RI identical to the lab utilized by CNTT for the instantiation and certification of RI-1.
It is assumed that the reader of this chapter has the skill set to install Common Cloud Infrastructure on their own labs.
Covers installers, automation, etc.
Integration of installers and components.
8.2. Prerequisites
The following hardware was cabled and set up according to the OPNFV Pharos Specification:
Node |
CPU Model |
Memory |
HDD |
SSD |
1 GbE NIC |
10 GbE NIC |
|---|---|---|---|---|---|---|
Jump |
2xE5-2699 |
64 GB |
1 x 3 TB Sata |
1 x 180 SSD |
2 |
2 |
1 |
2xE5-2699 |
64 GB |
1 x 3 TB Sata |
1 x 180 SSD |
2 |
2 |
2 |
2xE5-2699 |
64 GB |
1 x 3 TB Sata |
1 x 180 SSD |
2 |
2 |
3 |
2xE5-2699 |
64 GB |
1 x 3 TB Sata |
1 x 180 SSD |
2 |
2 |
4 |
2xE5-2699 |
64 GB |
1 x 3 TB Sata |
1 x 180 SSD |
2 |
2 |
5 |
2xE5-2699 |
64 GB |
1 x 3 TB Sata |
1 x 180 SSD |
2 |
2 |
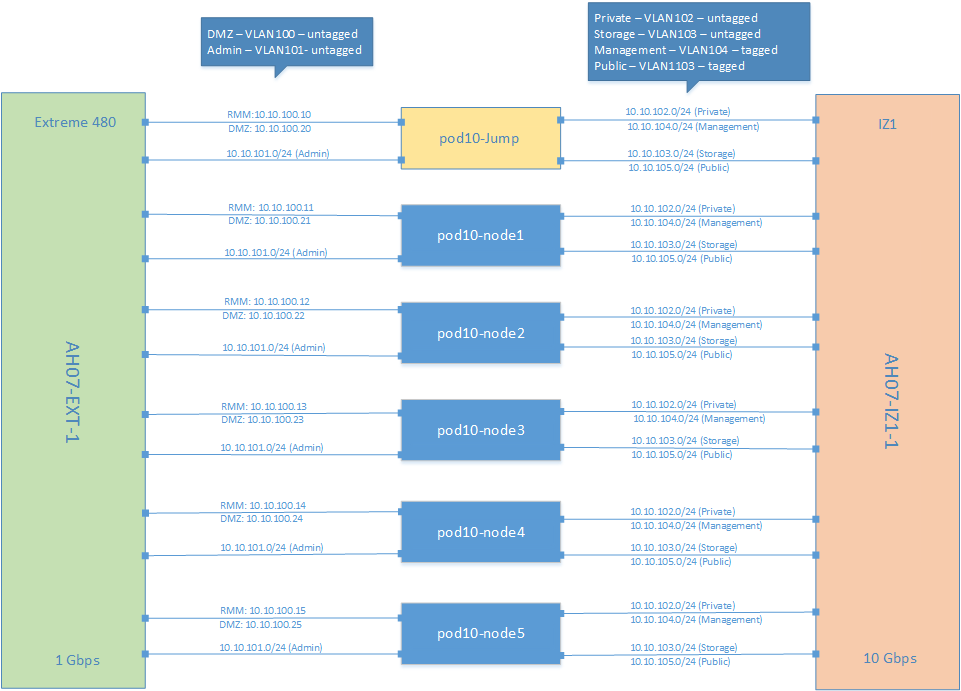
Each server has all of 1GbE NICs connected to the same Extreme 480 1GbE switch, and all 10GbE NICs conneted to the same IZ1 switch as follows:
8.3. Requirements Gathering
Requirements gathering processes and steps:
RA Requirements Gathering process
Infra Requirements and Selection Process
8.4. Access & Connectivity
This RI leverages OPNFV Pharos pod 10, which is hosted by Intel and requires VPN access. Requests for VPN access must go through the OPNFV Infra Project by submitting a JIRA request for VPN access here: https://jira.opnfv.org/projects/INFRA
Upon completion, the VPN credentials and certificate will be sent via email.
Once VPN connectivity is established, the only available subnet is the “DMZ” network, which gives access directly to the Foundation (jump) node. All interaction with the RI must be done through this node. It is possible to use software such as sshuttle (https://sshuttle.readthedocs.io/en/stable/ ) to assist with routing inside the lab.
As an example, the following command adds the External API subnet route via sshuttle, allowing direct access from the client side of the VPN into that subnet:
sshuttle -r root@10.10.100.20 10.10.105.0/24
This will allow the VPN client host to directly access the Horizon dashboard, as an example.
8.5. Available Installers
8.5.1. Airship
8.5.1.1. Descriptor File Preparations
Reference steps describing the use, creation, and implementation of descriptor files. This is where the Airship Manifest files need to be documented:
Profiles
Hardware
Server
Device Aliases
Disk Aliases
Nodes
Networks
Software
PKI-Catalog
Secrets
Actions
Before getting into the details of descriptor file preparation, it is important to discuss what constitutes infrastructure description, and what are the options available- the related works. The term infrastructure is used to refer to both hardware and software components that form the NFV environment, on which the virualized network functions are run. As an end-user, one can define/describe the infrastructure using a select set of parameters. The below table categorizes these set of parameters, using which a user can describe the infrastructure, and which constitute any infrastructure definition. These parameters applies to any Installer available to the end-users, however, some installers may allow user to configure all parameters within a category, whereas some would allow just a subset of it. In addition, not all the categories would apply to all the installers.
GENERIC: Management (location, owner, etc.), Strategy, Globals, Tooling, Versioning, |
HARDWARE: Vendor, Gen., BIOS, CPUs, Memory, Disks, NICs (PCI, MAC), etc. |
PROFILES (HOST): Name, Disks & Partitions, N/W->NIC Mapping, OS, |
NETWORK: Names, vlans, cidr, routes, ip, g/w, speed, mtu, bonding, etc. cidrs for diff. n/ws, container n/w, SRIOV, etc. |
NODES: Networks and address, profile-mapping, metadata |
SECRETS: Certificates, passphrases, publickeys, etc. |
SOFTWARE: Software and nodes mapping, versions, registry |
ACTIONS: Bootactions- custom scripts, drivers, etc. |
OTHERS: Jumphosts-Defn., Network Services (NTP, DNS, etc) |
There have been various efforts around infrastructure description. Below list is the example of few such efforts:
OPNFV PDF/IDF
Airship Treasuremap Manifests
TripleO Heat Templates
Kayobe’s YAML files.
Fuel Configuration in OPNFV-IDF.
GUI-Based configuration in compass.
OPNFV Apex’s - inventory, network and deploy settings.
Kubernetes CRDs
In this document, we will focus on first two OPNFV’s descriptor files and Airship manifests.
8.5.1.1.1. OPNFV Descriptor Files
The descriptor files – platform, infrastructure and software descriptor files – as used in OPNFV, provides an installer-agnostic way of describing both the hardware and software infrastructure. The main consumer of these descriptor files is the openstack (OPNFV) installer. For example, Fuel consumes these descriptor files to create its own set of templates/manifests, which will be used for deployment. The below figure summarizes how these descriptor files are consumed by the installers.
It is important for the generic descriptor files, apart from being generic, to be exhaustive enough to cover the parameters that are important and user-configurable. The importance of the parameters can be decided by various factors, and below we mention 3 of them:
New Use-Cases: If the parameter(s) helps in creating new use-cases. Ex: Different networking scenarios.
Feature: If the parameter(s) adds new feature to the installation. Ex: Security.
Simplify: If the parameter(s) simplifies the auto-creation of custom manifests. Ex: Metadata.
8.5.1.1.2. OPNFV Descriptor Files
Currently, OPNFV descriptor files is generic, but not exhaustive enough. There is an ongoing effort to enhance the descriptor file schema. As mentioned in preceding section, there are three files – PDF, IDF and SDF. SDF is currently not well defined and used among the Installers. Below section describe the schema of these files, and enlists the parameters that are configurable by the user.
8.5.1.1.3. PDF
The below table summarizes the configurable parameters under PDF. Most of these parameters are self-explanatory.
Pod Details |
|---|
pod_owner: Lab Owner |
contact: email@address.com |
lab: Linux Foundation |
location: Portland, Oregon, USA |
type: {production, development} |
link: http://wiki.opnfv.org/ |
** #node** |
name: pod1-jump |
node: |
type: {baremetal or virtual} |
vendor: supermicro |
model: S2600JF |
arch: {x86_64 or aarch64} |
cpus: 2 |
cpu_cflags: {broadwell, haswell etc} |
cores: 10 |
memory: 32G |
disks: |
|
disk_capacity: {M,MB,G,GB,T,TB} |
disk_type: {hdd,ssd,cdrom,tape} |
disk_interface: {sata,sas,ssd,nvme,scsi,iscsi} |
disk_rotation: {0,5400,7200,10000,15000} |
# operation system installed |
os: ubuntu-14.04 |
remote_params: &remote_params |
type: {ipmi,amt,libvirt} |
versions: |
|
|
user: root |
pass: root |
remote_management: |
address: 10.4.7.3/24 |
mac_address: |
# physical interface list |
interfaces: |
|
address: 192.168.100.1 |
mac_address: |
vlan: {native or 1-4095} |
8.5.1.1.4. IDF
The Installer Descriptor File extends the PDF with POD related parameters required by the installer. This information may differ per each installer type and it is not considered part of the POD infrastructure. Currently, this file has only one section that is ‘generic’ – the net_config section. The below table describes the fields of the net_config section.
The other section(s) in IDF are Installer specific.
key |
Details |
|---|---|
interface |
The index of the interface to use for this net. |
vlan |
VLAN tag (integer) or the string native. Required for each network. |
ip-range |
For now, only range start address is used. |
network |
Network segment address. Required for each network, except oob. |
mask |
Network segment mask. Required for each network, except oob. |
gateway |
Gateway IP address. Required for public, N/A for others. |
dns |
List of DNS IP addresses. Required for public, N/A for others. |
8.5.1.1.5. OPNFV Airship Manifests
Airship is a collection of loosely coupled and interoperable open source tools that declaratively automate cloud provisioning - Infrastructure Deployment and Lifecycle Management of cloud.
Airship is a robust delivery mechanism for organizations who want to embrace containers as the new unit of infrastructure delivery at scale. Starting from raw bare metal infrastructure, Airship manages the full lifecycle of data center infrastructure to deliver a production-grade Kubernetes Cluster with Helm deployed artifacts, including OpenStack-Helm. OpenStack-Helm is a set of Helm charts that enable deployment, maintenance, and upgrading of loosely coupled OpenStack services and their dependencies individually or as part of complex environments.
Airship allows operators to manage their infrastructure deployments and lifecycle through the declarative YAML documents that describe an Airship environment.
OPNFV-Airship, is an Airship-based installer project, which aims to come up with Reference Implementation of cloud and NFV infrastructure according to industry infrastructure architecture model(s), and support the VNF Testing and Certification running on top of the cloud and NFV infrastructure if so specified in the model(s).
The process of creating manifests that would be used for deployment will involve following steps:
Preparation - Collect the hardware, network topology, public keys, etc.
Authoring - Customizing the templates using the information collected in preparation phase.
Auto-Generation - Generating certificates.
Publishing - In OPNFV-Airship’s Repository.
8.5.1.1.6. Preparation
The user needs to collect following information before starting the authoring process.
IPMI details of the Nodes. For Intel pods, this information is available in the wiki. For ex: Intel POD15.
The Disk Information: User can boot into any system and run the below command: sudo lshw -c disk
PCI Ids of NICs: User can boot into any system and run the below command: sudo lshw -c network businfo.
The topology and underlay networking details. For Intel pods, this information is available in the wiki. For ex: Intel POD15
Public Keys of Users.
Any custom requirements w.r.t software.
8.5.1.1.8. Auto-Generation
Auto-generation phase involves generating certificates, which will be used by Kubernetes. The process of generation of these certificates can be summarized with the steps below.
Get airship treasuremap to the jumpserver. git clone https://github.com/airshipit/treasuremap.git
copy type/cntt folder opnfv-airship to treasuremap under type
mv site definition for pod10 to treasuremap
sudo tools/airship pegleg site -r /target collect intel-pod10 -s intel-pod10_collected
mkdir intel-pod10_certs
sudo tools/airship promenade generate-certs -o /target/intel-pod10_certs /target/intel-pod10_collected/*.yaml
cp intel-pod10_certs/*.yaml site/intel-pod10/secrets/certificates/
mv site/intel-pod10 ../airship/site/
8.5.1.1.9. Publishing
The process of publishing involves submitting the manifests to opnfv-airship gerrit repo. It is important that the site-specific manifest, along with certificates, is present in ‘site’ folder in opnfv-airship repository. This will be used for the deployment process and described in the subsequent section. An example record for pod-10 dashboard would be:
A | dashboard-airship.intel-pod10.opnfv.org | 10.10.100.100
8.5.1.2. Deployment: Installer & Install Steps
The deployment is performed and managed from the ‘jump-host’ node. Any authorized user can login to this node.
8.5.1.2.1. FQDN Registration
To access the deployment, using FQDNs, it is important to get them registered as DNS records with the network administrator. In case of OPNFV Intel pods, the linux foundation helpdesk (sso.linuxfoundation.org) can take the request and add the records.
8.5.1.2.2. Setting up the Genesis Node
Install Ubuntu 16.04 (Standard ISO) on the genesis node (Ex: Node-1 in Intel-Pod10), this node will be used as seed for the rest of the environment. During installation ensure the following:
UTC Timezone
Proper hostname - As defined in site-definition
Partitioning - As defined in site-definition
Disable automatic updates
After Installation, perform the following:
Configure networks according to the site-definition.
Install proper kernel version - As defined in site-definition
Install ntpdate/ntp
Ensure password-less login from jumphost
8.5.1.2.3. Install
As Airship is tooling to declaratively automate site deployment, the automation from the installer side is light. See deploy.sh. User will need to export environment variables that correspond to the new site (keystone URL, node IPs, and so on). All these are captured in the site environment file - as described in the wiki page Once the Genesis node is setup, and the manifests are created, user can execute deploy.sh that supports (Shipyard) actions: deploy_site and update_site. Along with the action, the deploy script also take the site name (ex: intel-pod10). The deploy.sh script is part of the opnfv-airship repository. The steps to run the deploy script are as follows.
git clone https://gerrit.opnfv.org/gerrit/airship
cd airship/tools
./deploy.sh intel-pod10 deploy_site
OR
./deploy.sh intel-pod10 update_site
8.5.1.2.4. Keeping track of the progress
The complete installation can take signification time - 2-3 hours, and it involves following process:
Genesis node setup.
Software deployment.
Baremetal provisioning of the nodes by Drydock
Control plane nodes
Dataplane nodes.
Software deployment.
First, the genesis node is setup as single-node Kubernetes Cluster. This is followed by provisioning baremetal nodes. Once the Baremetal provisioning starts, user can use this link to check for the status:
http://<IP-OF-GENESIS-NODE>:31900/MAAS/#/nodes

Ex: for Pod10 - http://10.10.100.21:31900/MAAS/#/nodes
The provisioning of the baremetal nodes is done in a particular order - ex: control nodes (node2 and node3 of intel-pod10) first and then the compute nodes (node4 and node5). To understand any failures in this step, user can check the logs of the drydock service in genesis-node.
Once the baremetal provisioning is completed, the software deployment process starts. This includes setting up multiple services on the Kubernetes Cluster, under following namespaces – in that particular order:
kube-system
ceph
ucp
osh-infra
tenant-ceph
openstack
Below table provides some commands to run on genesis node to keep track of the software deployment.
Description |
Command |
|---|---|
Show all pods for a particular namespace, that has completed. Check for any crashlookBackoff states |
kubectl get pods -n namespace-name -o wide |
Look at the logs of a any pod in any namespaceYou can follow it with –follow |
kubectl logs -n namespace-name pod-name; |
Monitoring Ceph StatusShould be HEALTH_OK |
kubectl exec -it -n ceph ceph-mon-instance-id – ceph -s |
Get services running, and describe a service |
kubectl get svc -n openstack and kubectl describe svc -n openstack ingress |
The Troubleshooting guide will provide all the details for trouble shooting any issues.
Once the software is successfully deployed, and the deploy.sh script terminates normally, user can use the following link to access the horizon dashboard.
http://dashboard-airship.intel-pod10.opnfv.org
In addition to that, users can also use these links to track the metrics and logs, respectively:
Steps and procedures for installing and setting up the RI. Start pulling in content from: https://wiki.opnfv.org/display/AIR/Airship+Installer+Deployment+Guide
http://grafana-airship.intel-pod10.opnfv.org/login
http://kibana-airship.intel-pod10.opnfv.org/
8.5.2. Future Installers
Installers such as Triple-O specefic instructrions will come here.
8.6. Deployment Validations
CNTT RI should be both verified as any OpenStack deployment and compliant with the CNTT requirements which induces that the validation is composed of:
the basic test cases as asked by the OPNFV release criteria
the functional tests checking all OpenStack services and capabilities even if they are considered as optional in RA1 Core OpenStack Services APIs
all test cases listed in RC1 TC Requirements
Like the classical Functest containers, all current test cases currently selected by CNTT leverages on Xtesting which provides the common test case execution and the unified way to manage all the interactions with the CI/CD components and with third-parties. Then all test jobs needed by RI are easily configured via simple Jenkins job templates to run the full container list. For its part, Xtesting runs the tests, publishes all test results in the centralized test database and all artifacts (reports, logs, etc.) to an S3 compatible storage service.
The yaml file configuring LFN Jenkins was firstly generated by Xtesting CI. It’s worth mentioning that everyone can deploy anywhere similar plug-and-play CI/CD toolchains in a few commands via Xtesting CI.
To deploy the CI toolchain verifying OpenStack:
virtualenv functest --system-site-packages
. functest/bin/activate
pip install ansible
ansible-galaxy install collivier.xtesting
ansible-galaxy collection install ansible.posix community.general community.grafana kubernetes.core community.docker community.postgresql
git clone https://gerrit.opnfv.org/gerrit/functest functest-src
(cd functest-src && git checkout -b stable/wallaby origin/stable/wallaby)
ansible-playbook functest-src/ansible/site.yml
deactivate
rm -rf functest-src functest
To deploy the CI toolchain running CNTT Compliance:
virtualenv functest --system-site-packages
. functest/bin/activate
pip install ansible
ansible-galaxy install collivier.xtesting
ansible-galaxy collection install ansible.posix community.general community.grafana kubernetes.core community.docker community.postgresql
git clone https://gerrit.opnfv.org/gerrit/functest functest-src
(cd functest-src && git checkout -b stable/wallaby origin/stable/wallaby)
ansible-playbook functest-src/ansible/site.cntt.yml
deactivate
rm -rf functest-src functest
Conforming to the OPNFV release criteria, all testcases proposed in OPNFV Functest healthcheck suite are firstly executed to quickly check the deployment status before deeply testing the deployment which costs time. It’s worth mentioning that test cases can be skipped here.
container |
test case |
criteria (Jenkins) |
|---|---|---|
opnfv/functest-healthcheck:hunter |
connection_check |
Success |
opnfv/functest-healthcheck:hunter |
tenantnetwork1 |
Success |
opnfv/functest-healthcheck:hunter |
tenantnetwork2 |
Success |
opnfv/functest-healthcheck:hunter |
vmready1 |
Success |
opnfv/functest-healthcheck:hunter |
vmready2 |
Success |
opnfv/functest-healthcheck:hunter |
singlevm1 |
Success |
opnfv/functest-healthcheck:hunter |
singlevm2 |
Success |
opnfv/functest-healthcheck:hunter |
vping_ssh |
Success |
opnfv/functest-healthcheck:hunter |
vping_userdata |
Success |
opnfv/functest-healthcheck:hunter |
cinder_test |
Success |
opnfv/functest-healthcheck:hunter |
odl |
Success |
opnfv/functest-healthcheck:hunter |
tempest_smoke |
Success |
opnfv/functest-healthcheck:hunter |
tempest_horizon |
Success |
Then all testcases proposed in OPNFV Functest smoke suite are executed to verify all services and capabilities. It should be noted that they allow skipping tests if optional services (e.g. Gnocchi, Barbican, etc.) or capabilities (e.g. remote console access, Neutron BGPVPN or SFC, etc.) are missing.
container |
test case |
criteria (Jenkins) |
|---|---|---|
opnfv/functest-smoke:hunter |
tempest_neutron |
Success |
opnfv/functest-smoke:hunter |
tempest_cinder |
Success |
opnfv/functest-smoke:hunter |
tempest_keystone |
Success |
opnfv/functest-smoke:hunter |
tempest_heat |
Success |
opnfv/functest-smoke:hunter |
rally_sanity |
Success |
opnfv/functest-smoke:hunter |
refstack_defcore |
Success |
opnfv/functest-smoke:hunter |
tempest_full |
Success |
opnfv/functest-smoke:hunter |
tempest_scenario |
Success |
opnfv/functest-smoke:hunter |
tempest_slow |
Success |
opnfv/functest-smoke:hunter |
patrole |
Success |
opnfv/functest-smoke:hunter |
networking-bgpvpn |
Success |
opnfv/functest-smoke:hunter |
networking-sfc |
Success |
opnfv/functest-smoke:hunter |
tempest_barbican |
Success |
According to RA1 Core OpenStack Services APIs and RC1 TC Requirements the following test cases are executed at the end.
container |
test case |
criteria (Jenkins) |
|---|---|---|
opnfv/functest-smoke-cntt:hunter |
tempest_neutron_cntt |
Success |
opnfv/functest-smoke-cntt:hunter |
tempest_cinder_cntt |
Success |
opnfv/functest-smoke-cntt:hunter |
tempest_keystone_cntt |
Success |
opnfv/functest-smoke-cntt:hunter |
tempest_heat_cntt |
Success |
opnfv/functest-smoke-cntt:hunter |
rally_sanity_cntt |
Success |
opnfv/functest-smoke-cntt:hunter |
tempest_full_cntt |
Success |
opnfv/functest-smoke-cntt:hunter |
tempest_scenario_cntt |
Success |
opnfv/functest-smoke-cntt:hunter |
tempest_slow_cntt |
Success |
opnfv/functest-benchmarking-cntt:hunter |
rally_full_cntt |
Success |
opnfv/functest-benchmarking-cntt:hunter |
rally_jobs_cntt |
Success |
opnfv/functest-benchmarking-cntt:hunter |
vmtp |
Success |
opnfv/functest-benchmarking-cntt:hunter |
shaker |
Success |
opnfv/functest-vnf:hunter |
cloudify |
Success |
opnfv/functest-vnf:hunter |
cloudify_ims |
Success |
opnfv/functest-vnf:hunter |
heat_ims |
Success |
opnfv/functest-vnf:hunter |
vyos_vrouter |
Success |
opnfv/functest-vnf:hunter |
juju_epc |
Success |
8.7. Development Validations
CNTT RI jobs must verify all patches before merge as defined in the best open source practices (see OpenStack Gates or Functest Gates) to achieve the stability needed by CNTT. Then the deployment validations previously detailed must be also applied for every patch proposed in RI and all changes published in Gerrit must be automatically voted -1 by Jenkins in case of failures.
At the time writing, CNTT RI is not compliant with RA1 Core OpenStack Services APIs and then a part of the containers selected in RC1 TC Requirements cannot be executed successfully.
container |
test case |
criteria (Jenkins) |
|---|---|---|
opnfv/functest-healthcheck:hunter |
connection_check |
Success |
opnfv/functest-healthcheck:hunter |
tenantnetwork1 |
Success |
opnfv/functest-healthcheck:hunter |
tenantnetwork2 |
Success |
opnfv/functest-healthcheck:hunter |
vmready1 |
Success |
opnfv/functest-healthcheck:hunter |
vmready2 |
Success |
opnfv/functest-healthcheck:hunter |
singlevm1 |
Success |
opnfv/functest-healthcheck:hunter |
singlevm2 |
Success |
opnfv/functest-healthcheck:hunter |
vping_ssh |
Success |
opnfv/functest-healthcheck:hunter |
vping_userdata |
Success |
opnfv/functest-healthcheck:hunter |
cinder_test |
Success |
opnfv/functest-healthcheck:hunter |
odl |
Success |
opnfv/functest-smoke:hunter |
tempest_scenario |
Success |
opnfv/functest-smoke:hunter |
networking-bgpvpn |
Success |
opnfv/functest-smoke:hunter |
networking-sfc |
Success |
opnfv/functest-smoke:hunter |
tempest_barbican |
Success |
opnfv/functest-benchmarking-cntt:hunter |
vmtp |
Success |
opnfv/functest-benchmarking-cntt:hunter |
shaker |
Success |
opnfv/functest-vnf:hunter |
cloudify |
Success |
opnfv/functest-vnf:hunter |
vyos_vrouter |
Success |
opnfv/functest-vnf:hunter |
juju_epc |
Success |
All OPNFV test cases part of RI development validation must follow the same principles to prevent falsy testing and then to avoid blocking the RI gates. It’s worth mentioning that Functest already part of RI development validation conform to these best practices by running all test cases vs SUTs currently CNTT compliant.
8.8. CICD Tool Chain (use of, process, and scripts)]
Placeholder to describe the CICD tool chain used in RI validations.
Include flow diagram.
8.9. Jenkins Setup & Job Creation
Placeholder to describe the process, access, steps, instance, etc, information for the setup of Jenkins, the jobs required for validation, and the results dashboard.
8.10. Compliance Validation (steps, process)
Placholder to describe the purpose, steps, and process, using the Jenkins Jobs, Tool Chain, and Test Case requirements mapping to perform validations.