3. ‘vsperf’ Traffic Gen Guide
3.1. Overview
VSPERF supports the following traffic generators:
- Dummy (DEFAULT): Allows you to use your own external traffic generator.
- IXIA (IxNet and IxOS)
- Spirent TestCenter
To see the list of traffic gens from the cli:
$ ./vsperf --list-trafficgens
This guide provides the details of how to install and configure the various traffic generators.
3.2. Background Information
The traffic default configuration can be found in tools/pkt_gen/trafficgen/trafficgenhelper.py, and is configured as follows:
TRAFFIC_DEFAULTS = {
    'l2': {
        'framesize': 64,
        'srcmac': '00:00:00:00:00:00',
        'dstmac': '00:00:00:00:00:00',
        'srcport': 3000,
        'dstport': 3001,
    },
    'l3': {
        'proto': 'tcp',
        'srcip': '1.1.1.1',
        'dstip': '90.90.90.90',
    },
    'vlan': {
        'enabled': False,
        'id': 0,
        'priority': 0,
        'cfi': 0,
    },
}
The framesize paramter can be overridden from the configuration
files by adding the following to your custom configuration file
10_custom.conf:
TRAFFICGEN_PKT_SIZES = (64, 128,)
OR from the commandline:
$ ./vsperf --test-param "pkt_sizes=x,y" $TESTNAME
You can also modify the traffic transmission duration and the number of trials run by the traffic generator by extending the example commandline above to:
$ ./vsperf --test-param "pkt_sizes=x,y;duration=10;rfc2455_trials=3" $TESTNAME
3.3. Dummy Setup
To select the Dummy generator please add the following to your
custom configuration file 10_custom.conf.
TRAFFICGEN = 'Dummy'
OR run vsperf with the --trafficgen argument
$ ./vsperf --trafficgen Dummy $TESTNAME
Where $TESTNAME is the name of the vsperf test you would like to run. This will setup the vSwitch and the VNF (if one is part of your test) print the traffic configuration and prompt you to transmit traffic when the setup is complete.
Please send 'continuous' traffic with the following stream config:
30mS, 90mpps, multistream False
and the following flow config:
{
    "flow_type": "port",
    "l3": {
        "srcip": "1.1.1.1",
        "proto": "tcp",
        "dstip": "90.90.90.90"
    },
    "traffic_type": "continuous",
    "multistream": 0,
    "bidir": "True",
    "vlan": {
        "cfi": 0,
        "priority": 0,
        "id": 0,
        "enabled": false
    },
    "frame_rate": 90,
    "l2": {
        "dstport": 3001,
        "srcport": 3000,
        "dstmac": "00:00:00:00:00:00",
        "srcmac": "00:00:00:00:00:00",
        "framesize": 64
    }
}
What was the result for 'frames tx'?
When your traffic gen has completed traffic transmission and provided the results please input these at the vsperf prompt. vsperf will try to verify the input:
Is '$input_value' correct?
Please answer with y OR n.
- VPSERF will ask you for:
- Result for ‘frames tx’
- Result for ‘frames rx’
- Result for ‘min latency’
- Result for ‘max latency’
- Result for ‘avg latency’
Finally vsperf will print out the results for your test and generate the appropriate logs and csv files.
3.4. IXIA Setup
3.4.1. On the CentOS 7 system
You need to install IxNetworkTclClient$(VER_NUM)Linux.bin.tgz.
3.4.2. On the IXIA client software system
Find the IxNetwork TCL server app (start -> All Programs -> IXIA -> IxNetwork -> IxNetwork_$(VER_NUM) -> IxNetwork TCL Server)
Right click on IxNetwork TCL Server, select properties - Under shortcut tab in the Target dialogue box make sure there is the argument “-tclport xxxx” where xxxx is your port number (take note of this port number you will need it for the 10_custom.conf file).
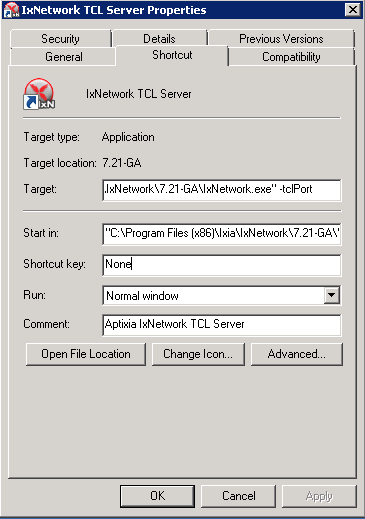
Hit Ok and start the TCL server application
3.5. Spirent Setup
Spirent installation files and instructions are available on the Spirent support website at:
Select a version of Spirent TestCenter software to utilize. This example will use Spirent TestCenter v4.57 as an example. Substitute the appropriate version in place of ‘v4.57’ in the examples, below.
3.5.1. On the CentOS 7 System
Download and install the following:
Spirent TestCenter Application, v4.57 for 64-bit Linux Client
3.5.2. Spirent Virtual Deployment Service (VDS)
Spirent VDS is required for both TestCenter hardware and virtual chassis in the vsperf environment. For installation, select the version that matches the Spirent TestCenter Application version. For v4.57, the matching VDS version is 1.0.55. Download either the ova (VMware) or qcow2 (QEMU) image and create a VM with it. Initialize the VM according to Spirent installation instructions.
3.5.3. Using Spirent TestCenter Virtual (STCv)
STCv is available in both ova (VMware) and qcow2 (QEMU) formats. For VMware, download:
Spirent TestCenter Virtual Machine for VMware, v4.57 for Hypervisor - VMware ESX.ESXi
Virtual test port performance is affected by the hypervisor configuration. For best practice results in deploying STCv, the following is suggested:
- Create a single VM with two test ports rather than two VMs with one port each
- Set STCv in DPDK mode
- Give STCv 2*n + 1 cores, where n = the number of ports. For vsperf, cores = 5.
- Turning off hyperthreading and pinning these cores will improve performance
- Give STCv 2 GB of RAM
To get the highest performance and accuracy, Spirent TestCenter hardware is recommended. vsperf can run with either stype test ports.
Revision: 11ea896d3dee85a79316c57838adef8807784359
Build date: January 25, 2016